How to Make Choux Pastry

Q: What do you call a unicorn combined with a cream puff? 

A: A CHOUXNICORN! 

You might feel like you have no idea what pâte à choux is, but trust me, you've had it before. It's the dough that's used to make, among other things, cream puffs and eclairs. It's a good thing to know how to make, as it offers many delicious rewards AND let's face it, people are always impressed when you can make something French.

This is my adaptation of a recipe I originally found on Eugenie Kitchen. I've made a few tweaks that make it a little different just in ways that suit my personal style (ie I am lazy), but she is clearly an incredible baker and provided the perfect template and recipe ratios! 

Everyone should have a great pâte à choux recipe in their repertoire. Here's mine! 

Pâte à Choux

  • 1/4 cup (1/2 stick) unsalted butter, cut into pieces 
  • ½ cup water 
  • 1/2 teaspoon salt 
  • 1/2 cup plus 1 tablespoon all purpose flour
  • 2 eggs, lightly beaten

In a thick-bottomed saucepan, combine the butter, water, and salt. Heat over medium until the butter is totally melted and the mixture begins to boil. Remove from heat, and stir in the flour immediately. 

Put the pan back on low heat, and cook until it easily forms into a ball (this won't take long at all, a minute or maybe less). Let it cool slightly (for just 2-3 minutes) so it doesn't scramble your eggs in the next step. 

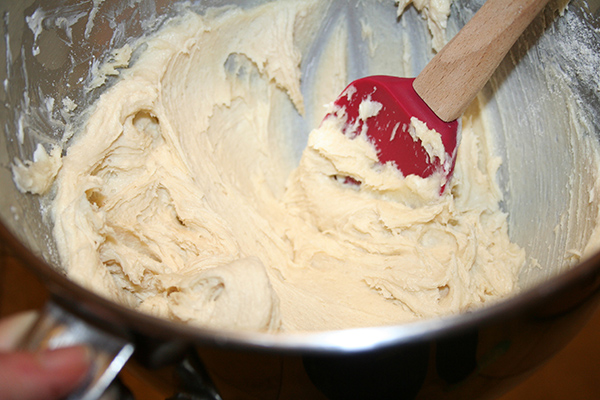
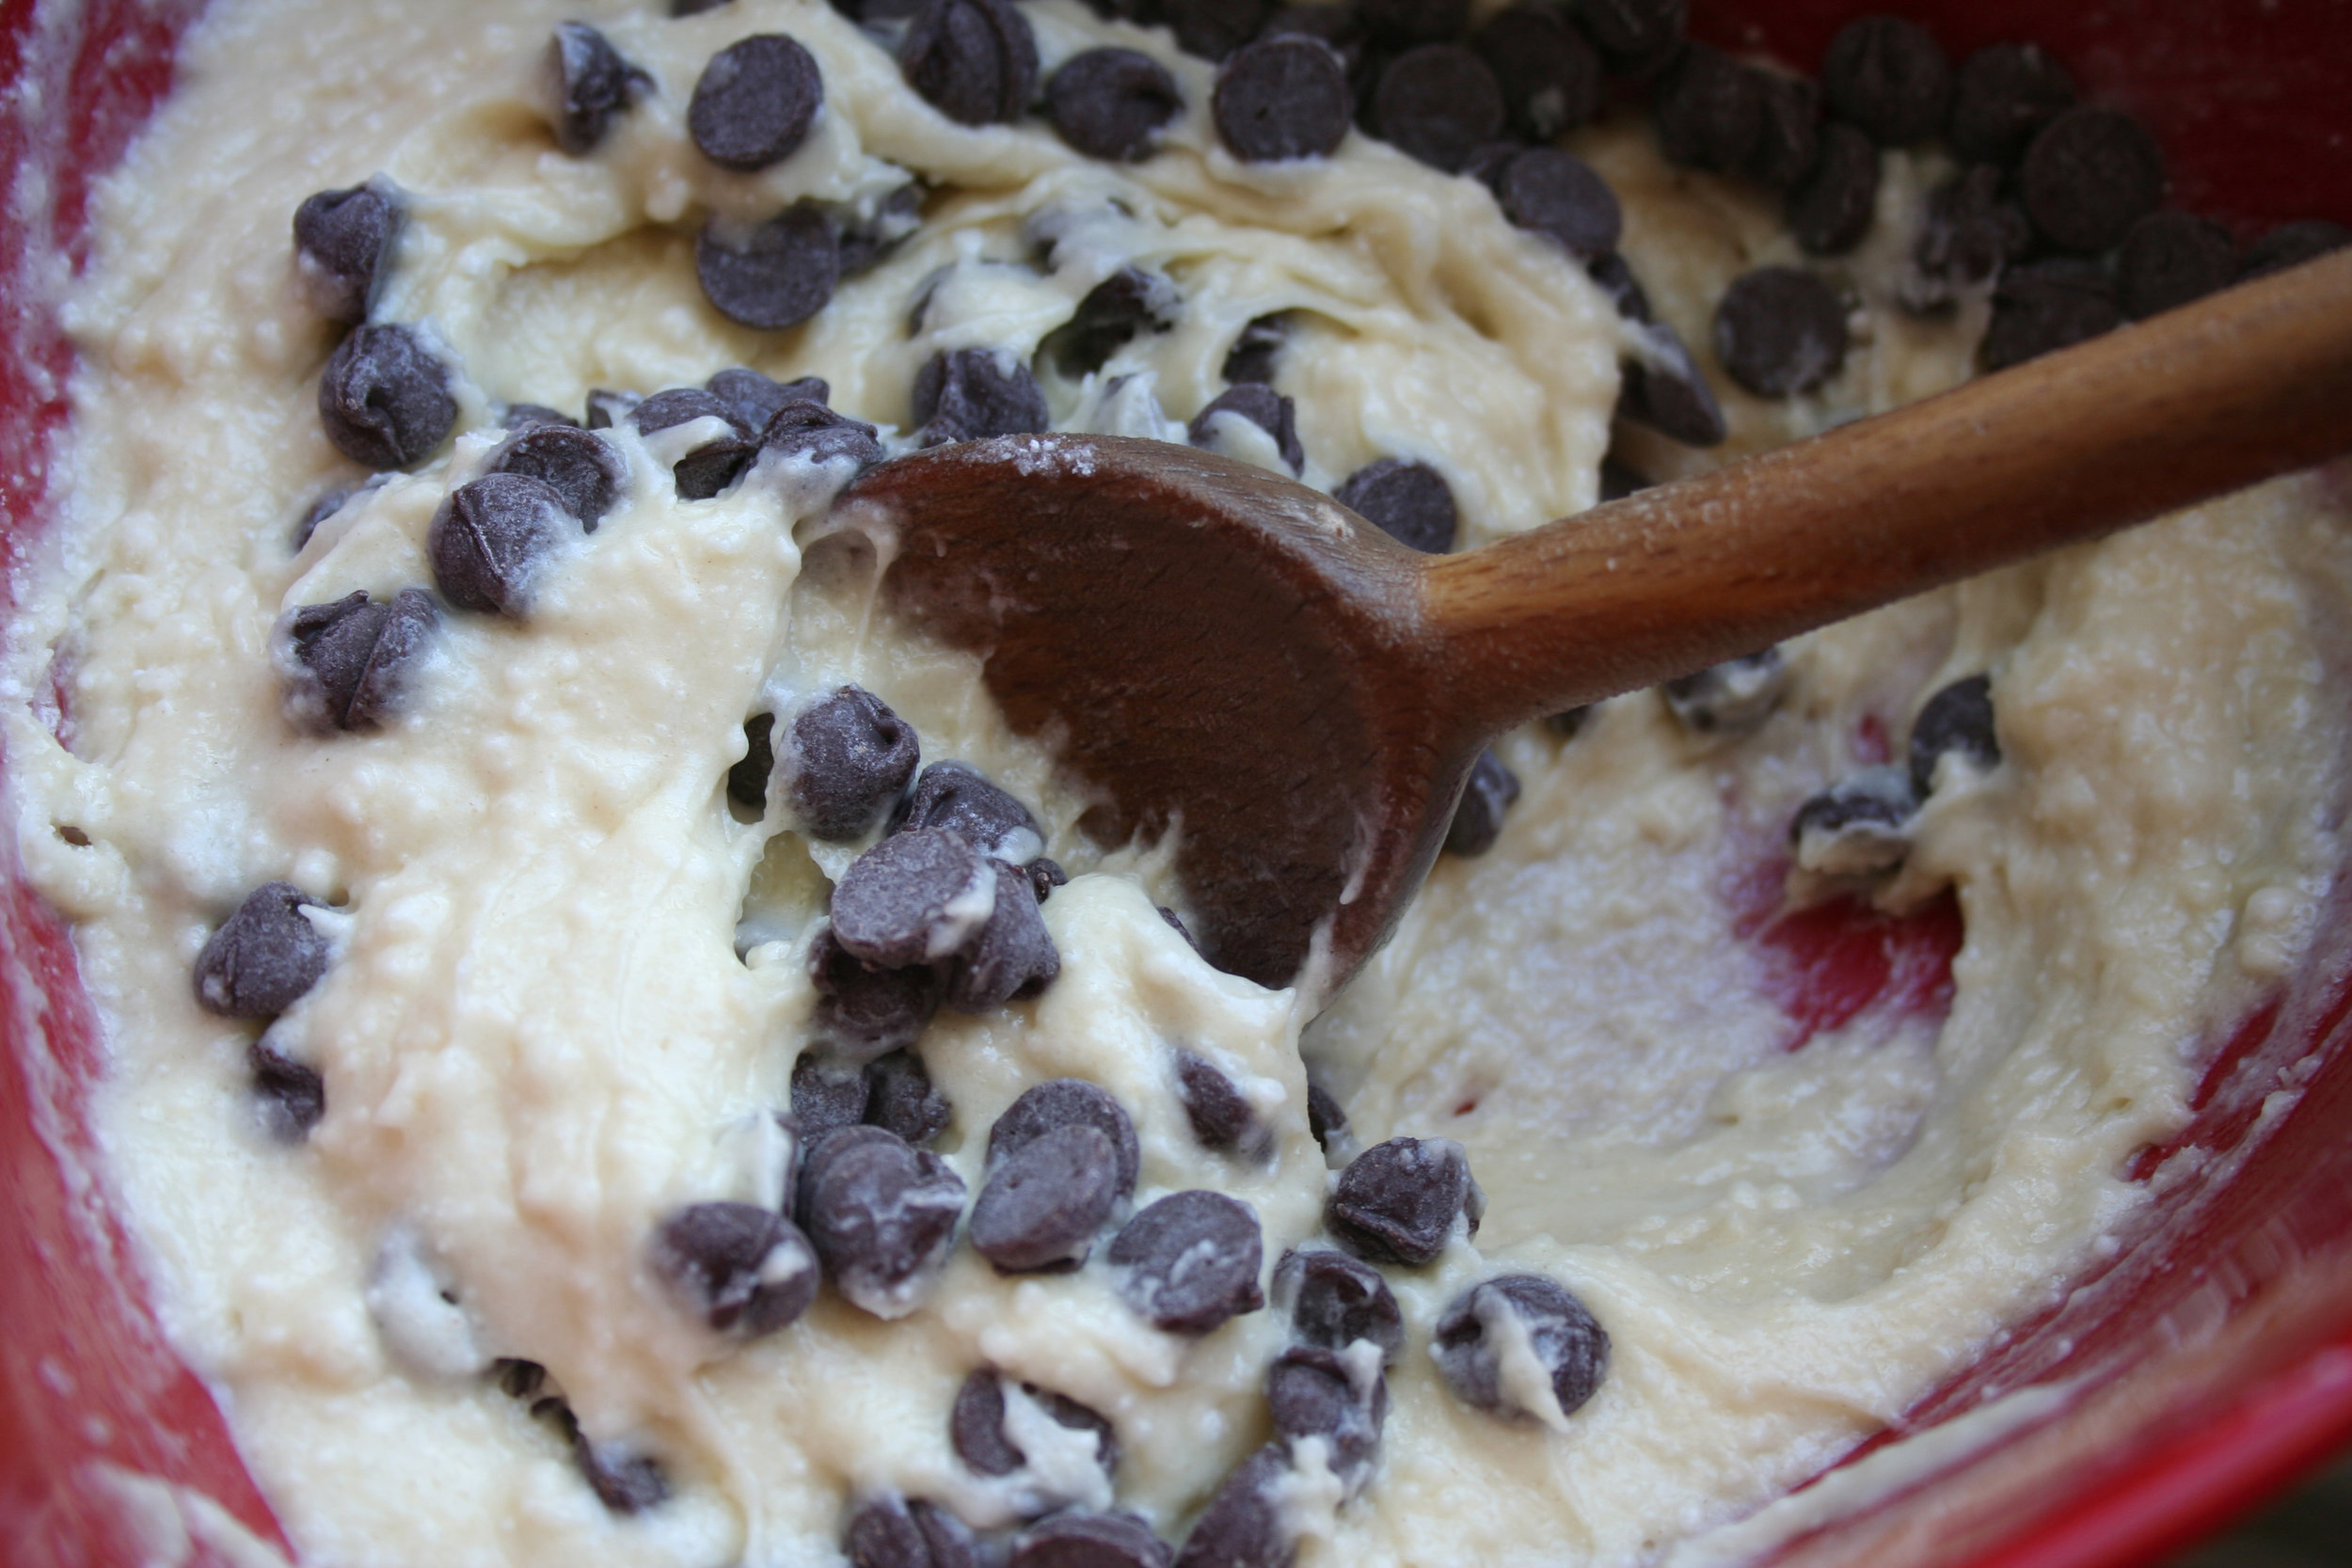
Now, you want to incorporate the eggs into the mixture. Me, I did this by putting the choux dough in a stand mixer fitted with the paddle attachment, starting to mix on low, and slowly pouring in the egg mixture. Stir until the mixture is thick, cohesive, and shiny. 

Now, your pâte à choux is ready to use! Spoon mounds of it onto a parchment-lined baking sheet, or load it into a piping bag and pipe portions on to the sheet. You want them to be nice and mounded so that you get that "puff" that makes cream puffs so special. This dough can be used to make cream puffs, eclairs, or other pastries like profiteroles or religieuse. 

To bake your pâte à choux, bake in a preheated 375 degree oven. In general, the bake time will be 15-20 minutes, depending on the size of your pastries. 

If you make bigger portions, you do run the risk of your pastries deflating after they're removed from heat. Personally I don't sweat this, I just slice 'em open and fill them with more cream. 

Have you ever made pâte à choux?

Another Family's Classic Cornstarch Pudding Recipe

You down with OPP? Yeah you know ME! 

Allow me to clarify: when I say "OPP" I mean, of course, "other people's pudding". And I don't mean it as a euphemism.

I literally mean that I am, in fact, down with making and eating other people's pudding recipes.

Case in point: this classic cornstarch pudding recipe. It's a reader's family recipe, originally from Edie Bliss. It shared with me, and I made it, and I want to share the recipe with you.

Let me tell you how it went down. 

So, I have this Facebook page for CakeSpy, and one of my favorite things to do there is to ask people's opinions on various dessert-related things. For instance, I might ask "what is your favorite cake to enjoy with cream cheese frosting?" or something along those lines. I love reading people's responses. If you like talking about stuff like that, definitely check out my Facebook page! 

On a recent crowd-sourcing conversation with readers, someone mentioned a unique pudding recipe in their family archives which includes vanilla, almond, AND lemon extracts. I was like "ooh!". 

Sure enough, not long later, that reader's daughter sent along the recipe! (title of the email I received: "Subject: My Mother's Pudding Recipe That You Were Interested In: Cornstarch Pudding").

I made it yesterday, and I have to tell you, this pudding is very, very special.

For one thing, it's crazy-easy to make. You need like, zero skills and five minutes, and you can make this pudding, and it is glorious.

It is delicious and tastes like it took way more skill and time than it really did.

For another thing, it's delicious. I love recipes with lemon, almond, OR vanilla extract, but I don't believe I have ever combined all three in one recipe. While the pudding looks like a standard vanilla pudding, it has a truly unique flavor which has echoes of almond and lemon and will truly intrigue your taste buds!

Perhaps more importantly, I loved the intimate look that this recipe gave me into another family's traditions. Part of what makes foods so special is who you share them with, so for me, this was a beautiful way to interact with readers and see what type of food is part of their loving memories. It makes my heart sparkle, the very thought! 

In terms of eating: I loved this pudding still warm, but it's also great chilled. 

Thanks to Juli and Judi for sharing this recipe! It's a keeper, for sure. I'm keeping the recipe formatted just as it was sent! 

Cornstarch pudding

4 servings 

  • 1/3 C. sugar
  • 3 Tbsp. cornstarch 
  • ¼ tsp. salt


Mix these three together in a medium-size pan.

  • 2 egg yolks

Add to sugar mixture, and mix again.

  • 2 C. milk (2% or whole)

Add very gradually and stir well. Cook until it bubbles.

  • 1 tsp. vanilla extract
  • ½ tsp. lemon extract 
  • ¼ tsp. almond extract

Remove pudding from heat and stir in.


Variation:

For chocolate pudding, add 4 ozs. melted bitter chocolate and increase sugar by ¼ C. Omit almond and lemon extracts.

(Mom used the leftover egg whites to make meringue cookies or something else. Nothing went to waste!)

Do you have a favorite pudding recipe in your family?

Funfetti Explosion Birthday Ice Cream Cake

If you were a unicorn, what would you be eating at right this very minute? I can tell you what I'd be eating. THIS:

Reprinted with permission from Secret-Layer Cakes by Dini Kodippili, Page Street Publishing Co. Photo credit: Kodippili

This splendid and magnificent thing is called "Funfetti Explosion Birthday Ice Cream Cake," and it is featured in the new book Secret-Layer Cakes by Dini Kodippili. Oh, you might know her as the celeb blogger behind The Flavor Bender. I'm kind of friends with her. It's no big (it's totally a big!). 

I should also tell you that recently, Dini made some donuts inspired by MY recent book, Stuff Unicorns Love. Be sure to check out that post, too! 

Her publisher was kind enough to grant permission for me to share this incredible masterpiece on CakeSpy. Please, promise me you'll make it every day? Here's the headnote from Dini and then the recipe. Enjoy! 


Funfetti Explosion Birthday Ice Cream Cake

This cake looks like a funfetti cannon exploded all over it. Kids love rainbow colors and funfetti, so it'll be perfect for a summer birthday party! A fudgy blondie layer is packed with funfetti and topped with a cake batter-flavored funfetti ice cream layer. Top it with some sparklers to complete the look. 

Makes one 8-inch (20-cm) cake

Funfetti Blondie Layer

  • 170 g (6 oz) unsalted butter
  • ½ tsp salt
  • 250 g (8.8 oz) brown sugar
  • 2 eggs
  • 1 tsp vanilla extract
  • 175 g (6.2 oz) all-purpose flour
  • ½ cup (113 g) funfetti (rainbow) sprinkles

Funfetti Cake Batter Ice Cream Layer

  • ¼ cup (59 ml) whipping cream
  • ¼ cup (61 g) milk powder
  • 1 tsp vanilla extract
  • 1.9 L (64 oz [4 pints]) vanilla ice cream, softened
  • 1½ cups (339 g) funfetti (rainbow) sprinkles

Stabilized Whipped Cream

  • ½ cup (118 ml) water
  • 3¾ tsp (19 g) powdered gelatin
  • 5 cups (1 L) plus 1–2 tbsp (15-30 ml) chilled whipping cream, divided
  • 1 cup (130 g) confectioners’ sugar
  • Red, orange, yellow, green, blue and purple gel food coloring

To Decorate

  • Funfetti sprinkles
  • M&M’s® candies

Funfetti Blondie Layer

Preheat the oven to 350°F (180°C). Butter an 8-inch (20-cm) wide, 3-inch (8-cm) tall springform pan. Line the bottom with parchment paper and dust the sides with flour. Melt the butter, salt and brown sugar in a heatproof bowl in 30-second intervals in the microwave. Stir to form a smooth butter-sugar mixture. Set aside to let cool slightly.

Once the butter-sugar mix has cooled, add the eggs, one at a time, whisking well after each addition. Stir in the vanilla and the flour. Fold in the funfetti sprinkles.

Pour the batter into the prepared pan and bake for 25 to 30 minutes (the blondie should still be soft and fudgy in the middle). Let the blondie cool in the pan.

When it has cooled, line the sides with parchment paper or acetate paper. Refrigerate the blondie layer until the ice cream is ready.

Funfetti Cake Batter Ice Cream Layer

Microwave the cream until it’s warm, but not hot. Add the milk powder and dissolve it completely. Add the vanilla and stir to combine. Let cool.

Place the softened vanilla ice cream in a bowl, add the cooled milk powder mixture and stir to combine. Fold in the funfetti sprinkles. Spread the ice cream over the funfetti blondie.

Place the ice cream in the freezer until it freezes and hardens completely. This makes it easier to frost the cake quickly.

Stabilized Whipped Cream

Place the water in a small bowl and evenly sprinkle the gelatin over it. Set aside for 10 to 15 minutes to let the gelatin bloom. Microwave the bloomed gelatin in 10-second intervals, stirring in between, until the gelatin is completely dissolved (making sure that the gelatin does not boil).

Add 5 cups (1.2 L) of the chilled whipping cream and confectioners’ sugar to a cold bowl. Whisk with the whisk attachment of your hand mixer on medium speed. Add the remaining 1 to 2 tablespoons (15 to 30 ml) of chilled cream to the hot, dissolved gelatin and stir to temper the gelatin. Add this gradually to the cream that is being whipped (being careful to pour it near the whisk, so that the gelatin gets mixed in with the cream immediately!). Whisk gently until you get soft peaks that still hold their shape. Use immediately.

Work quickly to frost the frozen ice cream cake. Divide the whipped cream into 7 portions, then combine two to make one larger portion (so that you have 5 small portions and 1 double portion). Color the small portions with red, orange, yellow, green and blue gel food coloring. Color the double portion with purple.

Decorate

Remove the completely frozen funfetti ice cream cake from the freezer, and unmold from the springform pan.

Spread the whipped cream on the sides of the cake to create a rainbow pattern—either rainbow patches, or rainbow ombre stripes—starting with red at the bottom and purple at the top edge and on the top of the cake.

You can use the leftover whipped cream to pipe rainbow swirls on top of the cake as well.

Sprinkle some funfetti sprinkles and M&M's on top (in the center). Return the cake to the freezer until you’re ready to serve. 

Who in your life needs this cake? 

Easiest-Ever Potato Chip Cookies

So, I got some potato chips in the mail. Through this and that, cookies were the result.

The chips were sent to me by Tim's Cascade Snacks. As a bit of disclosure, the chips were sent to me at no cost, but I was not compensated for this post.

The flavors were interesting - Sweet Chili and Maple Bacon. The sweet chili sounds good to snack on, but the maple bacon proved inspiring for baking projects.

According to the Tim's PR release, this chip flavor "imparts the perfect yin/yang  blend of sweet and slightly salty flavors. With its smoky fall flavors of Maple combined with bacon, Maple Bacon chips are cut extra thick and crunchy, and are sure to be a hit during game day. Gluten- free and with no preservatives or artificial flavors, since they are a Special Edition flavor, Tim’s Maple Bacon Chips will only be in stores for a limited time."

But I digress. When I saw them, my first thought was "I'd like to make some potato chip cookies". As previously noted, the maple bacon flavor seemed like a more natural fit, so I decided to use those.

Only problem? I had no eggs, and many cookies require eggs. Unnnnnggghhh, it's too cold to go to the grocery store. But then what should I spy in my fridge but a tube of refrigerated sugar cookie dough? 

Perfect. So I decided to mash the chips into the pre-made dough and see what I could see.

Well, here's what I found when I combined the store bought cookie dough and chips and baked it up. 

I actually quite liked how they came out. The chips added a nice salty-and-crunchy element to the cookie dough, and dressed it up so it tasted way more homemade. This is the type of cookie that you just need to embrace in all its non-gourmet goodness and maybe serve with champagne if you need a touch of fancy.

If you're looking for a quick snack for a game day, whip up a batch of these super easy cookies! 

Easiest-ever potato chip cookies

makes about 24 medium sized cookies (or 12 jumbo cookies)

  • 1 tube refrigerated cookie dough (I used sugar cookie dough)
  • 2 cups potato chips (UNCRUSHED) - about 2 generous handfuls 
  1. Preheat the oven to 350 degrees (or as specified on the cookie dough package). Line 2 baking sheets with parchment or silicone mats.
  2. Combine the cookie dough and chips in a large bowl. By hand, mash the mixture together until the chips are crushed into, and evenly dispersed, throughout the dough. I suppose this could be done with a mixer but by hand it felt cathartic. 
  3. Shape into approximately 1-inch balls, and place evenly spaced (with a little room on all sides) between 2 baking sheets. 
  4. Bake for 11-14 minutes (or as specified on the package instructions for the cookies). Remove from the oven; let cool briefly on the pan before transferring to wire racks to cool completely. Store covered at room temperature for up to 3 days. 

Have you ever "doctored" store bought cookie dough?

Pie Crust Crackers

Yo, you need some crackers quick? Use pie crust.

Usually, when I have extra pie crust, I make roly polies. But recently, I found a new and savory alternative to the sweet nuggets: pie crust crackers.

Let me set the scene for you. I happened to be making a cheese ball, and needed some crackers to take appetizing photos of it. I didn't happen to have crackers, but I did happen to have a disc of pie dough (you know how every recipe yields two? Sometimes you find yourself with an extra)

So I went ahead and rolled out that disc of dough and cut it into little rectangles. I "painted" them with an egg wash (whole egg plus a teaspoon of water) and sprinkled them with sea salt and some Italian seasoning mix.

Then I baked 'em up and here's what I got:

YUM! Pie crust crackers are completely delicious. They're crumbly and rich and flavorful.

The one problem with pie crust crackers, though, is that they are delicate. So for instance, if I were to try to use one to scoop a bit of cheese ball, the cracker would in fact explode. So as long as you know not to try to test these crackers like that, or to stack them carefully before eating, you're golden. 

I was fairly laissez-faire about baking, I didn't actuallly monitor how long it took, so please just use this as a general recipe concept/template. 

Pie crust crackers

  • Pie crust (a full dough disc or scraps)
  • 1 egg, beaten with 1 teaspoon water (for egg wash)
  • seasonings of your choosing

Preheat your oven to 450 degrees F.

Roll out some pie crust (a full one, or just your scraps from making a pie), about the same thickness as if you were making a regular pie crust. Then, cut the dough into small rectangles (I'd estimate mine were about 1 inch by 2 inches?). 

Place the dough rectangles on a lined baking sheet. Brush with an egg wash and sprinkle with seasonings of your liking.

Bake until deep golden brown - I'd say that mine took about 5-8 minutes but really, just keep an eye on them because I kind of forget the actual time it took and your oven might be different than mine. 

Store at room temperature for up to 3 days. 

Note: the egg wash is not completely necessary for these crackers but it is responsible for giving them that beautiful brown finish. 

What do you do with leftover pie dough scraps?

Mexican Hot Chocolate Piñata Bundt

Your New Year's health resolution is boring to me. Let's eat cake instead.

But not just any cake, friends: a Mexican Hot Chocolate Piñata Bundt Cake! This beauty is from the brand new book Beautiful Bundts: 100 Recipes for Delicious Cakes & More by Julie Anne Hession

OK, so this book is awesome. It delivers on the promise of the title, with plenty of beautiful bundt cakes in all shapes and sizes. However, it also has some unexpected recipes. From savory bundts to pull-apart options, there are creative options in addition to the classics. It's truly a book that will challenge the view of the bundt pan as one trick pony in the kitchen!

I'm delighted to have received permission to share this recipe for a Mexican Hot Chocolate Piñata Bundt cake on the blog. This happy cake is perfect for parties, Cinco De Mayo, or really, let's be honest, any day of the year that you crave chocolate and joy (which is most days for me!). 


Mexican Hot Chocolate Piñata Bundt

Photo credit (above) and headnote (below): Julie Anne Hession

A piñata Bundt? That sounds fun! Indeed. This Bundt is full of surprises and guaranteed to turn any occasion into an instant fiesta. Cut into the whole cake, pull out the first slice and you’re met with a cascade of colored chocolate candies spilling out onto your plate. Take your first bite, and what you thought was a standard chocolate cake hits you with notes of cinnamon and spicy cayenne. Whether or not you hit the dance floor, your taste buds will definitely be doing the salsa!

Makes 12 to 14 servings

Tips

After filling cake, it’s best to invert it onto a serving plate instead of a wire rack. Because sections of the cake have been removed and replaced, the cake should be moved as little as possible.

The ganache thickens quickly once poured over the cake. To coax it down the sides, firmly tap the cake-topped plate or wire rack on the counter a few times.


Before you bake:

  • Preheat oven to 350°F (180°C); dark pan, 325°F (160°C)
  • Get yourself a minimum 12-cup Bundt pan, and spray it with nonstick spray

Ingredients:

  • 2 1⁄2 cups all-purpose flour (625 mL)
  • 1 cup unsweetened cocoa powder, sifted  (250 mL)
  • 1 tsp baking soda (5 mL)
  • 1 tsp salt (5 mL)
  • 1 tbsp ground cinnamon (15 mL)
  • 1⁄4 to 1⁄2 tsp cayenne pepper (1 to 2 mL)
  • 2 1⁄4 cups  granulated sugar (560 mL)
  • 3⁄4 cup vegetable oil (175 mL)
  • 3 large eggs, at room temperature 
  • 1 tbsp coffee-flavored liqueur (such as Kahlúa) (15 mL)
  • 2 tsp vanilla extract (10 mL)
  • 1 1⁄2 cups  buttermilk (375 mL)
  • 1 3⁄4 cups mini candy-coated chocolate pieces (such as M&Ms), about 11 oz (330 g) 
  • 1 recipe Mexican Chocolate Ganache (see recipe below)    

Instructions

1.    In a medium bowl, whisk together flour, cocoa, baking soda, salt, cinnamon and cayenne.

2.    In the stand mixer bowl, beat sugar and oil on medium speed until blended. Beat in eggs, one at a time. Beat in liqueur and vanilla.

3.    With the mixer on low speed, alternately beat in flour mixture and buttermilk, making three additions of flour and two of buttermilk, and beating until incorporated. Transfer batter to prepared pan and smooth the top.

4.    Bake in preheated oven for 50 to 60 minutes or until puffed and a tester inserted in the center comes out clean. Let cool in pan for 10 minutes, then carefully invert cake onto a wire rack to cool completely.

5.    Prepare cake for filling as directed on page 88. Pour candies into the “moat,” filling it to about 1⁄2 inch (1 cm) from the top. Trim cut-out cake sections so that they fit snugly back together on top of the candies, pressing to adhere and completely covering up candies. Carefully invert cake onto a serving plate.

6.    Pour ganache over the cake, letting it drip down the sides (see tip). Let ganache set for at least 20 minutes before serving.


Mexican Chocolate Ganache

Makes enough for a cake baked in a 10- to 12-cup pan

  • 6 oz dark or semisweet chocolate, chopped  (175 g)   
  • 1⁄3 cup heavy or whipping (35%) cream (150 mL)
  • 1 tbsp unsalted butter (15 mL)
  • 1⁄2 tsp    ground cinnamon (2 mL)
  • 2 to 3 tbsp coffee-flavored liqueur (such as Kahlúa) (30 to 45 mL)

1. In a small saucepan, stir together chocolate, cream and butter over medium-low heat until melted and smooth. Remove from heat and stir in cinnamon and liqueur to taste.

Have you ever made a creative bundt cake?

Chocolate Chip Pistachio Cookies for Christmas

I'm bringing back this recipe because it's truly THE BEST! This is the only cookie recipe that I *always* make; others come and go.

Cookies

One of the most wonderful things about a recipe is all the places it can go.

Take, for instance, a recipe for two-tiered Chocolate Chip Pistachio Cookies that appeared in a women's magazine in the early 1980s. How could the recipe developer have known what a role this recipe would end up playing in the Spy family's lives?

Chocolate Chip Pistachio Cookies

After all, it was this recipe that struck the fancy of my mother (you know her as SpyMom) and intrigued her enough to bake a batch. And the whole family loved them. They were buttery and lightly crumbly but so soft and just ever so slightly chewy in the center, and the walnuts and pistachio and chocolate just worked so perfectly together. We all loved them so much, in fact, that the next year, she made them again. And the year after that. A tradition was born.

Chocolate Chip Pistachio Cookies

But somewhere along the line--was it when her children went to college, moved away, began having their own lives?--the cookies stopped being made. Every year someone (usually me) would lament the fact that they were missing from the festivities, but year after year, they did not make an appearance.

Chocolate Chip Pistachio Cookies

But this year, we brought the recipe out from hiberation. SpyMom found the handwritten recipe and told me that this was during her "penmanship phase", when she would stay up at night practicing perfect penmanship, trying to will her handwriting into something more perfect than it was. 

Pistachio Cookies

Since then, her handwriting has reverted back to its old, slighly messier, but in my opinion, more charming form.

But how wonderful to encounter this little slice of the past, complete with doodlings (mine? My little sister's?) and speckled with baking debris from years past. 

Chocolate Chip Pistachio Cookies

I baked the cookies while my parents were out, and when they returned, my mother shrieked. "What?" I cried out, thinking that perhaps she'd seen a mouse. But no. "They're just like I used to make!" she said. And I may be getting a bit flowery here, but I think that she and my dad both had a little moment, thinking sweet memories. And that made me extremely happy, in turn. 

How's that for season's sweetings?

Chocolate Chip Pistachio Cookies

Chocolate Chip Pistachio Cookies

Makes about 24

  • 3 1/4 cups all purpose flour
  • 2 teaspoons baking powder
  • 1 teaspoon salt
  • 1 cup (2 sticks) butter, softened
  • 1 cup granulated sugar
  • 2 eggs
  • 2 tablespoons milk
  • 1 teaspoon vanilla
  • 1/4 cup chopped walnuts
  • 1 package (3 3/4 ounces) instant pistachio pudding (NOT sugar-free)
  • 6 ounces (half a bag) semisweet chocolate chips, plus 20-30 chips for garnish
  • confectioners' sugar, for dusting

Procedure

  1. Preheat the oven to 375 F. Line two baking sheets with parchment paper, or lightly grease them.
  2. In a large bowl, sift together the flour, baking powder, and salt; set aside.
  3. In a separate bowl, using an electric mixer, cream the butter and sugar until smooth, 2-3 minutes on medium speed. Add the eggs, milk, and vanilla; blend until creamy. Add the flour mixture in 3-4 increments, mixing until a stiff dough forms. Remove 1/4 of the dough to a separate bowl; add the walnuts.
  4. To the remaining dough, add the pudding mix and stir until completely combined. Fold in the 6 ounces of chocolate chips.
  5. By rounded teaspoonfuls, form the green dough into balls, and place 1 1/2 inches apart on the prepared sheets. Using the back of a teaspoon or a floured drinking glass bottom, gently flatten the tops of these dough rounds. 
  6. Grab the small bowl of walnutty dough. Form the dough into marble-sized pieces, and place a ball of this dough on the top of each pistachio dough mound. Sort of like a two-part snowman. 
  7. Place a single chocolate chip on top of each of the cookies, pressing gently to make sure it will stay in place.
  8. Bake in your preheated oven for 8-15 minutes (listen, that long range is because I never calibrate my oven because I am lazy and I've baked these in a variety of ovens which have ranged though different bake times), or until set. It's going to be hard to see if they have become golden on the bottom, so mainly just look for a matte finish and an ever so slight golden color around the bottom edge. Remove from the oven and let cool on the rack for 5 minutes before transferring to a wire rack to cool completely. If desired, dust with confectioners' sugar.

Chocolate Chip Cookie Cake Pie

In case you hadn't heard the word, CakeSpy is 10 years old. As such, I've been revisiting some of my all time favorite recipes. Today? COOKIE CAKE PIE.

OK, so the Cookie Cake Pie I made in 2009 really kind of went viral, you guys. It was featured all over the interwebz and believe it or not, it even has its own Wikipedia entry (yes, proud moment). 

I mean, it was a brilliant idea. The basic premise was "cookies? cake? pie? why decide?". Genius might not be quite the right word, but it's the first one that comes to mind.

I decided the other day it was about time that I make it again. I didn't refer back to the old recipe, but instead just kind of winged it and kept it simple, with a construction punctuated with plenty of chocolate chips. It tasted just as good as I remembered.

The nice thing about this recipe is that you can make it using whatever components you like. Use your favorite pie crust, cookie dough, cake batter, and frosting. It can all be store bought or homemade. The bake time can vary but just keep an eye on the thing and you'll be fine.

Give this baby a try, if you never have! It's a little naughty, incredibly high carb, and intensely delicious. 

COOKIE CAKE PIE

Makes 1 pie

  • 1 unbaked pie crust
  • Cookie dough 
  • 1 box cake mix, batter mixed to package specifications 
  • A big ol batch of frosting (I used a can of Funfetti Frosting, but sadly I had poached the sprinkles from it so I had to use edible glitter to garnish)

Start by preheating the oven. I preheated to 350, because that's just always a good moderate place to start.

Place your cookie dough in the pie crust. Me, I happened to have about 10 portions of this "egg free" cookie dough so I just plopped them right in the crust. There were two types, whole wheat and all purpose flour cookie dough, I figured a little extra health couldn't hurt, right? 

On top of the cookie dough, pour a big ole bunch of the cake batter. Me, I used vanilla cake batter but stirred in a handful of chocolate chips to help it match the cookie dough. Now, this is important: you probably will not need the entire batch of batter, particularly depending on how full the crust is after the cookie dough. Basically, don't overfill. You can use that extra to bake some cupcakes or make pancakes, you know? 

Put your pie unit into the oven. Bake until golden on top and a toothpick inserted in the center comes out clean. For me, this took about 30 minutes, but depending on the type of cake batter and cookie dough you use, plus your oven, this could vary. Use your senses. 

Remove from the oven, let cool, then frost (generously). Garnish with sprinkles, edible glitter, whatever feels great to you. 

Serve in big fat slices. Thank your lucky stars that you've tasted this and can die happy now.

What kind of cookie cake pie flavor combo would you like to make?

Naturally Sweet Banana Muffins (No Added Sugar)

It has happened, you guys. I baked something without sugar.  Don't worry, I haven't gone paleo or "healthy" on you or anything. It just sort of happened.

I found a recipe for no-sugar added banana muffins online, and I got curious about the concept, so I decided to try it. In my mind, it was less about making muffins without sugar and more about making little banana bread rolls that let the natural sweetness of the bananas shine through.

I love cake for breakfast, but I can't eat it all that often because my brain feels foggy mid-morning (sad but true). Don't get me wrong, I still love to do it as a treat on occasion (particularly the day after my birthday!).

This recipe, however, offers a good solution for when I need to use my brain but want something more interesting than plain toast.

Just for the record, I'm not even calling these dessert. I'm not in any way or form saying that you should substitute these for dessert. They're more like bread; I found them very pleasant for breakfast, particularly with a little bit of peanut butter on top. 

If you feel like making a nice little batch of these and enjoying them for breakfast all week long, join me! They're tasty and perfect for topping with all sorts of tasty stuff as you would toast. 

Banana muffins with no sugar added

Makes 12 muffins

  • 4 large ripe bananas
  • 1/4 cup oil (I used coconut oil) or melted butter
  • 1 large egg, room temperature
  • 1 teaspoon vanilla
  • 1 teaspoon pumpkin pie spice (can just use cinnamon, too)
  • 1 ½ cups whole wheat flour
  • 1/2 teaspoon baking soda
  • 1/2 teaspoon baking powder
  • 1/2 teaspoon salt

Preheat your oven to 350 degrees F. Generously grease or place muffin/cupcake liners in a 12 cup muffin pan.

Using clean hands, mash the bananas in a large bowl. Add the oil/butter, egg, vanilla, and spice (I add the spice now because I feel like it infuses better this way). Give it a stir with a wooden spoon to combine.

In a separate bowl, sift together the dry ingredients. Add them to the wet mixture and stir only until evenly moistened. It’s gonna be somewhat lumpy.

Divide the batter evenly between the muffin tin.

Bake in your preheated oven for 14-20 minutes (big range here because my oven runs very hot so it was on the low end), or until golden and a toothpick inserted inside comes out pretty clean. Remove from the oven, let cool in the pan for a few minutes, then transfer to a wire rack to cool completely.

Do you like banana baked goods?