Batter Chatter: Interview with Carrie Sellman of Half Baked - The Cake Blog

Cherry blossom cake by Carrie Sellman for CakeSpy Interview
Let's talk about cakes. More specifically, beautiful cakes--which are in abundance on the great site Half Baked - The Cake Blog. Written by Carrie Sellman, a former cake shop owner-turned blogger, this site is a great resource for not only cake but party ideas, and you can easily lose yourself looking at the gorgeous pictures. And now is the time to discover the site--there's currently a pretty awesome $100 Crate & Barrel gift card giveaway going on! But who is behind the blog? Read on to learn more:

CakeSpy: First off--tell us a bit about who you are.
Half Baked Cake Blog: My name is Carrie Sellman. I’m a cake designer and former specialty cake shop owner, now turned blogger. Most importantly, I’m a lover of all things cake!

CS: What is your first cake memory?
HB: Growing up, my mother always went out of her way to celebrate family birthdays. There was always party decorations, our favorite meal and of course, cake! I have such great memories of my childhood birthdays! Making a wish and blowing out candles. Chocolate cake was always the staple for my family. Ironically now as an adult, I prefer something lighter when it comes to cake.

CS: Your site mentions that you are self-taught. How did you develop an interest in cake decorating?
HB: When I was about 10, I got my first set of cake decorating tips and a pastry bag from the craft store. I made my dad a character cake of a golfer for father’s day. You know my star tip got a workout on that cake! I’m sure there is a picture somewhere… but let’s just say that my talent was not yet at full potential. Fast forward many years through college and a career in IT. I started to think that my hobby could be something more. Thanks to the encouragement of my husband, family and friends, I decided to go for it!

CS: You closed your business in Dallas to relocate--any plans to open a new location where you are now, in Illinois?
HB: Yes, closing my business in Dallas was a heart wrenching thing to experience. But my husband got the opportunity to pursue his dream job. So we relocated to Central Illinois. I truly wish I could reopen here, but I just don’t think it’s the right market or the right time. So I’ll have to settle for writing about cake, for now…

CS: Do you find that the baking scene is different in Illinois than in Dallas? How so?
HB: Most definitely. I think all trends tend to hit the big cities first and then spread throughout the rest of the country. The cupcake trend is just now settling in here. I think it will be a little while before cake design, as I know it, will be in demand. I wonder if the high costs inherently associated to a cake that requires such intensive labor will prevent modern cake design from ever truly becoming popular here. But what do I know!

CS: Fondant seems to be a type of icing that can often taste...well, not good. Do you have any tips for making it more delicious--recipes, types to use, things not to do, etc?
HB: You would not believe the number of clients who love how fondant looks but prefer the taste of buttercream. Most often my solution is to give them a little bit of both. The majority of my cake designs have a buttercream base icing with fondant accents only (i.e. the stripes, polka dots, flowers, bows, etc). The perfectionist in me spends way too much time smoothing the buttercream to give it that porcelain look, but I think it is worth it. The end result is a stunning cake that still tastes good! If I cover the entire cake in fondant, then I use Satin Ice and I roll it as thin as possible.

CS: Tell us about one of your personal favorite cakes that you've made.
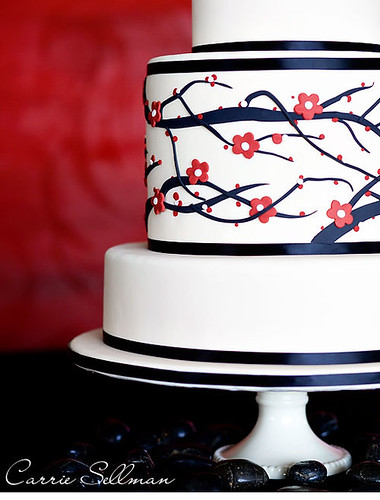
HB: It’s really hard to pick a favorite. It seemed like I used to have a new favorite each week! But one of my all time favorites is a design that I created for Bride & Bloom Magazine (pictured top of the post). I was given basic guidance that the theme was Asian Contemporary and the colors were red and black. But other than that, I had complete creative control. I always feel that I do my best work when I have more freedom with the design. It was three tiered (one tall, two short) with ivory fondant and black satin ribbons. The cherry blossom pattern was inspired by a sleek and modern pillow from Crate & Barrel. We placed some black river rocks around the base of the cake stand for the photos, which was the perfect finishing touch.

CS: Your blog focuses a lot on parties (at which cakes are consumed, natch). What role does cake play in a party?
HB: What’s a party without cake? Cake is the best part of any party. Really, think about birthday celebrations in the workplace. Why does everyone head to the conference room for some awkward idle banter? It’s all about the cake! Cake brings people together. :o)

CS: How does your blog feed your cake obsession?
HB: I truly miss owning my business, working with clients to design a cake for their event. You feel like such a part of their big day. I loved that! But my blog allows me to play a small role in my reader’s events. Whether it provides them with some inspiration or connects them with a fabulous cake designer in their area via our Top Tier Directory. And I get my cake fix by featuring hot new cake designs, the stunning events where they were enjoyed, and the talented artists behind the cakes. Throw in some inspiration boards, real parties, insightful articles and fab finds. You’ve got yourself a party. Have I mentioned that I LOVE parties?

For more sweetness, check out Carrie's site, Half Baked - The Cake Blog; you can also stay updated via twitter!

Cake Byte: Preview of the Trophy Cupcakes Show!

Add Bardahl (and cupcakes)
Dudes and Dudettes. I am, like, so excited about my upcoming artist reception at the Wallingford Trophy Cupcakes tomorrow evening!

It is going to be an action-packed day for me: I will be selling artwork all day at the awesome Urban Craft Uprising (P.S. check out the interview I did on their blog!), then rushing over to Trophy at 6 p.m. for some delicious cupcakes and the artist reception!

Note: Don't worry if you can't make it to the reception. I'd be happy to see you, of course, but the artwork will be up all month, through January 2! Plenty of time to pick up a holiday present for a loved one (or for yourself. You totally deserve it.).

I've been painting my little fingers weary, and wanted to give a preview of what will be on show at Trophy from among the nearly 80 new works, many depicting Seattle scenes, such as...

Cuppie Loves Lunchbox Laboratory in Ballard, Seattle
Cuppie enjoying a delicious burger at Lunchbox Laboratory;

Ballard Sunday Market, Ballard, Seattle
Cuppie shopping local at the Ballard Farmer's Market;

Cuppie Makes a Splash at the Farmer's Market!
Cuppie making some mischief at a produce stand at Pike Place;

Cupcakes at Le Pichet in Belltown, Seattle
Cuppies hanging out at cute Belltown cafe Le Pichet;
Preview of show at Trophy Cupcakes
and so, so many more! Hope to see you this weekend! For the Wallingford Trophy Cupcakes location and more information about their cupcakes, visit their site!

Cake Byte: New Crafty Cuppie Rubber Stamps by Taylored Expressions!

New Stamps for Taylored Expressions!
Are you a crafty little cupcake? Or...do you perhaps know a crafty little cupcake who deserves a sweet surprise in their Christmas stocking this year? Well, search no longer for the perfect present, because here it is: the sweetest new set of rubber stamps by Taylored Expressions featuring CakeSpy art!

This set is doubly perfect for crafty types, because not only can you make cards and projects with the stamps--but they depict Cuppie doing all sorts of creative things!
CraftyKnitter Thank You
This set retails for $21.95 and comes nicely packaged with a beautiful color index sheet; you can purchase it here. You can also find great project ideas on the Taylored Expressions blog and stay in touch with Taylored Expressions via Twitter!

Instant Pleasure: Pumpkin Cake in a Mug from Coffee Mug Cake Cookbook

Coffee Mug Cake
I know what you're thinking after looking at this picture. "CakeSpy," you're thinking, shaking your head sympathetically, "has been hitting the vanilla extract a bit hard".
Well, maybe sometimes. But not this time--this cake, which might be a little ugly but is actually surprisingly tasty--was baked in the microwave, in a mug.
It was a sample recipe from the self-released book Coffee Mug Cake Cookbook which immediately intrigued me--after all--cake? Baked in the microwave? In a mug? I had to give this a try.
The recipe was very easy to follow; the cake itself came out with an unusual but not unpleasant texture, more like a sort of thick flan or custardy cake. To try and make it ever-so-slightly cuter I topped it with some confectioners' sugar quickly whisked with cream and a mellowcreme pumpkin. I am not going to forsake the oven, but in a pinch, this is definitely a sweet option for a quick sweet fix.

Curious about the book? It can be purchased here. Want to try the recipe? Here it is:

Pumpkin Cake in a Mug

  • 7 tablespoons flour
  • 1/4 cup brown sugar
  • 1/4 teaspoon cinnamon
  • Dash of ginger, ground cloves and nutmeg
  • 1 egg
  • 2 tablespoons milk
  • 1/4 teaspoon vanilla
  • 1/4 cup canned pumpkin
  • 3 tablespoons chopped pecans (optional) - I used walnuts

MixedIn the Microwave
  1. Mix together the flour, brown sugar, cinnamon, ginger, ground cloves and nutmeg. Add egg, milk and vanilla. Mix well, making sure to scrape the sides and bottom of the mug. Stir in the pumpkin and pecans.

    Just out of the MicrowaveFlipped

  2. Cook for 3 minutes on high on a microwavable plate, followed by 2 minutes at 50% power. Turn the mug upside down to release the cake onto the plate.

Coffee Mug Cake
Notes: 

1. CAUTION: MUG WILL BE HOT.
2. Make sure to use a microwaveable mug that is at least 15 ounces large (about 4.5 inches in height and 3 inches in
diameter). If you opt for something smaller, be prepared for massive spillage.
3. Coat the inside of the mug with a no-stick spray to ensure easy release.
4. Unless you have a mini whisk, forks work just as effectively.
5. The outside may be a bit “gooey-er” than the inside. The cook times listed are optimal for a 700-watt microwave and are the best for ensuring the cake is not too dry on the inside.

Sweet News: CakeSpy Featured in the Saveur Gift Guide!

CakeSpy Featured in the Saveur Gift Guide!
Every foodie knows Saveur, one of the best food sites and magazines out there! (Oh, and by the way, if you haven't picked up the december issue, please do: they have a great holiday dessert article!).

And so considering how rad Saveur is, how sweet is this: CakeSpy artwork is featured in the Saveur Gift Guide! Here's the blurb:

In addition to her baking and blogging capabilities, the founder of Cakespy, Jessie Oleson, is also a talented illustrator, and has created an entire line of original artwork featuring characters such as Cuppie, Toastie, Pie Slice, and Doughnut. These framed and whimsical watercolors add a bit of sweet kitsch to any kitchen. $25-$45 each.

Of course, CakeSpy is in good company: also featured are Bake It Pretty, Spice House, Compartes Chocolatier, Truly Toffee, and so many more!

For the full list, click here.

Cake Byte: Cuppie At the Milwaukee Art Museum!

MAM After Dark
Cuppie has made it to the big time: he's officially been acknowledged by the Milwaukee Art Museum!

OK, granted, it's a very tiny image, but hey: we've got to start somewhere, right? Next stop, solo show at MoMA!

Cuppie was used as a promotional image for the Milwaukee Art Museum's MAM After Dark: A Very Red Velvet Holiday event, which is also brought to you by the lovely and amazing Sandy Ploy of Iron Cupcake. For more information on the Andy Warhol-meets-cupcakes event, visit their site!

Cookie Love: Red and Green Christmas Cookies

Red and Green Christmas Cookies
What do black and white cookies wear to holiday parties? Festive red and green frosting, of course! This fun take on the classic New York treat starts with the classic cakey drop cookie, but instead of the traditional fondant, I went for a more rich (and in my opinion, more delicious!) combo of colored buttercreams for the top. This was also a great choice because Challenge Dairy was kind enough to send me a bunch of coupons for free butter to bake with (say what you will, but I will always accept candy from strangers and free butter)! They were intended for a party, but they didn't last long enough!
Red and Green CookiesYum

The recipe can also be found on my latest entry for Serious Eats!

Red and Green Christmas Cookies

- makes 8 to 12 cookies, depending on size -

For the cookies:

  • 1 1/4 cups all-purpose flour
  • 1/2 teaspoon baking soda
  • 1/2 teaspoon salt
  • 1/3 cup well-shaken buttermilk
  • 1/2 teaspoon vanilla
  • 1/3 cup (5 1/3 tablespoons) unsalted butter, softened
  • 1/2 cup granulated sugar
  • 1 large egg
For the frosting:
  • 1 stick (1/2 cup) butter--I used Challenge Dairy's unsalted butter
  • 2 cups confectioners' sugar (you may not use all of it)
  • 1/4 teaspoon vanilla
  • red and green food coloring
  1. Make the cookies. Preheat the oven to 350°F. Whisk together flour, baking soda, and salt in a bowl; in a separate small bowl, stir together buttermilk and vanilla.
  2. Beat together butter and sugar in a large bowl with an electric mixer until pale and fluffy, about 3 minutes, then add egg, beating until combined well. Mix in flour mixture and buttermilk mixture alternately in batches at low speed (scraping down side of bowl occasionally), beginning and ending with flour mixture. Mix until smooth (the texture is somewhere between cake batter and drop cookie batter).
  3. Using a cookie or ice cream scoop, put mounds of batter about 3 inches apart on a parchment-lined baking sheet. If you use a cookie scoop, you will probably get about 12 medium-sized cookies; if you use an ice cream scoop, which is generally a bit bigger, you will get about 8 big cookies. Bake in middle of oven until tops are puffed and pale golden, and cookies spring back when touched, 15 to 17 minutes. Transfer with a metal spatula to a rack and let cool until they are room temperature.
  4. While the cookies cool, make the frosting. In an electric mixer, cream the butter, adding the vanilla, and then the confectioners' sugar, bit by bit, until it has reached your desired consistency. Separate your frosting into two separate dishes. Combine the frosting in each dish with food coloring (I used about 10 drops of green and 10 drops of red for strong, vibrant colors) until fully combined.
  5. To frost, first turn the cookies over—you will actually frost the flat bottom side. Frost the cookies one side at a time. I found that I could get a sharper line down the middle if I started frosting from the outside in, finishing with a stroke down the center. When adding the second color of frosting, the key is to make sure you frost the part where the two colors touch last, frosting the dividing line in one smooth stroke (no backtracking or you will drag the other color of frosting back with you!).
  6. Serve immediately; store at room temperature in an airtight container. I found that these tasted best either the day made or the next day.

Say Cheesecake: Pumpkin Cheesecake with Caramel Swirl and Gingersnap Crust Recipe

Pumpkin Caramel Cheesecake
Leftover pumpkin pie? Not a chance. But if you stockpiled pumpkin puree like it was going out of style this Thanksgiving season (you're not alone!), then it is time to use some of your stash to make a Pumpkin Cheesecake with Caramel Swirl. CakeSpy buddy Nick recently served Mr. Spy and I this cake and let me say, our socks were knocked not only off but clear out of the park. Adapted from a 1993 Bon Appetit recipe, this cheesecake is like a meeting of Thanksgiving and Christmas flavors, including pumpkin in the filling and spicy gingersnaps in the crust--throw in about two pounds of cream cheese, and nirvana ensues. Nick's summation? "the crust is made of gingersnaps and pecans and butter, the cheesecake is made fairly traditional with about a cup and half of pumpkin bits and I used cinnamon and 'pumpkin pie spice', the frosting top is part of the cheese cake mix in it's early stage when it's just cream cheese and sugar, and to finish it off I used a spiced rum caramel drizzle on top." (Note: the recipe below just includes the regular caramel swirl)
Pumpkin Caramel Cheesecake
Pumpkin Cheesecake with Caramel Swirl
- 10 servings -

Crust:
1 1/2 cups ground gingersnap cookies
1 1/2 cups toasted pecans (about 6 ounces)
1/4 cup firmly packed brown sugar
1/4 cup (1/2 stick) unsalted butter, melted

Filling:
4 8-ounce packages cream cheese, room temperature
1 2/3 cups sugar
1 1/2 cups canned solid pack pumpkin
9 TBS whipping cream
1 tsp ground cinnamon
1 tsp ground allspice

4 large eggs
1 tablespoon (about) purchased caramel sauce
1 cup sour cream

  1. For Crust: Preheat oven to 350ºF. Finely grind ground cookies, pecans and sugar in processor. Add melted butter and blend until combined. Press crust mixture on to bottom and up sides of 9-inch-diameter springform pan with 2 3/4-inch-high sides.
  2. For Filling: Using electric mixer, beat cream cheese and sugar in large bowl until light. Transfer 3/4 cup mixture to small bowl; cover tightly and refrigerate to use for topping. Add pumpkin, 4 tablespoons whipping cream, ground cinnamon and ground allspice to mixture in large bowl and beat until well combined. Add eggs 1 at a time, beating just until combined. 
  3. Pour filling into crust (filling will almost fill pan). Bake until cheesecake puffs, top browns and center moves only slightly when pan is shaken, about 1 hour 15 minutes. Transfer cheesecake to rack and cool 10 minutes. Run small sharp knife around cake pan sides to loosen cheesecake. Cool. Cover tightly and refrigerate overnight.
  4. Bring remaining 3/4 cup cream cheese mixture to room temperature. Add remaining 5 tablespoons whipping cream to cream cheese mixture and stir to combine. Press down firmly on edges of cheesecake to even thickness. Pour cream cheese mixture over cheesecake, spreading evenly. Spoon caramel sauce in lines over cream cheese mixture. Using tip of knife, swirl caramel sauce into cream cheese mixture. (Can be prepared 1 day ahead. Cover and refrigerate.)
  5. Release pan sides from cheesecake. Spoon sour cream into pastry bag fitted with small star tip (do not stir before using). Pipe decorative border around cheesecake and serve. Nick's Note: I did not do the sour cream border, found it to be excessive and kind of weird to the whole thing.

Sweet Love: A Bakery Crush on Goody Goodie Cream and Sugar


Photo via Goody Goodie Cream & Sugar

What inspires love?

I'll tell you what inspires love: Goody Goodie Cream & Sugar, a San Francisco cookie company which I discovered recently via DailyCandy. Turns out they use a very important filling-to-dough ratio in their cookies: four to one. As in, you'll have a mouth full of fillings, and they won't be from the dentist.

And with flavors like "The Circus" (a perfectly sweet and salty mix of candy popcorn and semisweet chocolates) or "Coconut Five-O" (semisweet chocolates and coconut galore!) to macaroons which promise to make you a believer, they've certainly hooked me. The cookies are available at various retail locations in the SF area, and I know I will be seeking them out the next time I am there!

Oh, Goody Goodie: I've never met you, but I love you.

For more information, visit goodygoodie.com.

Sweet Love: A Bakery Crush on Gourmet Library


I don't know about you, but I love looking at online bake shops. Even if I don't order, I get a lot of flavor ideas (and things to dream about!).

My current online crush? Gourmet Library, a site dedicated to food: including videos, stories--and an online shop!--which I discovered via Thrillist. They have a comprehensive Cakes and Confections section, which includes goodies like Almond Pan Cantuccio,Chocolate Dipped figs, Almond-filled Speculaas, Stroopwafels, and more! I especially love how each product has a video where the employees discuss the product.

Check it out at gourmetlibrary.com!

Sweet December: Cupcake Royale's Holiday Cupcake Roster

Figgy Pudding Cupcake, Cupcake Royale
So what if it's not technically December yet? Cupcake Royale has their holiday flavors out already in full force!

Here's what you'll find there this month:

Figgy Pudding: A rich and fudgy chocolate chunk fig cake topped with a light and fluffy, old-fashioned brandied chocolate buttercream. Puts a whole new spin on "bring us some figgy pudding"!

Eggnog: Featuring real eggnog buttercream from local dairy farmers, swirled on top of a vanilla butter cake. Topped with holiday sprinkles and freshly ground nutmeg.

Candy Cane: A wintry peppermint buttercream swirled top either vanilla or chocolate cake, topped with a sweet starlight mint.

and of course, they decorate their Red Velvet Cupcakes (it's a new recipe!) with a sweet holiday sparkle at this time of year.

Available all autumn long at the four Cupcake Royale locations; for directions and contact info, visit www.cupcakeroyale.com. Of course, you can keep up to date with their goings-on at legalizefrostitution.blogspot.com.

Sweet Seconds: Thanksgiving Leftover Cranberry Nut Bars for Serious Eats

Thanksgiving Leftover Cranberry nut Squares for Serious Eats

The year's biggest eating weekend is over (sigh). But there's definitely some sweet eating to be had from the little leftovers left, as proven by these cranberry nut squares. This is a revamped version of a pecan bar but composed instead with leftover cranberry sauce and the mixed nuts that played a supporting role in so many Thanksgiving recipes. The result is surprisingly addictive: sweet, salty, tart, and buttery, all at once.

Not only will you enjoy eating them, but you'll also feel a sense of accomplishment at finishing some of the slower-moving Thanksgiving leftovers.
Thanksgiving Leftover Cranberry nut Squares for Serious Eats
You can find the full recipe at Serious Eats!

Winter Wonderland: A Sweet Dispatch from the National Gingerbread House Competition

Gingerbread Houses
Have you ever been curious about the nation's gingerbread elite? Even if you weren't, bet you are now. Here, Cake Gumshoe Shannon reports on the scene at the National Gingerbread Competition:

A peppermint forest, a sprinkle laden path, sugary turrets and beams of brown baked gingerbread. This is the stuff that children’s dreams are made of, as are the incredible and edible works of art entered in this year’s famous National Gingerbread House Competition put on by The Grove Park Inn in Asheville, North Carolina.
Gingerbread Windmill
After months of baking and building, gingerbread architects and purveyors of icing of all ages from across the country have witnessed the judging of their mouth-watering creations. Winning entries are now on display throughout the historic hotel until January 3.

While the name of the contest may conjure pictures of a child’s dilapidated yet endearing four-sided gingerbread home made from a store-bought kit, you’ll find much more among this spicy and sweet collection of entirely edible concoctions.
A marshmallow-laden igloo. A zoo of tasty lions and tigers with caramel cages. A Dutch windwill with spokes of pretzels and chocolate. A cuckoo clock with almond pinecone weights. A castle with a gingerbread princess. Next to a mandate of gingerbread as a building block, imagination is the most important rule of this contest.

Some of my most favorite entries are the most out-of-box inventions such as a festive Egyptian pyramid draped with frosted boughs and holly atop a sugary sweet desert neighbored by a crystal blue sea with a magical sailboat. The base of the boat is made of ice cream cones and is topped by a mast of ruby red licorice and a sail of yellow fruit roll-up.

Then there is the gingerbread house that models a posh Mediterranean villa with a terracotta roof, manicured gardens, a tiled patio and glistening blue fountains that mimic running water, or the gingerbread woven picnic basket filled with fruit and a parade of ants atop an iced picnic blanket.

The grand prize winner of this year’s contest perhaps bends all notions of gingerbread houses with a stunning copper and gold gilded bird cage with two brilliant snow white turtle doves. The base of the bird cage is encircled with perfectly shaped pears and leaves that seem to glow with reflected light (pictured top).
Gingerbread Picnic Basket
Certainly too beautiful to eat, it’s not hard to see on first glance, why this entry brought home the contest’s ultimate prize, which includes a $3,000 prize check, a two-night club floor stay at The Grove Park Inn, dinner for two, daily breakfast for two and a prize package from Chef Nicholas Lodge including a two-day class at the Nicholas Lodge School in Atlanta, Georgia, not to mention major bragging rights at the next neighborhood cookout or potluck.

While the top winners are interesting to see as a collection, each individual gingerbread creation has a story to tell that’s reflected in the incredible attention to detail and hours of work invested. To hear the stories behind the gingerbread, visit The Grove Park Inn and take part in the “Stories of Gingerbread” guided tours.

The Grove Park Inn, 290 Macon Ave., Asheville, NC 1-800-438-5800; Gingerbread Hotline 1-800-413-5778; online at groveparkinn.com.

For more of Shannon Connell’s work, check out her website.

Just a Speck: The Birnen Speck Cake

Pear and Bacon Cake
This photo is credited to Einwanger, Klaus-Maria on Kuechengoetter.com.

As a dessert detective agency, it is the official duty of CakeSpy to report on the birnen speck cake.

What's a birnen speck cake? Well, birnen means pear; speck roughly translates as bacon; and cake...well, you know that one.
Birnen Speck Cake
Yup: Pear Bacon Cake. I was tipped off about this cake by Criminal Crafts, and finally hunted down a recipe and tutorial online on the site kuechengoetter.de. Basically this cake is made by laying bacon in a loaf pan, nestling pared pears on top, and then smothering it all in cake batter before baking it. The result? A confection which yields a strangely pretty slice, with pear shards surrounded by buttery cake, all surrounded by pink-red-and-white bacon. Ready to give it a try? While an effort to directly translate may not be easy, the recipe can be found here.

Cake Byte: CakeSpy Artwork at Trophy Cupcakes Starting December 5!

Cupcake and Bacon in Seattle
Breaking Cake News! CakeSpy is having another art show at Trophy Cupcakes! The first one this summer was such a success that they have asked for more cupcake art to get them through the holiday season!

Please note that if you read the update about the show a week or so ago, the artist reception has changed. It will now take place at the following time:

Saturday, December 5, from 6-8 p.m.
at Trophy Cupcakes in Wallingford, 1815 N. 45th Street in the Wallingford Center
There will be plenty of awesome artwork and of course a limited supply of free cupcakes!

There will be over 80 new paintings featuring cupcakes (and even some other foods!) in all sorts of sweet (and sometimes bittersweet) situations, and many illustrations including Seattle landmarks.

Of course if you can't make the reception, the artwork will be up all month long in Wallingford, through January 2, so you can pick up sweet gifts for your friends, neighbors, family and maybe even your sweet self all December long!

Hope to see you there!

Roll With It: Pumpkin Roulade Cake Recipe from Cake Gumshoe Julia

Guest Post from Cake Gumshoe Julia - roulade cake with sugar
CakeSpy Note: What the world needs now is love, sweet love--all rolled up in a pumpkin roulade cake. Cake Gumshoe Julia is at it again, and has contributed a totally sweet recipe! You can follow her everyday adventures on her site, Fat Girl Trapped in a Skinny Body.

I have been wanting to make a roll cake for years. But I have been so intimidated by them--they always look so perfect, and I always feared there was no room for error in the texture of the cake or consistency of the frosting. It had to be perfect or else it wouldn't roll correctly. But Saturday morning I was feeling lucky.

I had a pumpkin I had just roasted which I wanted to use for some baked goods. I also realized I hadn't made any pumpkin baked goods yet and Thanksgiving is only 5 days away. So right then I knew I had to make Ina Garten's Pumpkin Roulade. Her recipes have always turned out well for me, which gave me the confidence to move forward. Of course I modified her recipe slightly (I just have a habit of always adding some of my own 'flair' you can call it).

Pumpkin Roulade Cake

For the cake:
  • 1/4 cup all-purpose flour
  • 1/2 cup whole wheat
  • 1/2 teaspoon baking powder
  • 1/2 teaspoon baking soda
  • 1 teaspoon ground cinnamon
  • 1 teaspoon ground ginger
  • 1/4 teaspoon ground nutmeg
  • 1/2 teaspoon kosher salt
  • 3 extra-large eggs, at room temperature
  • 1/2 cup granulated sugar
  • 1/2 cup brown sugar
  • 3/4 cup canned pumpkin (not pie filling)
  • 1/4 cup confectioners' sugar, plus extra for dusting

For the filling:
  • 8 ounces cream cheese (I used low fat)
Note: I have been using Philadelphia cream cheese. I used the generic cheap stuff forever, but recently discovered that Philly has such a better consistency.
  • 1 1/4 cups sifted confectioners' sugar
  • 1 tablespoon heavy cream
  • 1/4 cup fresh pumpkin puree
  • 1/2 banana, mashed
  • Pinch kosher salt

Directions
  1. Preheat the oven to 375 degrees F. Grease a 13 by 18 by 1-inch sheet pan. Line the pan with parchment paper and grease and flour the paper.
  2. In a small bowl, sift together the flour, baking powder, baking soda, cinnamon, ginger, nutmeg, and salt and stir to combine. Place the eggs and sugars in the bowl of an electric mixer fitted with the paddle attachment and beat on medium-high speed for 3 minutes, until light yellow and thickened. With the mixer on low, add the pumpkin, then slowly add the flour mixture, mixing just until incorporated. Finish mixing the batter by hand with a rubber spatula. Pour into the prepared pan and spread evenly. Bake the cake for 10 to 12 minutes, until the top springs back when gently touched.Guest Post from Cake Gumshoe Julia - roulade cake on towel
  3. While the cake is baking, lay out a clean, thin cotton dish towel (I used a cheese cloth) on a flat surface and sift the entire 1/4 cup of confectioners' sugar evenly over it. (This will prevent the cake from sticking to the towel.) As soon as you remove the cake from the oven, loosen it around the edges and invert it squarely onto the prepared towel. Peel away the parchment paper. With a light touch, roll the warm cake and the towel together (don't press!) starting at the short end of the cake. Allow to cool completely on a wire rack. Note: I just dumped the cake onto the powdered sugar towel, and I watched a huge cloud of powdered sugar spread everywhere. So the term 'with a light tough' is key to making a little less mess.
  4. Meanwhile, make the filling. In the bowl of an electric mixer fitted with the paddle attachment, beat the cream cheese, confectioners' sugar, and cream together for about a minute, until light and fluffy. Stir in the pumpkin, banana, and salt.Guest Post from Cake Gumshoe Julia - roulade cake with frosting
  5. To assemble, carefully unroll the cake onto a board with the towel underneath. 
  6. Spread the cake evenly with the filling. 
  7. Reroll the cake in a spiral using the towel as a guide. Remove the towel and trim the ends to make a neat edge. Dust with confectioners' sugar. Serve sliced.


Guest Post from Cake Gumshoe Julia - roulade cake fork cutting