Bar Hopping: Peanut Butter and Chocolate Chip Topped Bar Cookies Recipe

If I were, on this very day, pressed to answer the question "what treat would you most enjoy eating until you descend into morbid obesity?" I would have a ready answer: Peanut butter and Chocolate Chip-Topped Bar Cookies.

It all happened recently while baking the "Dream Bars" from Betty Crocker's Cooky Book and realizing that--duh--I basically had none of the ingredients for the top layer, which was meant to be made up of an almond-coconut topping. So there I was, with a somewhat sad expanse of beige batter for a bar cookie base.

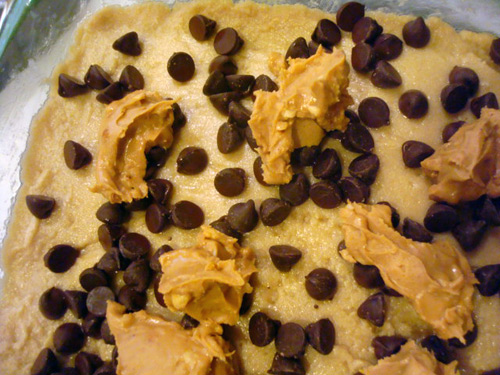
Turning to my pantry (OK, my cabinet), I found half a jar of old-fashioned chunky peanut butter and half a bag of milk chocolate chips. Yes! In the mix they both went, scattered irregularly on top of the batter.

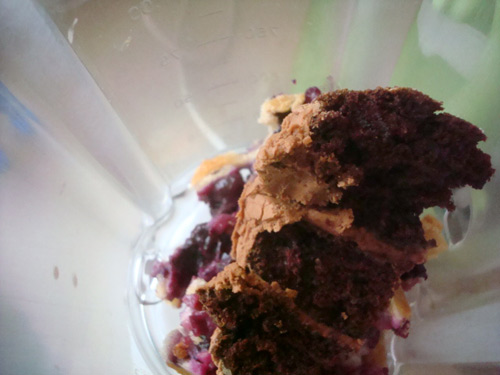
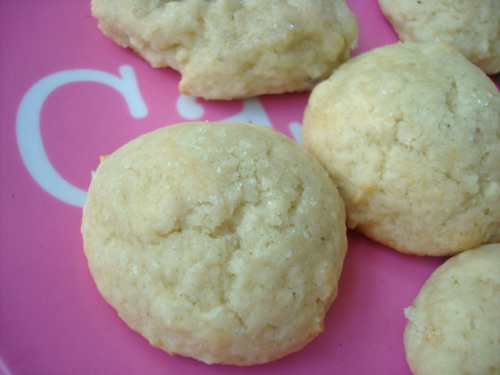
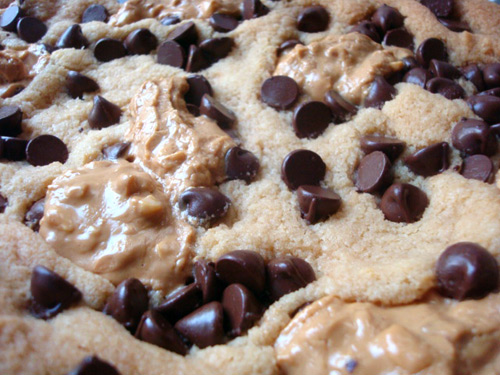
The result? Something lovely and amazing. Moist blondie-esque cookie bars with pockets of gooey-crunchy peanut butter and smooth, delicious chocolate. Something you won't...be...able...to...stop...eating. And if you don't like them? No problem, I'll finish the tray for you.

Peanut Butter and Chocolate Chip-Topped Bar Cookies

adapted from Betty Crocker's Cooky Book

Ingredients

  • 1/2 cup butter
  • 1/2 cup brown sugar, packed
  • 1 cup flour
  • 1/2 jar (about a cup) peanut butter (I used chunky)
  • 1/2 bag (about a cup) milk chocolate chips

Procedure

  1. Heat oven to 350 F.
  2. Mix the butter and sugar thoroughly. Stir in flour. Press and flatten with hand to cover the bottom of a parchment-lined oblong pan, 13x9-ish. 
  3. Bake 10 minutes, then spread with the topping (irregularly spooned globs of peanut butter and a sprinkling of chocolate chips).
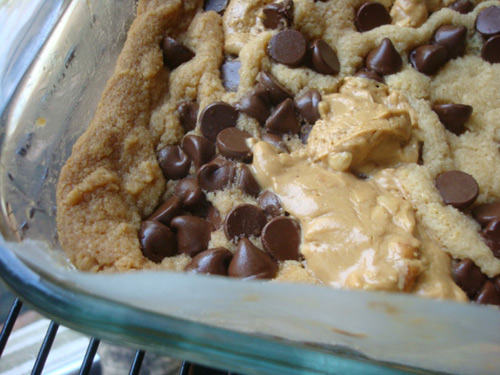
  4. Return to the oven and bake for 25 minutes more, or until golden brown. Cool slightly, then cut into bars. Makes about 20.

Battle in Seattle: A Cake Vs. Pie Party Roundup

The writeup on SLOG is better.It happened the other night at CakeSpy Shop: Cake Versus Pie. The ultimate showdown. Planned along with the food-smartypants powers of Jenise Silva and Edible Seattle, and judged by experts including pie mavens Kate and Brittany. How'd it go?

Well, that begs the question: do you want the short answer or the long answer?

I'll give you both.

Short answer: a Pie won best in show.

The long answer: as a cake devotee, I am willing to admit the pie was stellar...but I am not admitting defeat. After tasting ten of the most delicious cakes of my life, and seeing how fast the leftovers disappeared, I don't think it's quite time to throw in the towel. And I'm willing to bet that there are many others who would be willing to take part in a delicious rematch.

Now, I could get all in-depth about it and tell you about the trials and tribulations, the whos, hows, and whys.

But you know what? A bunch of other talented writers and photographers have, ah, already done it for me. For the full review, I suggest that you click over to the SLOG, where the lovely and amazing Megan Seling delivers a play by play.

You can also find a great roundup here by Alana!

Here's another roundup by Irina Vodonos!

And--most deliciously--you can find some of the recipes for the treats we enjoyed in these places (perhaps more to come?):

Oh, and you can follow the Twitter feed from the event here. 

Brownie Heaven: The Baked Brownie

Now, I don't like to talk in absolutes, but...

...without a doubt, there's definitely something wrong with you if you don't think that the Baked Brownie is the finest brownie of all.

I recently used it as the base for Mimosa Brownies, which were most excellent--but really, this is a brownie that doesn't need anything added--and for that reason, I'd like to take a few moments to celebrate the beauty that is the Baked brownie in its purest form.

This is a brownie which is fudgy and chewy but not too extreme in either direction. Each bite is redolent of chocolate, and every bite is indulgently delicious. They're perfect (but it's ok if you don't like the espresso--while I don't necessarily understand what your problem is, they still taste great without).

Here's the recipe. As you can see from the top photo, it's not only CakeSpy-beloved, but gnome-approved.

The Baked Brownie

As seen in Baked: New Frontiers in Baking  

Ingredients

  • 1 1/4 cups flour
  • 1 teaspoon salt
  • 2 Tablespoons dark cocoa powder
  • 11 ounces quality dark chocolate (60-72%), chopped coarsely
  • 8 ounces butter (2 sticks), cut into 1 inch cubes
  • 1 tsp instant espresso powder
  • 1 ½ cups sugar
  • ½ cup light brown sugar
  • 5 large eggs, room temperature
  • 2 teaspoons vanilla extract

Procedure

  1. Preheat oven to 350 degrees.
  2. Butter the sides and bottom of a glass or light colored metal pan 9x13x2 pan (I like to lay down a bit of parchment too, for easy removal from the pan).
  3. In a medium bowl, whisk together the flour, the salt, and cocoa powder.
  4. Configure a large sized double boiler. Place the chocolate, the butter, and the instant espresso powder in the bowl of the double boiler and stir occasionally until the chocolate and butter are completely melted and combined. Turn off the heat, but keep the bowl over the water of the double boiler and add both sugars. Whisk the sugars until completely combined and remove the bowl from the pan. Mixture should be room temperature.
  5. Add three eggs to the chocolate/butter mixture and whisk until just combined. Add the remaining eggs and whisk until just combined. Add the vanilla and stir until combined. Do not over beat the batter at this stage or your brownies will be cakey.
  6. Sprinkle the flour/cocoa/salt mix over the chocolate. Using a spatula (DO NOT USE A WHISK) fold the dry into the wet until there is just a trace amount of the flour/cocoa mix visible.
  7. Pour the mixture into the pan and smooth the top with your spatula. Bake the brownies for 30 minutes (rotate the pan half-way through baking) and check to make sure the brownies are completely done by sticking a toothpick into the center of the pan. The brownies are done when the toothpick comes out with a few moist crumbs.
  8. Cool the brownies completely before cutting and serving.


Pie + Cake + Shake = Pake Shake

This is a personal note to everyone who came to Monday's Cake Vs. Pie Party. This crust-against-crumb was a star-studded event, and you have my greatest thanks (along with co-hosts Jenise and Edible Seattle) for coming. True, a PIE was declared best in show--but it was a rather fine specimen, so I can live with this.

But today I'm here to talk about the darker side of sampling 10 pies and 10 cakes in one evening: the massive pie-and-cake sugar hangover you're bound to have the next morning. How to deal with this unique sort of sugar shock to the system?

Hair of the dog that bit you, that's how. And my suggested medicine? The Pake Shake.

Equal parts pie, cake, and shake, this beauty is inspired by both the pake and the excess of Monday's indulgent evening of tasting pie and cakes. True, it may not be the most beautiful concoction, but it's good for what ails you, a sort of bloody mary equivalent for a sugar hangover.  Keep this idea on file for the next time you find yourself sampling 10 pies and 10 cakes in one night (it might be sooner than you think).

Pake Shake (Pie-and-Cake Shake)

Ingredients

  • 1 slice pie (I used the "Rhueberry", a lattice-topped rhubarb-blueberry pie made by Wendy Sykes)
  • 1 slice cake (I used a slice of mocha cake with chocolate buttercream made by Nazla Merce)
  • 2 large scoops vanilla ice cream
  • Cream or milk, to taste

Procedure 

  1. Combine all of the above ingredients in a blender. Blend until smooth, adding more milk or cream until it has reached your desired consistency.
  2. Pour into a glass, reflect on last night's revelry, and enjoy.


Cake Poll: Cupcake Tote Giveaway!

Win it!You know what's tote-ally awesome?

Winning a free cupcake tote, as seen in Sex and the City 2, that's what! And the totally sweet folks at Wedding Things, who have plenty of awesome cupcake gear, have kindly offered one up for a giveaway--along with a few packs of designer cupcake liners!

How do you enter yourself in the running? It's tote-ally (stop it, I know!) easy: just put your response to the below pressing cake question in the comments section!

Which is a better combination: chocolate cake with vanilla frosting, or vanilla cake with chocolate frosting?

US or Canadian entrants only, please. The cake poll will close one week from today, on Tuesday, August 17, at 12pm PST. The winner will be announced shortly after. Can't wait to see if you won? Shop for sweet stuff at Wedding Things!

Cake Byte: The Incredibly Awesome Art of Mike Geno at CakeSpy Shop!

Things I'm having a hard time with? First and foremost, wrapping my mind around the awesomeness that is Mike Geno's artwork. Second, believing that it's really here at CakeSpy Shop! 

These oil paintings are lovingly rendered on wood panels, and seem to channel the skill and style of another famous foodie painter, Wayne Thiebaud.

Now, I certainly can't afford a Thiebaud, but these Peeps might be within my price range:

Oh, and there are savory offerings too:

But even if you can't visit the shop, you can check it all out online here!

Sweet Love: A Bakery Crush on A La Mode Pies, Seattle

The time is Pie--er, high--to discover some delicious new pies in Seattle. 

I'm happy to share my newest discovery: A La Mode Pies, a new company which is currently running a fairly small operation, working on a custom order and wholesale basis in Seattle (as I learned from owner and "Pie Guy" Chris Porter, a retail location is the ultimate goal; for the moment, though, if you want to try it by the slice, the pies can be found most reliably at Knee High Stocking Co.)

Why are they worth seeking out? Well, for me, it comes down to one beautiful, beautiful phrase: "Chocolate-Caramel Pecan Tart". This beauty is described as a "gift to your sweet tooth"--comprised of bittersweet chocolate ganache lining an all-butter crust, which is then filled in with toasted pecans and a perfectly balanced, rich homemade caramel. 

Another lovely which has captured my attentions is the fetching "Chocolate Cream With Pretzel Crust", which sounds like the perfect unity of sweet and salty (and we all know how delicious chocolate and pretzel are together!).

And--OMG, cute!--they have LolliPies!

And of course, if you like, you know, health food, they also have fruit pies, including the signature "Blue Hawaiian" (blueberry, pineapple, and coconut) and seasonal variations such as Sour Cherry.

You can hit them up online to order entire pies, or you can visit Seattle's Knee High Stocking Co. to grab a slice today.

Chocolate Dream: Double Chocolate Ice Cream Pudding Pie for Serious Eats

Topping the list of things I'll never do again? Preparing instant pudding pie filling with cold milk. Why? Because as it turns out, it's far more delicious when you make it with melted ice cream.

And when you make it chocolate on both counts (pudding and ice cream), you'll be rewarded with possibly the most luxuriant chocolate cream pie filling you've ever tasted. The thick, velvety chocolate mixture falls somewhere between pudding pop and mousse in texture, which is so deeply, darkly, completely chocolaty in flavor that you won't want the slice to stop.

Note: As for the pie crust, the style used is up to you. I used a traditional butter pie crust, but you could easily swap it out for a graham cracker or cookie crust if desired.

For the recipe, visit Serious Eats!

Reading Is Totally Sweet: Honey-Yogurt Panna Cotta with Berries Recipe from Author Jenny Nelson

Eating is awesome, but what to do during those in-between meal times when you're not hungry? Work up an appetite by reading food-themed literature, that's what. Or at least that's what I do (when I'm not painting anthropomorphic pastries, of course).

So I was delighted to receive a review copy of Georgia's Kitchen, a novel wherein the namesake character is a New York chef who goes to Italy to find herself, both in a culinary and existential sense. The book is full of sensual descriptions of delicious food (hooray!). While there isn't a heavy dessert presence, happily I was able to catch up with author Jenny Nelson, who was able to answer the question: what type of dessert keeps authors inspired? Here's what she had to say about one of her favorite recipes, for Honey-Yogurt Panna Cotta:

Panna cotta, a deceptively simple Italian dessert that means, literally, cooked cream, is one of my favorite desserts to make, serve and – most important – eat! I serve it all the time -- at dinner parties, holidays and even as a weekday treat for my kids. It’s elegant, delicious and so, so easy to prepare. While tasty panna cotta recipes abound, this is one of my all-time favorites. You can make it even richer using all cream, but I opt for a more healthful 1 cup half and half, 1 cup whole milk. Either way, it’s delicious.

Honey-Yogurt Panna Cotta with Berries

Serves 8

  • 2 cups heavy cream (or 1 cup half and half, 1 cup whole milk; or 2 cups whole milk)
  • 1/4 cup sugar
  • 1/2 teaspoon vanilla extract
  • 1 envelope (1/4 ounce) unflavored gelatin
  • 1 cup plain low-fat yogurt
  • 1/2 cup honey, plus more for serving
  • 1/8 teaspoon salt
  • 2 cups mixed berries (blueberries, blackberries and raspberries are my favorites)

Procedure

  1. Place cream and sugar in a medium saucepan. Bring cream to a boil, stirring to dissolve sugar. Cover pan, remove from heat, and set aside steep, at least 10 minutes.
  2. Place 1/2 cup cold water in a small bowl, and sprinkle gelatin over water; set aside to soften, at least 5 minutes.
  3. In a large bowl, whisk yogurt, honey, vanilla and salt until combined; set aside.
  4. Return cream to a boil. Remove from heat, and immediately stir in softened gelatin until dissolved.
  5. Pour mixture through a fine-mesh sieve into yogurt-honey mixture; mix until combined.
  6. Divide mixture among eight 4- to 6-ounce ramekins. Chill until firm, at least 4 hours and up to 2 days.
  7. Wash berries and, if necessary, cut into bite-size pieces. Mix together and set aside 

Smart Cookie: Chocolate Chip Cookie Cupcakes

What's better than a chocolate chip cookie?

How 'bout a big, cakey version of it served in cupcake form and slathered with rich chocolate fudge frosting?

Say hello to your new favorite dessert mash-up: the chocolate chip cookie cake. This is a cupcake adaptation of the chocolate chip cake found in Warren Brown's United Cakes of America, and if I do say so myself, it's delicious: rich, buttery, and sweet, it has all of the elements that make the classic cookie great, and then gets even better with the addition of frosting. Yes! 

Here's the recipe.

Chocolate Chip Cookie Cupcakes

adapted from United Cakes of America

Wet ingredients:

  • 1/4 cup milk
  • 2 teaspoons vanilla extract
  • Dry ingredients:
  • 2 cups flour
  • 1 teaspoon baking powder
  • 1/2 teaspoon salt
  • 4 ounces chocolate chips, plus extra for garnish

Creaming ingredients

  • 1 stick butter
  • 1 1/4 cups granulated sugar
  • 3/4 cup brown sugar, packed
  • 1 whole egg
  • 1 egg yolk

For the icing:

  • 1 cup heavy cream
  • 1/4 cup superfine granulated sugar
  • 1 stick soft unsalted butter
  • 10 ounces bittersweet chocolate
  • 2 teaspoons vanilla extract

Procedure

  1. Preheat oven to 335 F. Place the rack in the middle position. Line 14 cupcake cups with liners (split them among two trays). Or, line two 9x2-inch round pans with parchment.
  2. Combine the wet ingredients in a bowl; combine the dry ingredients except for the chocolate chips in another. Set aside.
  3. Using a flexible spatula, toss two tablespoons of the wet ingredients with the chocolate chips in a small bowl. Add 1/4 cup of the dry ingredients. Toss again to coat evenly.
  4. Mix the butter and sugars in the bowl of a standing mixer with a paddle attachment until the combination is well creamed--about 3 minutes.
  5. Add the egg and yolk, one at a time.
  6. Alternately add the dry and wet mixtures, about a quarter each at a time, without pausing between additions. Ease the resistance against the mixer's paddle by lowdering the bowl or raising the mixer's head.
  7. Remove the bowl and fold in the chocolate chips with the flexible spatula, using the handle if necessary. This mixture will be thick--more like cookie dough than cake batter.
  8. Divide the dough into your prepared pans or cupcake cups. If you're using pans, it will be too thick to spread to the edges, but the oven's heat will spread it for you. If you're using cupcake cups, put a heaping spoonful (or ice cream scoop's worth) of batter in each cup.
  9. Bake for 20 to 24 minutes for a cake--for cupcakes, I found that about 30 minutes was more like it. The edges will crown slightly, and become crispy. The tops should be evenly browned.
  10. Cool the cakes in the pans to room temperature, then if you're making cakes, invert them, using a small offset spatula to release the edges; if you've made cupcakes, just remove them from the pan.
  11. Prepare chocolate icing.In a saucepan over medium heat, bring the cream and sugar to a light simmer, stirring occasionally. Place the butter, chocolate, and vanilla in a large bowl. Pour the hot cream over the ingredients in the bowl and let stand for a few minutes to melt the chocolate. Whisk until smooth and set aside to cool, but do not refrigerate. Once the icing has thickened, stir with a flexible spatula until it reaches a spreadable consistency. Choose your adventure on assembly in the next step.
  12. Spread either between cake layers, leaving the top bare or sprinkled with confectioners' sugar and chocolate chips; if you're making cupcakes, spread frosting on top, or remove cupcakes from cups, split in half and fill with frosting and top with confectioners' sugar and chocolate chips as in the case of the cake.

Gentlemen Prefer Blondies: Delicious Blondies from Oddfellows Cafe, Seattle

In Seattle, there is a place called Oddfellows, and it is classified as both a cafe and bar. What does that mean, exactly?

Well, basically it means that you can belly up to the bar and get a delicious bar cookie to go along with your beverage. And my newest obsession? The Oddfellows Blondie.

This butterscotch-chip and nut-studded bar cookie is a bit of brown sugary, buttery bliss--pleasingly dense without being leaden, assertively but not aggressively sweet, soft and chewy, but firm enough that it doesn't crumble. In fact, I'd go so far as to say that if there was a blondie to make brownie devotees question their allegiance, this might be it.

Oddfellows has a rotating selection in their bakery case; call first to ensure availability. But even if they don't have these, they're bound to have something good. You can find them at 1525 10th Avenue (b/t Pike and Pine), Seattle; online here.

Cake Byte: Prepare Yourself for the Sweetest Week Ever

Which team are you on?You'd better load up on Mimosa Brownies at brunch this weekend, 'cos you're gonna need your energy. Here's what's coming up at CakeSpy Shop this week!

First off, a thanks for the super-sweet shout-out on Seattle Picks: CakeSpy Shop was awarded the coveted #1 pick spot on the list this week! Super sweet!

All week long: pick up these totally sweet new Cupcake and Unicorn cards, and the Team Pie and Team Cake pins I had made up for the below event...

Monday, August 9: Cake Vs. Pie Party at CakeSpy Shop! A smackdown of the sweetest variety! Several bakers will be bringing pies and cakes, respectively, which will be judged by expert tasters and awarded on various criteria (texture, taste, crumb, etc). Prize donors include Art of the PieCupcake RoyaleEdible SeattleChef Shop & more!Though the event is no longer accepting bakers, tasters are welcome! Though the shop is usually not open on Mondays, this event will kick off at 7 pm. Come and get it, and shop for something sweet while you're at it! 415 E. Pine Street (near Summit), Seattle WA 98122.

Thursday, August 12: Open late for the Capitol Hill Art Walk! Like, OMG: awesome overload! You'll be treated to the sweet and savory oil paintings of Mike Geno, who may or may not be related to Wayne Thiebaud. The work will be up all August long, but on Thursday I'll stay open late and even make some cookies so that you can check it out in style. 415 E. Pine Street (near Summit), Seattle WA 98122--artwalk is 5-8 p.m. (or til you've spent all your money on awesome art)

Saturday, August 14: CCE! The Conference for Creative Entrepreneurs will be taking place August 13-15, and I'll be moderating a panel on Guerilla Marketing for Small Business on Saturday! I will be joined by awesome panelists Nicole of Immortal Dog, Diane of Street Treats, and Becky of Sunday Drive Designs!

Here's to a sweet week!

Sweet Art: A Series of Custom Paintings for the Staff of Cake Central Magazine!

So, if you are an avid cake-baker, chances are you've heard of a little publication and website called Cake Central.

Wait, who are we kidding--of course you have! It's like, kind of a big deal in the cake world. And not only have I had the good fortune to have been featured in their magazine--but now I have the extreme pleasure of saying that I have supplied artwork for the offices of several staffers!

Yup: I was commissioned to do custom artwork for several of the Cake Central employees--for each employee, I was given a brief description and full creative license to create a unique piece for each.

I did one for Jackie, the editor, who loves all things girly (shown top);

one for Leanne, cake maker and decorator extraordinaire;

one for Heath, avid follower of baseball and lover of all things Tiki;

one for Jackie T., a cake-loving fitness buff (I know, study in contrasts, right?);

one for Andy, a card playin' fella;

one for Misty, a photographer;

and one for Deanna, who loves Diet Coke, her pets, and music.

It was possibly the most fun custom job ever--and what a thrill to be hired by such a big deal in the cake world!

Check out Cake Central's website for more awesomeness. Oh, and, like, follow them on Twitter.

Baker's Dozen: A Batch of Sweet Links

Are you a geek? Are you an Apple lover? Do you love cake? This one's for you.

If you've known and loved Salted Caramel...say hello to your newest friend, Salted Butterscotch Cookies

Chocolate Peanut Butter Cup S'mores Blondies: Yes, yes, a thousand times, yes.

Sugar sweet: a breakdown of various types of sweeteners and what, exactly, they are.

Mennonite Moms can cook: Soft white cookies with frosting sound pretty amazing.

Did you know you can make Drake's Cakes Funny Bones at home? Here's a review of how, and whether it's worth the time.

Did this ever catch on? Cactus and chicken wing ice cream.

How to make cookie cutters at home!

Good for Brownies at Brunch Month: the "Breakfast Witch" by Fat Witch Brownies.

Eat your veggies: Zucchini whoopie pies!

Speaking of zucchini, have you ever considered it as a delicious addition to Rocky Road Bars?

Taste the rainbow: I don't know why I'm so attracted to these mini gelato spoons, but I am.

Sweet memories: remember these Rolling Scones?

Pie in the Sky: Blueberry Pie Recipe from Macrina Bakery

What with Monday's Pie Vs. Cake Showdown coming up, I was pretty excited to discover that this month's newsletter from Macrina Bakery included a blueberry pie recipe! Yielding a not-too-sweet filling with a very buttery crust, this one might just be prize material!

As they put it in the newsletter, "Few things in life are as wonderful as homemade blueberry pie. It is heaven on earth! I recommend using slightly tart organic blueberries whenever possible."

Photo credit: Macrina Bakery

Classic Blueberry Pie

Makes one double-crust 9-inch pie

Ingredients

  • 7 cups (3-1/2 pints) organic blueberries
  • 3/4 cup granulated sugar
  • 1/4 cup light brown sugar
  • 2 teaspoons freshly grated lemon zest
  • 1 teaspoon cinnamon
  • 1 teaspoon pure vanilla extract
  • 3 tablespoons unbleached all-purpose flour
  • 1/2 recipe Flaky Pie Dough (see recipe), chilled
  • 1 tablespoon unsalted butter, cut into small pieces
  • Egg wash made with 1 egg and 1 teaspoon water
  • Coarse raw sugar
  • Vanilla ice cream, for serving

Procedure

  1. Sort through the blueberries, removing any stems and leaves. Gently rinse the berries and lay them out on paper towels to air dry.
  2. Combine 3-1/2 cups of the blueberries, granulated sugar, brown sugar, lemon zest, cinnamon, vanilla extract and flour in a medium saucepan. Mix with a spoon. Cook over medium heat until the fruit juices have been released and the mixture has thickened, 5 to 8 minutes, stirring frequently to keep the mixture from burning. Pour the cooked fruit into a large stainless steel bowl and add the remaining blueberries. Stir with a spoon and set aside until the fruit has cooled to room temperature.
  3. Divide the chilled pie dough into 2 pieces, making one piece slightly larger than the other. Coat your hands with flour and shape the larger piece of dough into a ball. Working on a floured surface, flatten the ball slightly, then roll it into a 12-inch circle, about 1/8-inch thick. Fit the rolled dough into a 9-inch pie pan. Trim the edges of the dough to leave a 1-inch overhang around the pan. Roll out the remaining piece of dough 1/8-inch thick and trim it into a 10-inch circle. Set aside. This will be the top crust.
  4. Pour the cooled fruit into the pie shell and dot with butter. Brush the top side of the overhanging dough with a little egg wash. Lift the top crust onto the pie, folding it in half to make it easier to accurately position. Lift the overhanging dough onto the top crust and crimp with your fingers. Mark the crimped edges with a fork, then brush all of the crust with egg wash. Sprinkle with coarse raw sugar and chill in the refrigerator for at least 30 minutes.
  5. Preheat oven to 375 degrees F. Line rimmed baking sheet with parchment paper.
  6. Place the pie on the prepared baking sheet. Using a sharp knife cut 4 slits in the center of the crust. Bake pie for 50 to 55 minutes. The crust will be golden brown and the fruit will be bubbling in the center of the pie. Let cool for 30 to 40 minutes. Serve with vanilla ice cream.

Cake Byte: Two Flavors of the Month at Cupcake Royale

In case you had any doubt about August being the sweetest month ever, well, here's proof:

Cupcake Royale has not one, but two flavors of the month.

Raspberry Lemonade, on the one hand, sounds refreshing, and the perfect mix of sweet and slightly tart.

But if excess and rich chocolatiness are your thing (they're mine), go for the Cherry Chocolate Almond--a triple threat of awesome. 

Both flavors will be available all August long at the four Cupcake Royale locations; for directions and contact info, visit www.cupcakeroyale.com. Of course, you can keep up to date with their goings-on at legalizefrostitution.blogspot.com and via Twitter.

Sweet n Sour: Old Fashioned Sour Cream Cookies Recipe

There are many moments in life to enjoy over-the-top desserts (seriously--just read the responses in the "what would your last-meal dessert be?" giveaway).

But sometimes, you just need a good old-fashioned cookie. Or, as Betty Crocker of the 60's would say, a cooky.

After all, Betty Crocker's Cooky Book is where I found this understated gem of a recipe for Old Fashioned Sour Cream Cookies. It's listed in the "Heritage Cookies" section of the book, which is where you'll find, as I think of them, the frumpy forefathers of today's cookies. I don't mean this as an insult--I simply mean that while they're not the sexiest-looking cookies, they're substantial enough in flavor that it's no secret why these recipes have stuck around through the years.

This particular recipe yields a cookie that is lightly tangy, and yet somehow fluffy without being "light"--they have a compelling flavor which keeps bringing you back for more. And with a sprinkling of sugar on top, they have a satisfying crunch, too.

Old-Fashioned Sour Cream Cookies

Ingredients

  • 1/2 cup butter
  • 1 cup sugar
  • 1 egg
  • 1 teaspoon vanilla
  • 2 2/3 cups flour
  • 1 teaspoon baking powder
  • 1/2 teaspoon baking soda
  • 1/2 teaspoon salt
  • 1/4 teaspoon nutmeg
  • 1/2 cup sour cream

Procedure

  1. Heat oven to 425 F.
  2. Mix butter, sugar, egg, and vanilla thoroughly. 
  3. Sift the dry ingredients together; add to the sugar mixture alternately with the sour cream.
  4. The original recipe suggests rolling the dough out, but I simply pinched off pieces and rolled them into approximately 1 1/2-inch diameter balls and placed them on the baking sheet, about 2 inches apart. 
  5. Place on a greased (or parchment-lined) baking sheet. Sprinkle with sugar.
  6. Bake 8-10 minutes, or until lightly browned on the sides. Makes about 36-48 cookies.

Sweet Art: Poster Design for CupcakeCamp DC!

What's the sweetest thing going on in DC?

CupcakeCamp DC, naturally! The festival of cupcake awesomeness (which I can attest to, because I attended the Seattle CupcakeCamp!) will be taking place in our Nation's Capitol on September 18th--that's a mere 45 days away, thanks to the counter on their website!

And adding to all that sweetness? They'll be using the above illustration for posters and promotion! Because hip cupcakes riding the metro in DC is totally...well, you know.

For more information, visit the CupcakeCamp DC website!

Ask CakeSpy: Shrinking Cupcakes?

Dear CakeSpy,

I have a technical question for you.  I tried making cupcakes from a Billy's Bakery recipe I found online and the cupcakes separated from the liners. Any idea why this happens?

-Shrinking in NY

P.S. Here's the recipe:

Billy's Bakery Cupcakes

  • 1 3/4 cups cake flour, not self-rising
  • 1 1/4 cups unbleached all-purpose flour
  • 2 cups sugar
  • 1 tablespoon baking powder
  • 3/4 teaspoon salt
  • 1 cup (2 sticks) unsalted butter, cut into 1-inch cubes
  • 4 large eggs
  • 1 cup whole milk
  • 1 teaspoon pure vanilla extract

Procedure

  1. Preheat oven to 325 degrees. Line cupcake pans with paper liners; set aside. In the bowl of an electric mixer fitted with the paddle attachment, combine flours, sugar, baking powder, and salt; mix on low speed until combined. Add butter, mixing until just coated with flour.
  2. In a large glass measuring cup, whisk together eggs, milk, and vanilla. With mixer on medium speed, add wet ingredients in 3 parts, scraping down sides of bowl before each addition; beat until ingredients are incorporated but do not overbeat.
  3. Divide batter evenly among liners, filling about 2/3 full. Bake, rotating pan halfway through, until a cake tester inserted in the center comes out clean, 17 to 20 minutes.
  4. Transfer to a wire rack to cool completely. Repeat process with remaining batter. Once cupcakes have cooled, use a small offset spatula to frost tops of each cupcake. Decorate with sprinkles, if desired. Serve at room temperature.

Dear Shrinking,

It's true: not all cups runneth over. But I must confess, and I promise I am not saying this in a "I'm such a great baker" sort of way--I've never actually had it happen, so I wasn't quite sure what might be the cause. Happily, I was able to consult the world's most reliable information source--Twitter, natch!--about the subject, and received many ideas as to what might be the cause.

One thing which several respondents mentioned was humidity as a shrinking factor: it being that you were baking in the summer, in NY, it could be as simple as blaming it on the weather!

Another widely accepted response was that the shrinkage could be due to over-greasing cupcake papers, which can cause separation (even more so depending on the type of paper used).

However I also received some other interesting responses:

As Bakelab, a Los Angeles-based retail bakery and baking school informed, this can often be because of a high amount of sugar in the recipe--and while 2 cups is certainly normal in cupcake recipes, it is a pretty substantial amount. A friend once told me that the sugar in recipes can generally be reduced by up to 1/4 cup without sacrificing the structure of a baked good--she might have been lying to me, but I'm just passing on what I've been told.

Ryan's Baking Blog also pointed me toward this posting on the subject, which notes that often, shrinkage can occur when the cakes are overbaked, but that other culprits may be too little mixture in the pan, over-greased trays, over-beating your batter, or too much liquid.

Unfortunately, all of this doesn't add up to one easy explanation, but it may give you some ideas for next time! Of course, if the cupcakes still tasted good, I say shrink away, since I'm gonna take the wrapper off anyway.

If anyone else has ideas as to what might have caused this to occur, please leave a comment!