
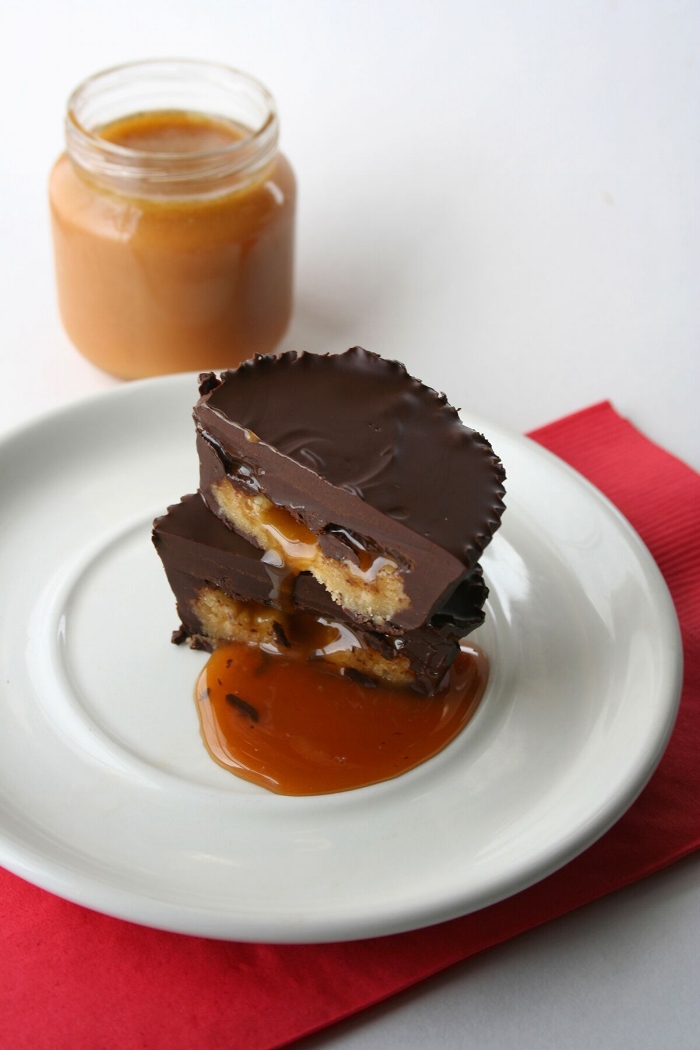
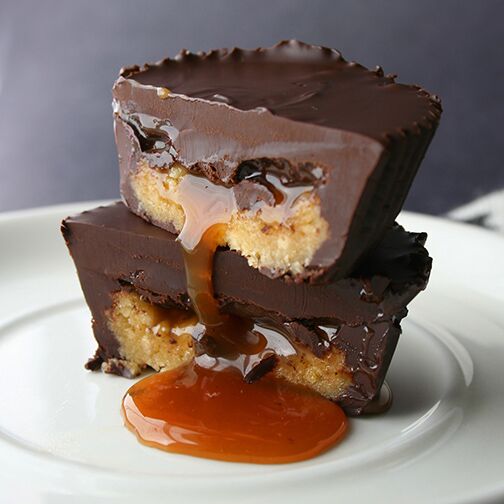
Peanut butter. Pretzels. Caramel. Chocolate. Four foods which are fantastic all on their own, but as it turns out, better together. Inspired by Chubby Hubby ice cream's flavor combo, these dessert cups feature a peanut butter, pretzel, and cookie crumb base. It's topped with caramel sauce. Then, the whole darn thing is coated in chocolate.
Seriously, OMG.

One taste of these sweet-and-salty cups, which ooze caramel when bitten into, and you’ll be hooked.
Peanut Butter & Pretzel Caramel Chocolate Dessert Cups
Prep time: 30 minutes
Cook time: N/A
Yield: 6 cups
For the base
- 1/2 cup finely crumbled vanilla wafer cookies
- 2 tablespoons crushed pretzels (about 6-8 small)
- 1 tablespoon creamy peanut butter
- 1/2 tablespoon melted butter
For the filling
- 2/3 cup prepared caramel sauce, chilled slightly
For the coating
- 2 bars (3.5 ounces each) good quality chocolate, coarsely chopped
- 2 tablespoons unsalted butter
Place 6 cupcake liners in a cupcake tin. Set to the side.
In a large bowl, combine the crumbled cookies, pretzels, peanut butter, and melted butter. Stir with a wooden spoon (or use your impeccably clean hands) to combine until the mixture is cohesive. It may be slightly sticky. Set to the side.
Make the coating. In a double boiler, or in the microwave, melt the chopped chocolate and butter together. Once mostly melted, remove from heat and stir; any residual bits should melt as you stir.
Spoon about 1 tablespoon of the chocolate mixture into each of the cupcake liners. Using either a spoon or a pastry brush, spread the chocolate along the bottom of the liners and about halfway up the sides. Place the tin in the refrigerator for about 10 minutes, so that the chocolate can slightly “set” before you proceed.
Once the chocolate has set slightly (it doesn’t need to be completely firm), remove the tin from the refrigerator. Spoon about 1 tablespoon of the cookie mixture into each cup. Gently press the cookie mixture to slightly flatten it, and using your thumb or the back of the spoon, create an indent in the center of the cookie layer in each cup.
Spoon about 1 tablespoon of the caramel sauce on top of the cookie base in each cup, making sure that the caramel remains slightly below the level of the chocolate sides along the walls of the cup.
Divide the remaining melted chocolate among the cups, pouring it on top of the caramel mixture and gently (so as not to expose the caramel beneath the chocolate) spread to ensure that the chocolate covers the entire top of each cup.
Place the tin back in the refrigerator for at least 30 minutes so that the cookie bar cups can set.
Once set completely, serve at room temperature. Store leftovers in the refrigerator.