Pâté au Chocolat

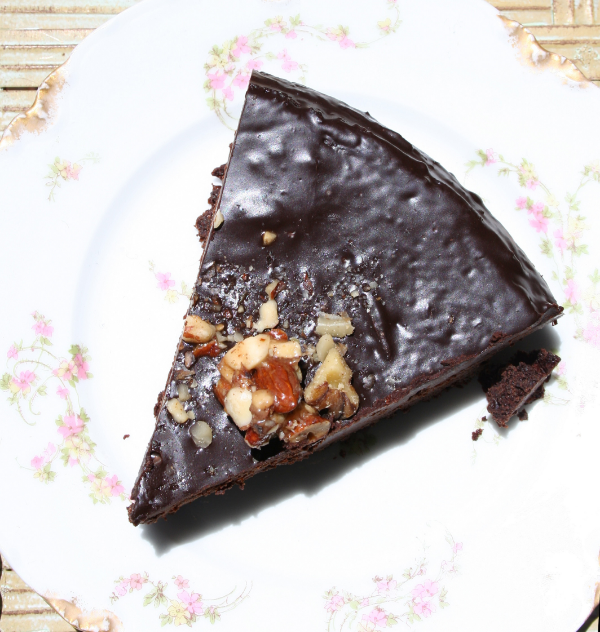
Why would I call such an easy to make dessert Pâté au Chocolat? Not because it's a crazy concoction featuring foie gras. I gave it this name because while it's actually quite easy to make, it tastes (and looks) fancy

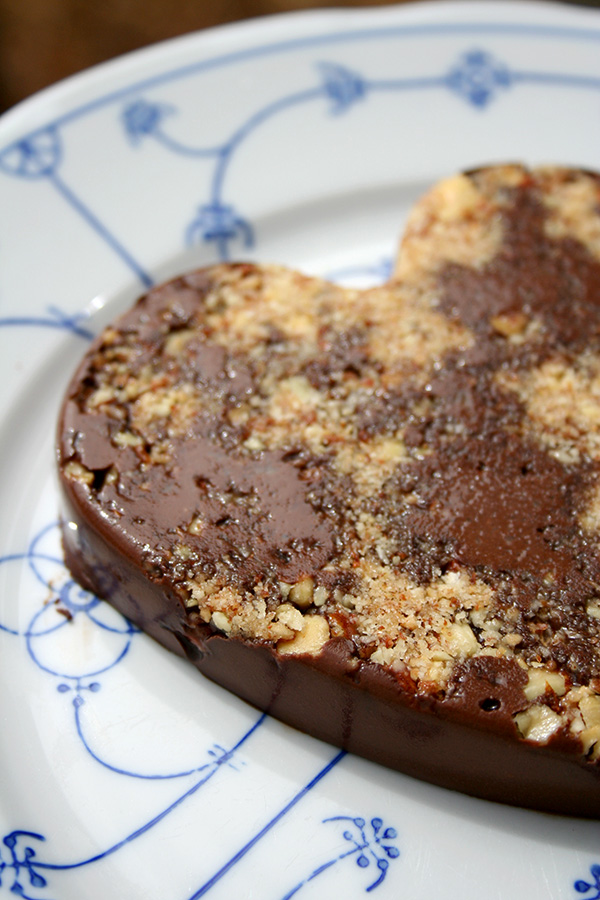
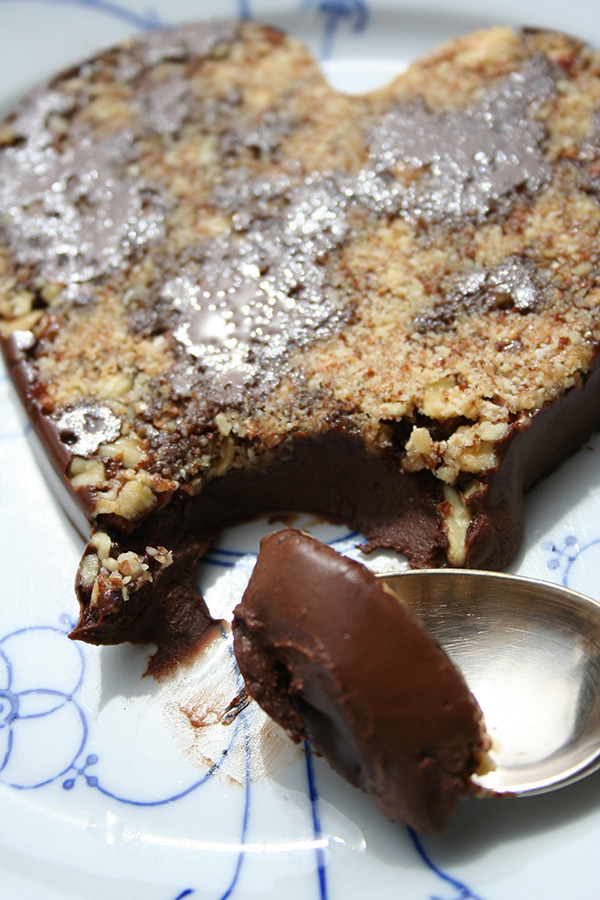
I felt that it deserved a name as fancy as its flavor. Plus, the texture is actually pâté-like: dense, creamy, and incredibly flavorful. 

Here's some other stuff I think you should know about this dessert.

1. I made it up.

Maybe there's a thing called Pâté au Chocolat, but I don't know about it. I didn't google it, so as far as I am concerned, I invented this thing and will put my hands over my hears and say lalalala if you try to say otherwise.

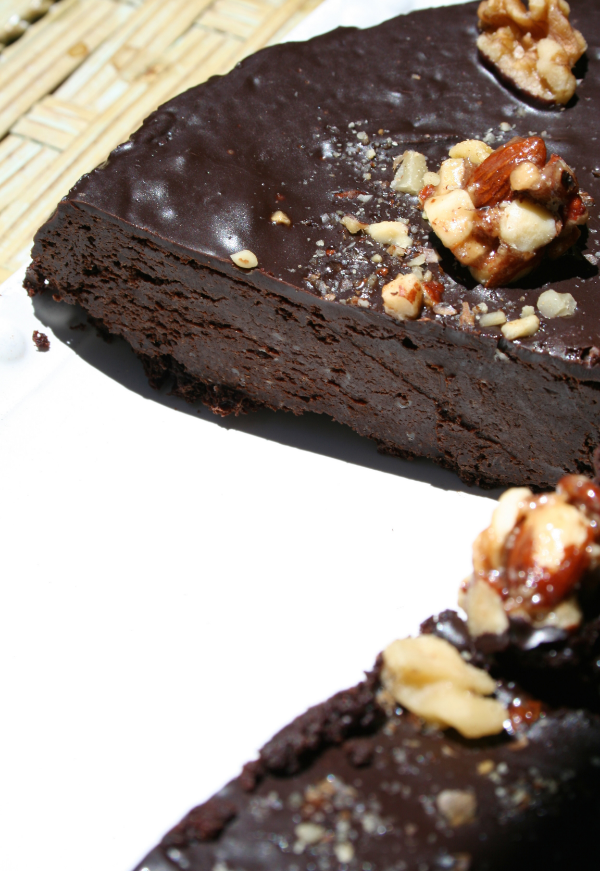
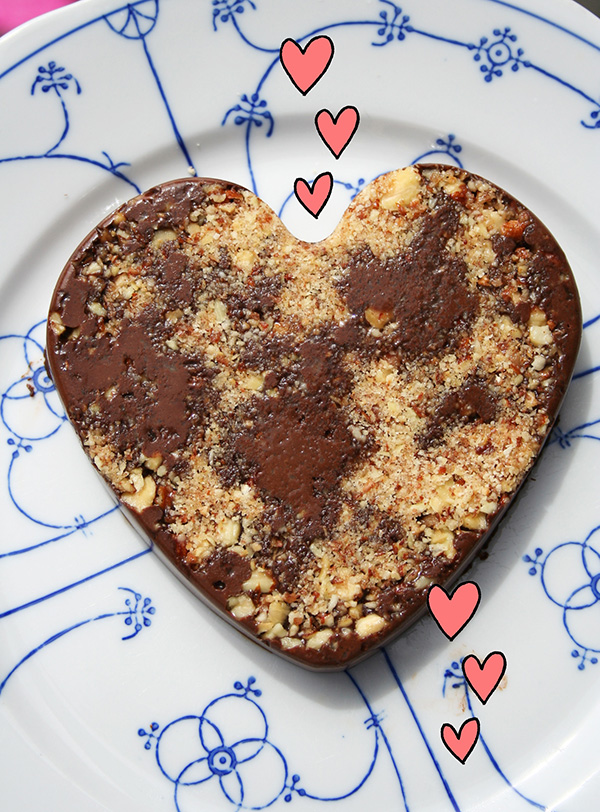
2. If you identify as "chocoholic", you will love this cake.

It's a little lighter than pure ganache but heavier than a slice of flourless chocolate cake. Flavor-wise, it melds the best of both, with a little ooh la la from a dollop of sour cream. A little would probably do you, but in my house, it was two servings and they were devoured with no complaints that the serving was too big. 

3. Its flavor will improve in direct correlation with the quality of the chocolate you use. 

Use the good stuff here. OK? 

4. It's easy to make.

I know I already said it, but it bears repeating. This dessert is easy to make. And tastes fancy! Make it for your next get together. 

Pâté au Chocolat

Makes two, or four - printable recipe here.

  • 1 cup toasted nuts, coarsely chopped
  • 5 ounces good quality dark chocolate 
  • 1/2 cup half and half
  • 2 tablespoons butter
  • 1 1/2 tablespoons sour cream
  • 1 teaspoon vanilla extract 
  • 1 teaspoon salt
  • 2 silicone molds (I used two heart shaped molds with a 1 cup capacity) or 4 cupcake liners

Grab your silicone molds or cupcake liners. Divide the nuts evenly between them.

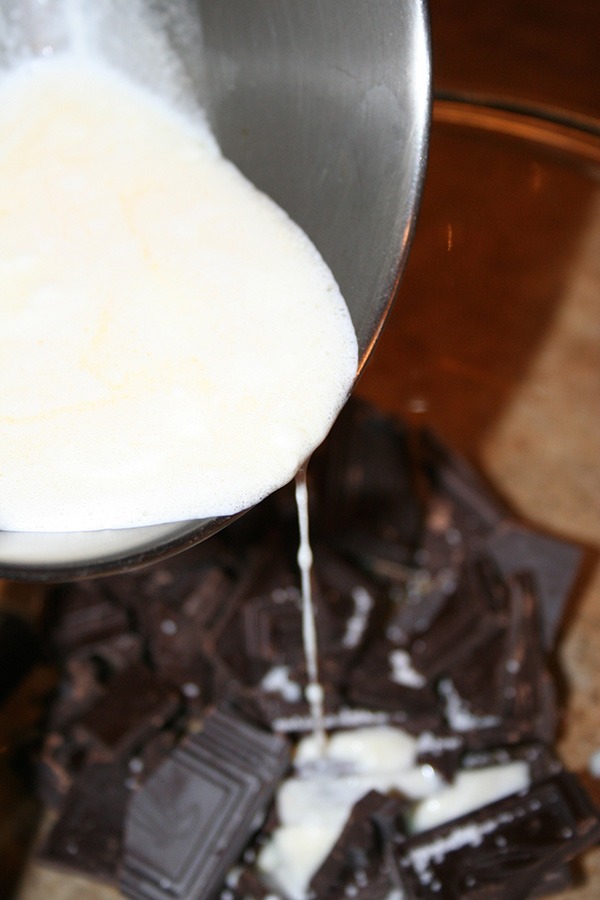
Place the chocolate in a heatproof bowl. Set to the side. 

In a medium saucepan, combine the half and half, butter, and sour cream. Heat over low heat until the mixture comes to a simmer. 

Remove the cream mixture from heat, and stir in the vanilla and salt. Pour the hot cream mixture over the chocolate. Stir until it becomes a cohesive mixture.

Pour in the cups with the nuts. Transfer to the fridge and let set for an hour or so, or in the freezer for less. This can vary depending on the heat and humidity - for instance, last night it was really hot here so I had to put them in the freezer to set. 

Invert from molds, and enjoy. 


Have you ever made a molded chocolate dessert?

What Happens When You Make Hawaiian Rolls with Mountain Dew?

Guess what I did, you guys. Well, if you guessed "made Hawaiian rolls with mountain dew", you're right.

If you aren't familiar with Hawaiian rolls, let me briefly educate you. These are a puffy, egg-enriched, sweetened type of roll. They're squishy, and vaguely brioche-like in texture.

They're most famously sold in grocery stores, in a plastic bag, under the label "King's Hawaiian Sweet Rolls".

These rolls are oddly addictive. They can go sweet or savory, and are equally great for sliders as they are as an ingredient in bread pudding. 

When I found a recipe for a homemade hack on King Arthur Flour's website, I got super excited...until I realized that I had no pineapple juice.

The idea of going to the store seriously bummed me out. I had baking mojo now! No interruptions!

So I looked around for something else to use, and my gaze settled on a can of Mountain Dew. It had been living in the fridge for quite some time--my other half sometimes indulges in the stuff along with popcorn while watching movies. 

Well, it had been there long enough.

I was going to do the dew...in my dough. 

dewandsugar.jpg

Other than the Dew, I stayed pretty true to the recipe. And here's how they came out:

Awwww, girl. Awwww, yeah. These rolls came out delicious!

Actually, the Mountain Dew mellowed out during the baking process, and gave the rolls a fascinating flavor. I have since made the traditional version of the rolls, with pineapple juice, for a post on Craftsy.com. Visually they were pretty much identical, but between you and me, I actually think that the Dew ones tasted better. They had a lightly sweet flavor, but something in the carbonation or the sugar in the soda condensed into a slightly malty, sweet flavor in the Mountain Dew batch of rolls. 

The rolls tasted fantastic with a pat of butter, just out of the oven, but they were similarly delicious when lightly toasted and used to make mini chicken salad sandwiches later that day. They were also great for breakfast the next morning, served alongside eggs and bacon and with some butter and maple syrup. What versatile rolls! Who knew that Dew could do this?

Honestly, I consider these a great success. Who knew? Mountain dew in bread rolls = a very good thing. 

Bread made with Mountain Dew? Why not?

rolls5a.jpg


Mountain Dew Hawaiian Bread Rolls

Printable version here

Adapted from King Arthur Flour  

Makes 16 rolls

For the sponge

  • 1/4 cup all purpose flour
  • 1 tablespoon yeast
  • 2 tablespoons lukewarm water

For the dough

  • 1/2 cup Mountain Dew
  • 1/4 cup (4 tablespoons) unsalted butter, softened
  • 1/3 cup brown sugar
  • 2 large eggs, plus 1 egg yolk; reserve the egg white
  • 1 teaspoon vanilla extract
  • 2 3/4 cups all purpose flour
  • 1 1/2 tablespoons corn starch
  • 1 teaspoon salt
  1. Prepare the “sponge”. In the bowl of your stand mixer, combine all of the sponge ingredients. Let them rest for 15 minutes.
  2. Add the Mountain dew, butter, brown sugar, eggs and yolk, and vanilla, mixing until combined.
  3. In a separate bow, sift together the remaining flour, starch, and salt. Add the dry mixture to the liquid ingredients in the stand mixer bowl.
  4. Begin to mix the ingredients using the paddle attachment. The mixture will start out quite sticky. Once the ingredients have come together, continue to mix and knead until the mixture becomes smooth and elastic. You can continue with the paddle attachment or switch to the dough hook. (Author’s note: I do not have a dough hook so I used the paddle attachment for 5 minutes to knead, pausing and scraping the dough that might have stuck to the bottom of the bowl and the paddle attachment a few times during the process.).
  5. Lift the dough out of the bowl for a moment. Lightly grease the bottom of the mixing bowl, form the dough into a ball, and place it back in the bowl. Cover, and let rise until puffy, about 2 hours.
  6. Grease a 9″ x 13″ pan. Gently, deflate the dough. Divide it into 16 equal pieces, by dividing in half, then in halves again, until you have 16 equal pieces.
  7. Form each piece into a smooth ball, with the seam, if any, facing down. Space the buns in the pan (two rows of 5, and one of 6).
  8. Cover the dough with plastic wrap. Let the dough rise in the pan for 1 hour, until it’s nicely puffy. Toward the end of the rising time, preheat the oven to 350 degrees F.
  9. Mix the reserved egg white with about 1 tablespoon of water, and brush over the tops of the rolls. This will give them a shiny finish.
  10. Bake the rolls for 20 to 25 minutes, or until golden on top.
  11. Remove the rolls from the oven, and place the pan on a wire rack. Let cool for several minutes, then remove from the pan to serve warm.

Have you ever used Mountain Dew in baking?

Easy Chocolate Pistachio Coconut Oil Truffles

Not so long ago, I was invited to a potluck which was attended 100% by yogis. Now, in case you've never been to such a potluck, when baking for yoga people, it's often important to make dishes that are vegan, gluten free, and/or raw. I know.

But I wanted them to be eaten, not just become the subject of a conversation about food allergies and what people don't eat, so I went down that virtuous road. 

Well, these truffles aren't raw because I'm pretty sure the temperature I used to melt the chocolate exceeded their cap of 118 degrees F. But they are vegan and gluten-free, and they're freaking delicious. 

They're SO chocolatey, I don't even know if "chocolatey" does the trick. It's like you're eating the pure essence of chocolate. They're rich, and so smooth with the coconut oil. They taste way more decadent than they actually are!

A simple recipe for a why-is-everything-so-hard monday. Just keep in mind, the coconut oil in these truffles make them pretty sensitive to heat, so keep them in the fridge if it's hot out!

Chocolate pistachio coconut oil truffles

Makes 12 or so - printable version here

  • 1 bar (3.5 ounces) Good quality dark chocolate
  • 1/4 cup cocoa powder
  • 2 tablespoons coconut oil
  • 1/3 cup salted pistachios, crushed

Procedure

Melt together the chocolate, cocoa powder, and coconut oil in a double boiler. Once melted, remove from heat and stir in the pistachios. Let the mixture cool for 20 minutes or so in the fridge, or until solid enough to roll into balls. Don't let it chill out for too long or it will set.  

Roll into balls. Dust with cocoa powder or roll in shredded coconut if desired. 

Keep chilled until ready to serve. They can get messy if they get too warm (but still so good). Please, don't mind the remnant of blue nail polish on my thumb, I promise that's all it is, not something weird. 


Have you ever made vegan truffles?

Chocolate Almond Cupcakes with Dark Chocolate and Almond Butter Frosting

I'll tell you what I want, what I really really want. To share this recipe with the world!

So, there's this cool new book out called Sweet, Savory, and Sometimes Boozy Cupcakes by Alison Riede. And it's full of creative cupcake flavors for a grown-up palate. 

This recipe in particular caught my eye, because:

1. Chocolate.

2. Dark chocolate frosting.

3. Almond butter.

Seriously, what else do you need? Here's what the author has to say about this recipe:

I remember the day I got hooked on almond butter. I was training for a half-marathon, and I didn’t have any food in the house for a pre-race snack, so I stopped by a local market and bought a small container of almond butter and a package of English muffins. Not only was it a tasty treat, but I had one of the best runs ever that morning. It wasn’t long after then that I created my almond butter frosting.

What are you waiting for? Get baking. This recipe was reprinted with permission from Sweet, Savory, and Sometimes Boozy Cupcakes.

Chocolate Almond Cupcakes with Dark Chocolate and Almond Butter Frosting  

Sweet, Savory, and Sometimes Boozy Cupcakes

⅓ cup olive oil
¾ cup granulated sugar
½ cup whole milk
½ cup sour cream
1½ teaspoons almond extract
¾ cup all-purpose flour
¼ cup self-rising flour
⅓ cup cocoa powder
1 teaspoon baking soda
½ teaspoon baking powder
½ teaspoon salt
1 cup sliced almonds

Preheat the oven to 350°F. Line a standard cupcake tin with 12 paper liners.

Using a stand or hand mixer, cream together the oil and sugar on medium speed in a large bowl. 

Reduce speed to low and add milk, sour cream, and almond extract. 

In a separate bowl, combine flours, cocoa powder, baking soda, baking powder, and salt. Slowly add dry ingredients to wet ingredients, and mix on medium speed until smooth, about 2 minutes. 

Slowly add sliced almonds and mix on medium speed for 1 minute, or until combined. 

Using a large spoon, fill the cupcake liners three-quarters full and bake for 18 to 20 minutes, or until a toothpick inserted in the center comes out clean. Let cool for 20 minutes. 

Dark Chocolate Frosting

½ cup butter, softened
2½ cups powdered sugar
¼ cup heavy whipping cream
¼ cup cocoa powder

With a hand or stand mixer, beat softened butter on medium speed for 3 minutes.

Slowly add half of the powdered sugar and beat on low for 1 minute.

Add heavy whipping cream and cocoa powder and beat for another minute, until combined.

Slowly add the rest of the powdered sugar and gradually increase the speed to high. Beat for 3 minutes, until fluffy.

Almond Butter Frosting

¼ cup butter
1 ounce (about 2 tablespoons) cream cheese
1 cup powdered sugar
¼ cup creamy almond butter
¼ cup whole or slivered almonds, for garnish

With a hand or stand mixer, beat softened butter and cream cheese on medium speed for 3 minutes.

Slowly add half of the powdered sugar and beat on low for 1 minute.

Add almond butter and beat for another minute, until combined.

Slowly add the rest of the powdered sugar and gradually increase the speed to high. Beat for 3 minutes, until fluffy. 

To Assemble Cupcakes

Gently pipe each cupcake with Dark Chocolate Frosting. On top of that, gently pipe a dollop of Almond Butter Frosting. Garnish with a sprinkle of whole or slivered almonds on each cupcake.

Do you like almond butter?

What Happens When You Make Jell-O with Evaporated Milk?

Can you make jell-o with evaporated milk? Friends, it's possible that you've never wondered about this question. But I did for you, and I can also supply an answer. This happens: 

I know! It looks legit, right? When I put a picture of it on Instagram and had people guess what it was, their guesses included avocado ice cream and matcha pudding. I was pleased that they thought so highly of me and the picture, but in truth, the actual ingredients were far more humble:

All I did was pour the jell-o powder in a heatproof bowl, heat the can of evaporated milk until it simmered, then poured the hot milk over the powder.

I stirred it briefly, poured it into a clean plate (I used a pie plate) and then put it in the fridge for several hours to set. 

It came out looking like this.

It scooped like this.

And it tasted....well, I will tell you, it tasted way classier than it should, considering the ingredients, one of which was canned, the other boxed, and that was all. It almost tasted like a key lime pie filling. You know, not necessarily a fresh key lime pie, but the type that you might buy in the freezer aisle. Maybe not the freshest and definitely far from farm-to-table, but surprisingly serviceable as a dessert course.

Hey, want to give it a try? Here's how you do it.

Jell-o made with evaporated milk

Printable recipe here

  • 1 box of lime jell-o (the smaller, 3 ounce or so size)
  • 1 can (14 ounces) evaporated milk
  1. Pour the jell-o powder into a heatproof bowl. Set to the side.
  2. In a saucepan, bring the evaporated milk to the simmering point over medium-low heat. Once it simmers, remove from heat and pour over the jell-o powder.
  3. Using a whisk, stir until everything is combined.
  4. Pour the mixture into a heat and cold-proof bowl. Transfer to the fridge, and let it set for several hours or overnight.
  5. Enjoy!

Have you ever made jell-o with anything other than water?

Because I Like Blondies Better than Brownies

I love brownies...but I love blondies better.

And these ones, with a slightly chewy, moist interior, gently crisped golden top, and rich, caramelly-buttery-brown-sugar-vanilla-y with a touch of salt flavor, are highly craveable. 

Don't get me wrong. I don't hate brownies. In fact, quite the opposite. If you hand me a dense, fudge-like brownie, I will be your friend for a good long time. There are some moments when only a brownie will satisfy your needs.

But if I were pressed to make a choice to have one or the other only for the rest of my life...I'd choose blondies over brownies.

What is it about blondies?

Maybe it's the texture: just chewy enough to provide a little resistance when you take a bite, to keep things interesting. Not too cakey, but definitely not a cookie. 

Maybe it's the color: blondies do have an awfully alluring toasty, honey-colored hue. 

Maybe it's the fact that the milder flavor lets the flavor of nuts really shine, whereas they can get lost under the powerful chocolate flavor of brownies.

Or maybe it's the flavor: each bite with flavor undertones of butterscotch, graham crackers, sweetened condensed milk, caramel, and shortbread, even though blondies contain none of these things. Maybe it's how the subtle flavor fills your mouth with sweet with a touch of salt flavor, and makes you want more and more and more.

Maybe it's all of these things. Probably.

But honestly, while I can get very thoughtful about the whole thing, I'd rather just eat some blondies. This is a particularly nice recipe, adapted from the Whole Foods Market Cookbook.  


These blondies rule

Makes one 9-inch square pan - printable version here

3/4 cup chopped pecans
1 1/2 cups flour
1/2 teaspoon salt
3/4 cup (1 1/2 sticks) butter, softened
1 1/3 cups packed light brown sugar
2 eggs
1 1/2 teaspoons vanilla extract

Procedure

Preheat the oven to 350°F.

Place the pecan pieces on a baking sheet, and roast them until they are nicely toasted, 4 to 6 minutes. I do this as the oven preheats; if you smell the fragrance of the nuts, they're ready. Once toasted, remove from the oven and set to the side for the moment.

Generously grease a 9-inch square cake pan, and insert a strip of parchment paper (I do this so I have "handles" to lift the bars out later).

In a medium bowl, stir the flour and salt to blend.

In the bowl of a stand mixer, cream the butter and brown sugar until fluffy (2-3 minutes on medium speed). Add the eggs, one at a time, mixing after each addition. Stir in the vanilla extract. 

Remove the bowl from the mixer, and stir the flour in by hand. Fold in the toasted and cooled nuts. 

Spread the thick mixture in your prepared pan. Bake for 35-40 minutes, or until golden and just set in the center. 

Remove from the oven, and let cool for several minutes. If you've added that little handle I told you about, you can pull out the blondies in one solid unit.

Enjoy!

Do you prefer blondies or brownies?

Grilled Peanut Butter Pound Cake

How about, for the 4th of July, you do this: eat grilled peanut butter pound cake. It's easy to to, and I can prove it.

First, you make a peanut butter pound cake. Then, you cut it in slices and grill them.

Then, you top them with ice cream and berries.

Then, you eat your fill and feel superior to everyone else in the world who isn't eating this ambrosial treat at this instant.

Learn how to make this happen: full recipe here!

Whole Foods' Flourless Chocolate Cake With Dark Chocolate Glaze

There isn't much I love more than spending $30 on a chocolate cake at Whole Foods.

Oh wait, yes there is: having chocolate cake and not spending $30.

The problem is that the Whole Foods near me makes a really, really tasty chocolate cake.

SOLUTION: use a Whole Foods recipe to make my own flourless chocolate cake! This thing came out beautifully, and since I saved myself a bunch of money, to say thanks, I shelled out (at Whole Foods, natch) some of my savings for the fancier chocolate, thus making my cake even better. 

Just look at that hunk of chocolate I used:

To say I'm feeling smug right now would be an understatement. 

But the cake backs up all of my overconfidence and more. Taking a bite of this thing is like taking a bite of the very soul of what chocolate is and should be. It's deep, it's dark, it's rich. It sticks to your teeth. Dieters will take one look and run away to the nearest treadmill (good riddance). Yeah, it's that good. 

And to cap it all off, it's topped with a sort of honey-chocolate ganache. 

I added a bonus to mine by adding candied nuts. Let me tell you, I don't regret doing this one bit.

Please, would you make this cake right now? You will not regret it. 

Save $30 Awesome Chocolate Cake

Adapted from Whole Foods - printable version here 
Serves 12

Ingredients: 

  • 8 ounces bittersweet chocolate chips or bittersweet chocolate, roughly chopped, divided 
  • 1 cup (2 sticks) plus 3 tablespoons butter, cut into chunks
  • 1 1/4 cups sugar
  • 6 eggs
  • 1 cup unsweetened cocoa powder

For the glaze 

  • 6 ounces chopped bittersweet chocolate
  • 6 ounces half and half 
  • 1 tablespoon honey
  • 1/4 teaspoon pure vanilla extract

Procedure:

Preheat oven to 375°F. Grease a 9-inch springform pan, then line the bottom with a circle of parchment. Grease the parchment on top. Set pan to the side. 

Place the chocolate and 2 sticks of butter in a medium saucepan over medium low heat.

This is your brain on chocolate and butter.

This is your brain on chocolate and butter.

Stir often, until the mixture melts and blends. Stir in the sugar until completely incorporated. Add the eggs, one at a time, whisking until no streaks remain. 

Sift the cocoa into bowl and stir just until blended.


Pour batter into prepared pan and bake for 30 to 35 minutes, or until cake has risen and top has formed a thin crust. A little jiggle in the center is OK. 

inspringformpa.jpg

Let the cake cool in the pan for 10-15 minutes, then remove the springform sides and invert on to a wire rack. Remove the parchment circle, and let the cake cool completely.


Meanwhile, make the chocolate glaze. Set the chocolate in a heatproof bowl, and drizzle the honey on top. 

In a saucepan, heat the half and half until it comes to a simmer. Once it simmers, remove from heat and pour over the chocolate and honey. Whisk until the mixture becomes smooth and cohesive. Stir in the vanilla, and mix until smooth. Let the mixture set for 15 minutes or until it has achieved a thick, honey-like consistency: you want to pour it over the cake, but not so liquid that it will run over the sides of the cake immediately. 

Pour the glaze on top of the cake. Using a spatula, smooth it along the top and sides of the cake. 

cake22.jpg

Regard its beauty.

cake20.jpg

If you wanna, top it with nuts or something.

cakefinish.jpg

Put the cake in the refrigerator for 20-30 minutes so that it can set, and the cake will slice cleaner. 

Have you ever tried any Whole Foods recipes?

Alarmingly Adorable: Baby Cake Designs by Whipped Bakeshop

I don't want you to die. BUT. The photos that follow are basically heart attack-inducing cute, so consider yourself warned.

These cakes are part of the new baby cake collection by Philadelphia bakery Whipped Bakeshop. I consider them worth their own post just to showcase their adorableness.

If you're in Philadelphia, you should go buy one, whether there's a baby in your life or not.

If you're not in Philadelphia, either go there, right now...

or just enjoy and coo at the photos and send a link to someone you know in the Philadelphia area.

Seriously - how freaking cute are these?? And there are more designs coming.  

Check out all of Whipped Bakeshop's designs here

Feel Good Friday: The Penny Project

Do you pick up heads-up pennies when you come across them?

I do. It's a small moment that makes me feel lucky, like yes, I am where I am supposed to be at that moment. I put the penny in my pocket and continue walking with a spring in my step. This small surge of happiness makes me more likely to hold the door for the next person I see, or to say hello, or to compliment someone's shoes. I even take it one step further: if I come across a penny that is heads-down, I will not keep it, but I will flip it over so that it is heads up for the next person, so that they might get that little surge. 

And who knows where those happiness ripples might go.

They might be small: maybe the person whose shoes I complimented had been feeling awkward that day and it just made them feel a little more at ease. They might be big, in the long run: maybe the person who I held the door for is more likely to be kind to a trainee bank teller, thus giving that teller the confidence to go on, rise up the ranks, and manage the bank one day.

All because of a penny. 

So, I found myself thinking: what if I did a little feel-good project where I placed pennies throughout the city, in order to engineer a slightly better day for people? The math seemed on my side: for a small investment...

I had the potential to make 50 days a little better. 

Some might dismiss this project as "throwing away money", but I really don't look at it that way. Think again about that meager investment of 50 cents. For the two hours that this project took me, I had a fantastic walk, and got some great exercise. In terms of exercise, it was far cheaper than a yoga class. I also had some great entertainment. If I had gone to a movie for entertainment, it would have cost way more than 50 cents, and the potential for that experience to brighten anyone else's day would be limited (though yes, I believe in going to movies to brighten my own day, too). 

So for a few hours, I walked around downtown Santa Fe and placed pennies here and there. Some highlights:

Placing my last penny, I felt exhausted, and my hands smelled metallic, but I felt exhilarated. The sun was setting and all felt right with the world.


Maybe not everyone would be thrilled to find a penny. Maybe some of them would be knocked over and end up heads down. But maybe, just maybe, some of these placed pennies would present a superpower. Maybe they would brighten someone's day just a little bit. And they would never know it, but that penny had been placed there just for them. 

I don't know what will happen to all of the pennies that I left around town. But the project is already a success, because of the potential to delight others, and the definite delight that it gave me to complete. 

There is magic and delight everywhere in the world, and it's waiting for you. 

What made you happy today? 

Win at Summer: Cassata Ice Cream Pops

Cassata is one of my favorite cakes. Not only is it fun to say, but it's delicious to eat: a traditional Sicilian cake involving marzipan, cannoli-like cream, and more goodness (you can read about a really good one I ate in New Orleans, here).

And guess what? Cassata translates well in popsicle form. Hooray! 

This delicious popsicle comes from the book Ice Pops! by Nadia and Cesar Roden. Somehow this book manages to combine a sophisticated adult palate with enough whimsy and summer fun to make this book a true pleasure, page after page. Viva la popsicle!

Here's the recipe from the book.

Cassata

We’ve managed to put Italy on a stick here, with this traditional Sicilian dessert converted to an ice pop. Creamy ricotta is mixed with chopped nuts like almonds and pistachios, chopped candied fruits, and tiny pieces of chocolate.

8‐10

  • 2 cups ricotta
  • 1 3⁄4 cups heavy cream
  • scant 3⁄4 cup superfine sugar
  • 2 1⁄2 teaspoons vanilla extract
  • 4–6 tablespoons milk, depending on the thickness of the ricotta 1 ounce candied orange peel
  • 1 ounce candied lemon peel
  • scant 1⁄4 cup shelled pistachios
  • scant 1⁄4 cup blanched almonds
  • 1 1⁄2 ounces dark chocolate
  • 1 teaspoon grated orange or lemon zest (optional) 

Procedure

  1. Put the ricotta, cream, sugar, and vanilla in a food processor and blend very briefly until smooth. (The mix will thicken slightly.) Pour into a bowl and stir in the milk to thin the mixture, but not too much, as the chopped ingredients need to float in the mixture.
  2. Chop the candied peels, nuts, and chocolate into small pieces and stir into the ricotta mixture. Mix in the zest, if using.
  3. Spoon the mixture into your ice pop molds, and bang the molds hard on the table so there are no big air bubbles. Leave 1⁄4‐inch at the top to let the mixture expand when it freezes. Insert the ice pop sticks and freeze. If you like, save a little chopped chocolate or candied fruit to sprinkle onto the frozen ice pops. 

Reprinted with permission from Ice Pops published in 2015 by Sterling Epicure, an imprint of Sterling Publishing Co., Inc. © Cesar and Nadia Roden. Photography by Adam Slama

What is your favorite popsicle flavor?