What Happens When You Make Pie Crust with Melted Butter?

The question is this: what happens when you make pie crust with melted butter? But before I tell you what happens, let me explain a bit. 

Listen. I find the generally finicky, fear-filled approach to making pie crust to be totally annoying.

There are so many rules. Your butter MUST be chilled! Your water MUST be ice-cold! Do NOT overwork the dough! It's no wonder that so many people beeline to the pre-made pie crust in the frozen aisle of the grocery store.

Often, when people tell me they are scared of making pie crust, I ask them this question: "what's the worst that could happen?". Well...ok. You add too much water and the pie crust is a little mushy. You don't work the flour in enough and it's hard to roll. You overwork the dough and it's a little tough. Honestly, these things aren't so bad, and the fact that it is a homemade pie crust, even with minor flaws, makes it a leg above anything you would buy.

So my advice is this: just make the pie crust. Even you mess it up when measured to pastry chef's standards, it will probably still be good enough to delight your family and friends. 

This pie dough? Made with melted butter.

This pie dough? Made with melted butter.

In my desire to rage against the pie dough fear machine, I began to wonder: what would be the worst thing that could happen if I used non-chilled butter? In fact, what if I just used melted butter? 

So, I gave it a try. Here was my approach. 

The recipe

I decided to stick with my favorite pie dough recipe from King Arthur Flour. I knew that there would have to be some alterations, since melted butter couldn't be squished with the fingers. 

As for the water in the recipe, I decided to stick with just room temperature water since using ice water didn't seem important when the melted butter was already warm. 

How it went down:

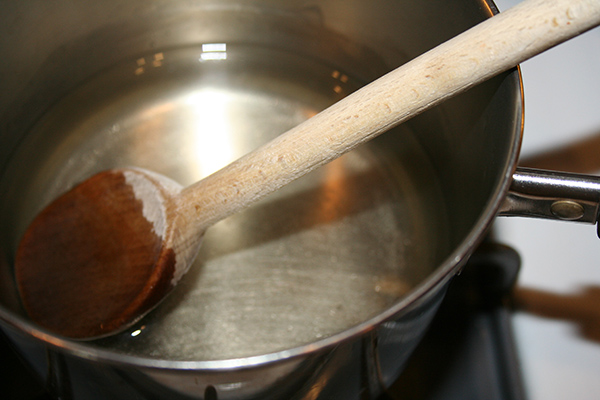
I started by assembling the flour and salt in a large bowl, and then melted the butter in a saucepan. 

Is there anything finer than butter gently melting on the stovetop?

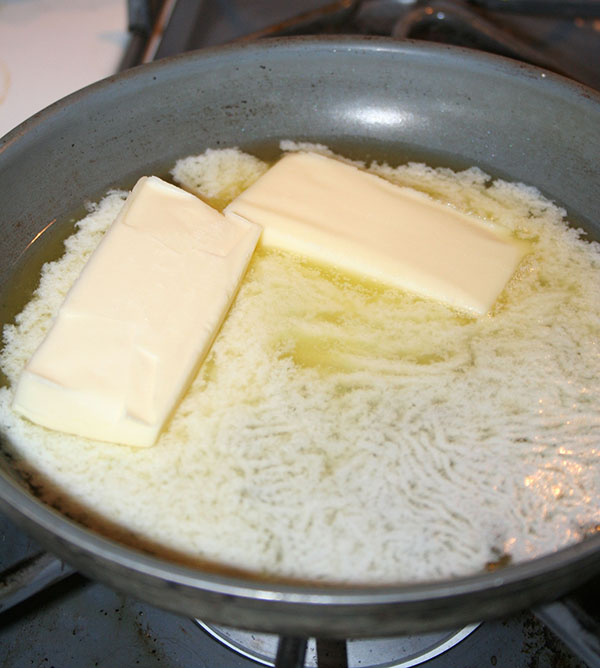
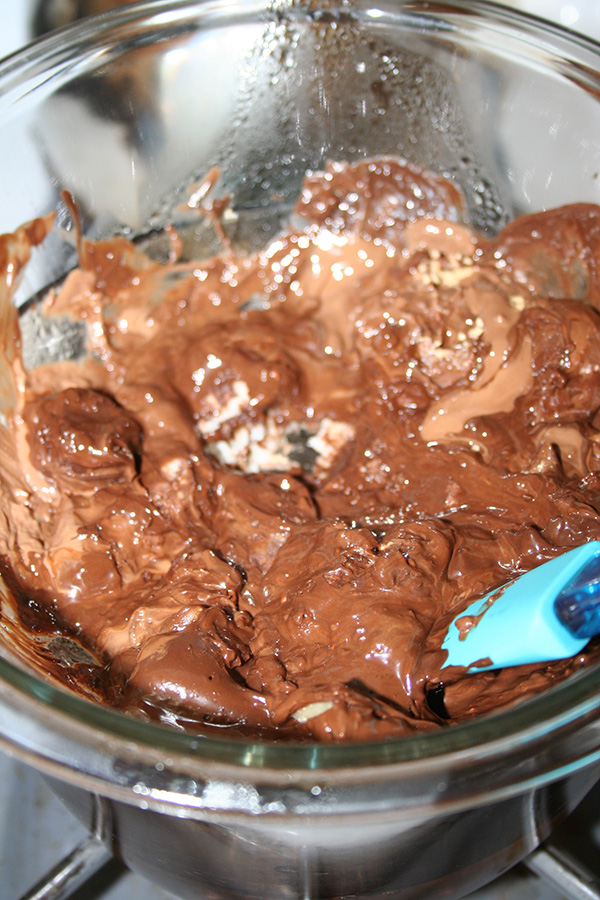
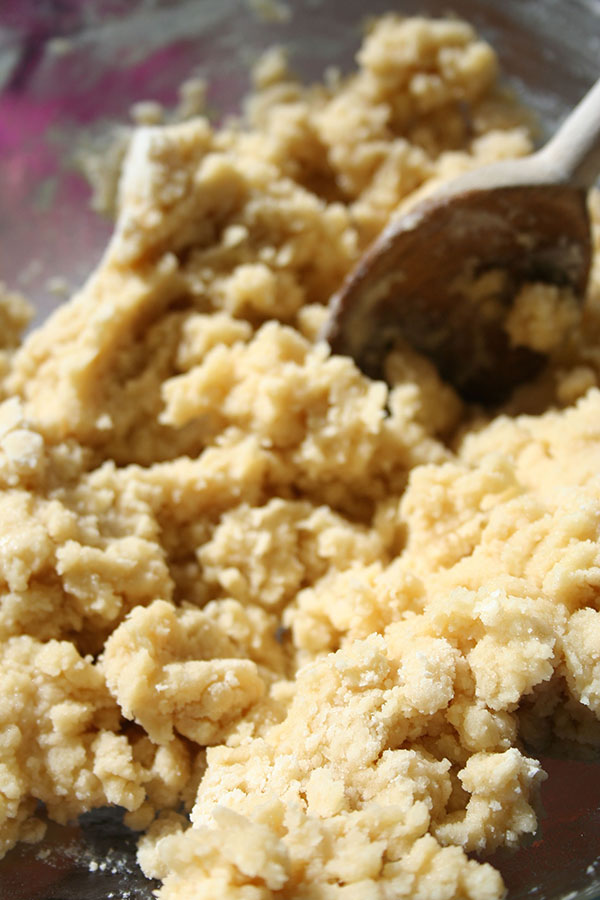
When it melted, I added it to the dry mixture and stirred. It became very apparent very early on that I wasn't going to need the water called for in the recipe--the melted butter was more than sufficient in saturating the dry ingredients. So I didn't add the water.

The mixture was sort of like a cookie dough, and it smelled heavenly. 

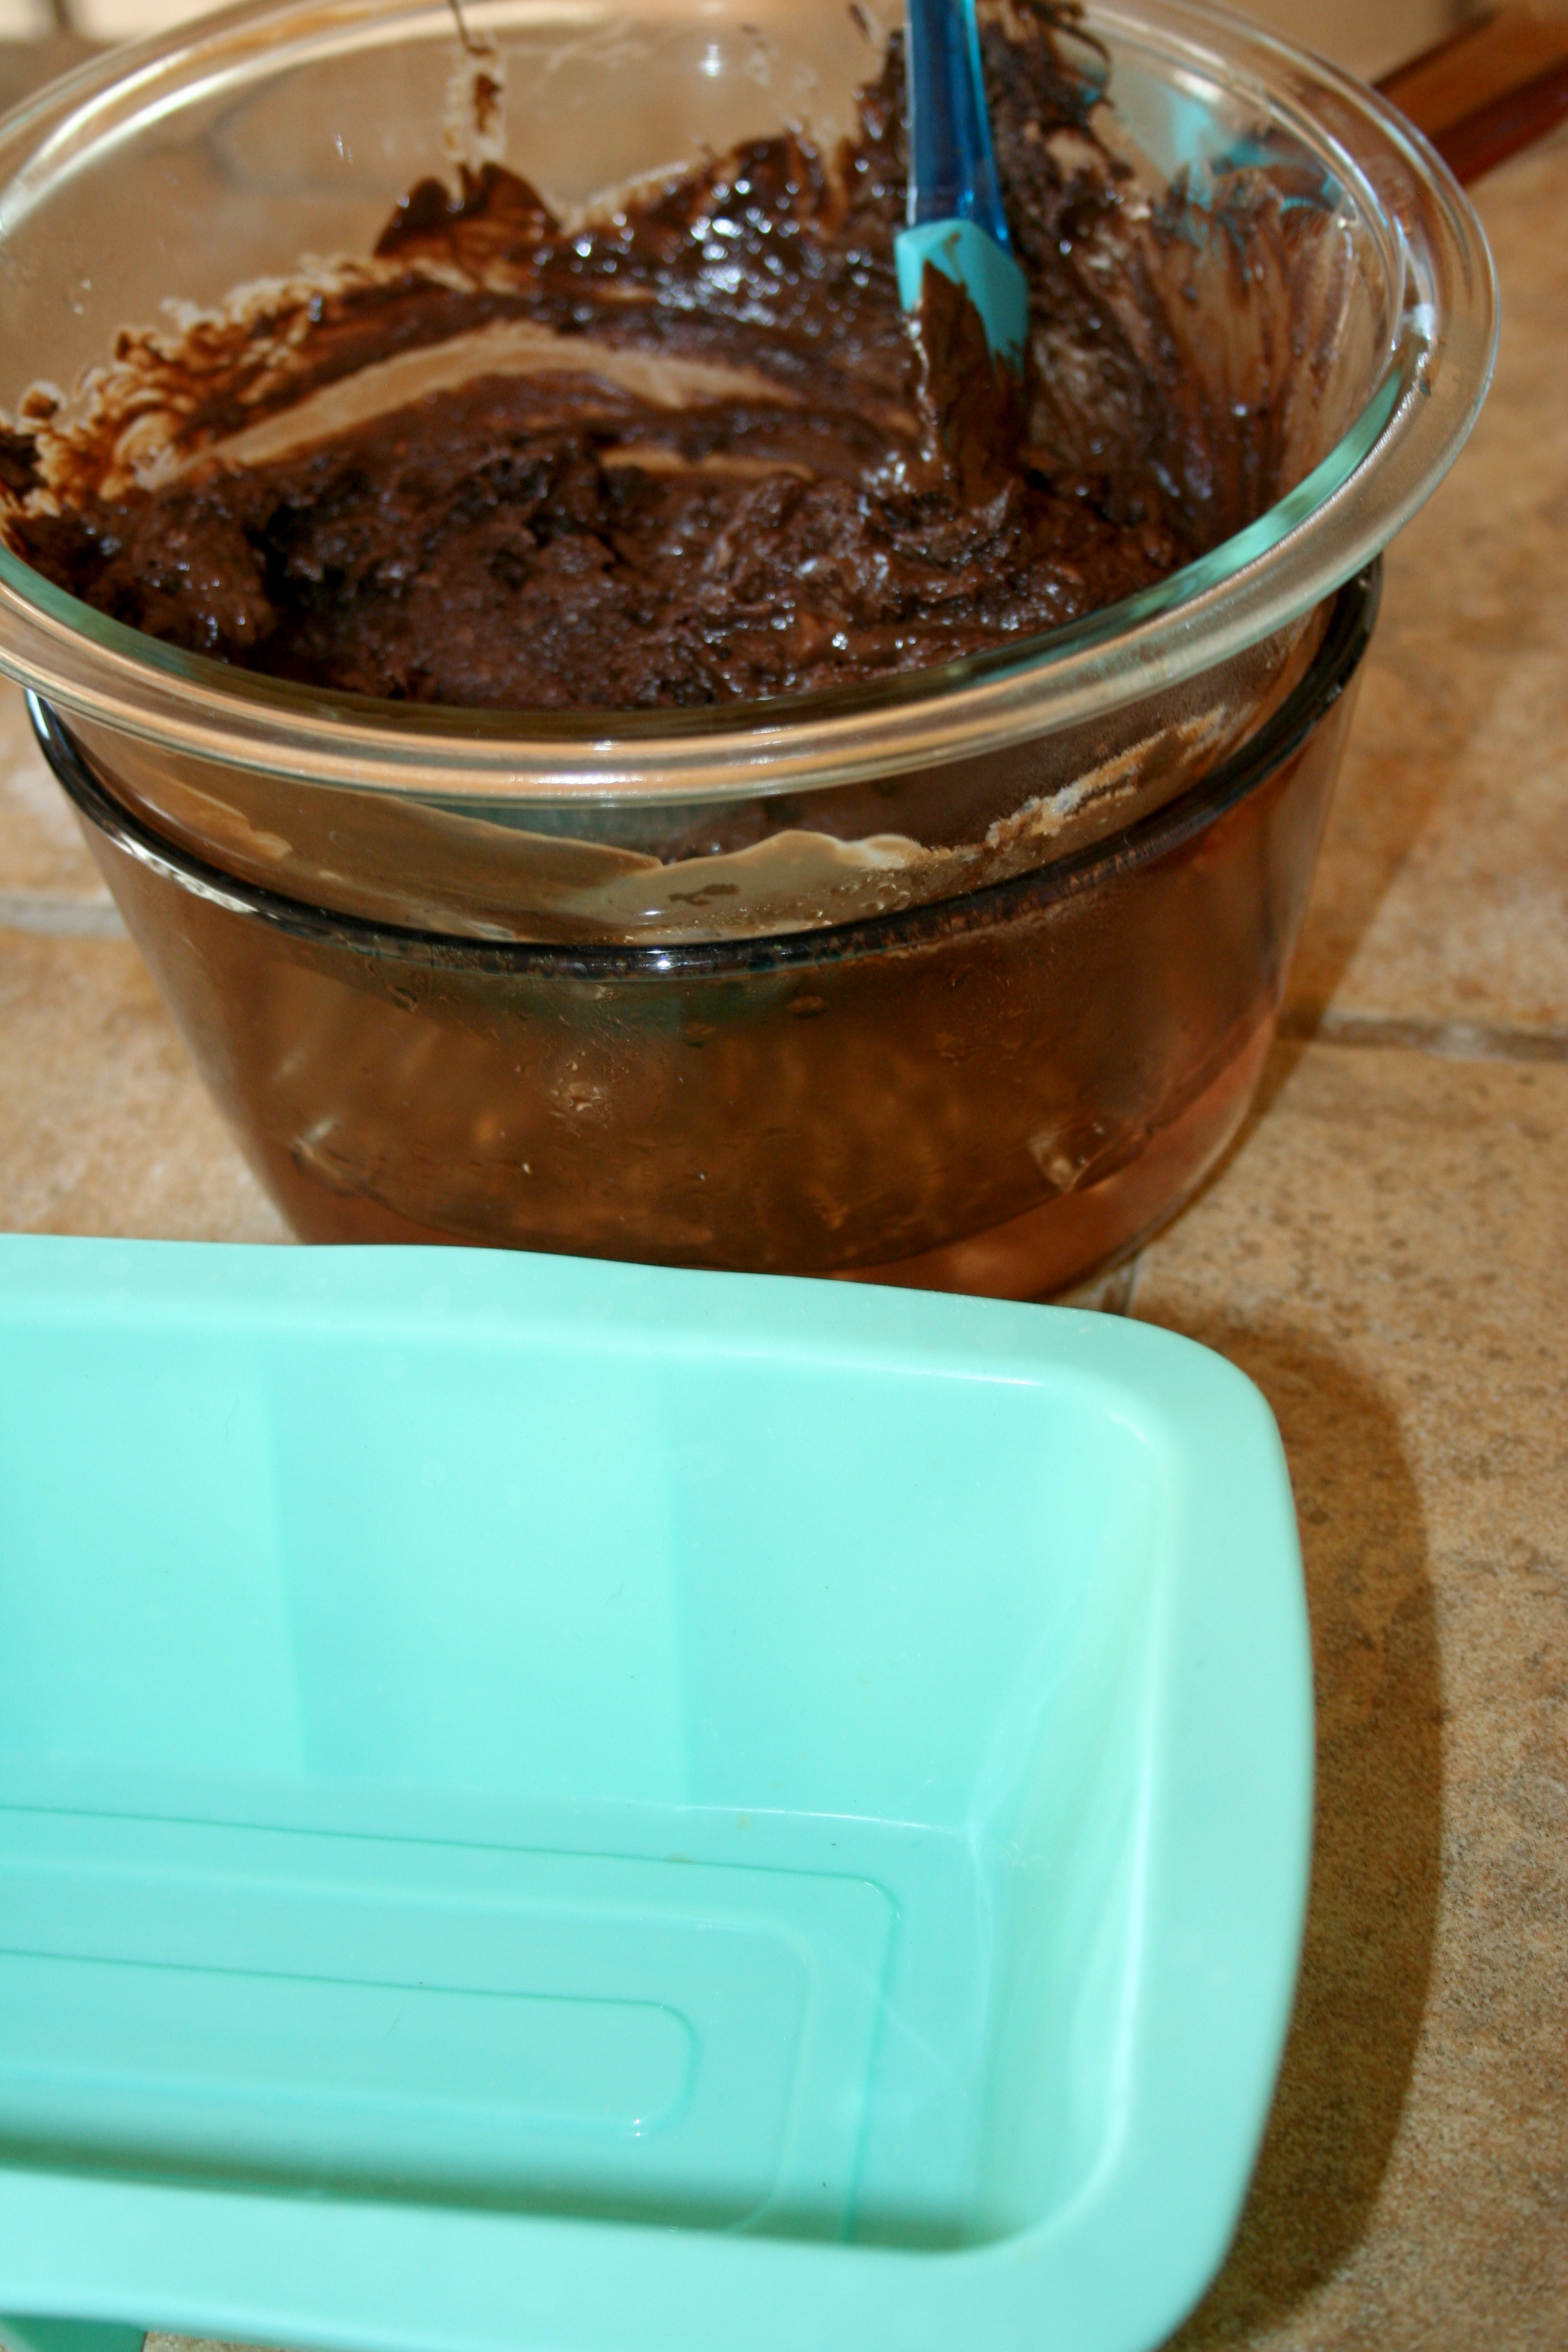
Rolling it wasn't really an option, so I pressed it into the pan. Interestingly, while this recipe is usually sufficient for two pie crusts, this version was more like 1 1/2 pie crusts. So I pressed as much as I needed in the pie plate, and reserved the rest. 

I placed the pie plate in the fridge for a while, because I didn't want it to be warm when I added the filling. It was malleable enough to be fluted.

Meantime, I knew exactly what to do with that leftover portion of pie dough: try out roly polies!

I've often said that roly polies are the best part of pie. I was anxious to see if it worked with the melted butter crust.

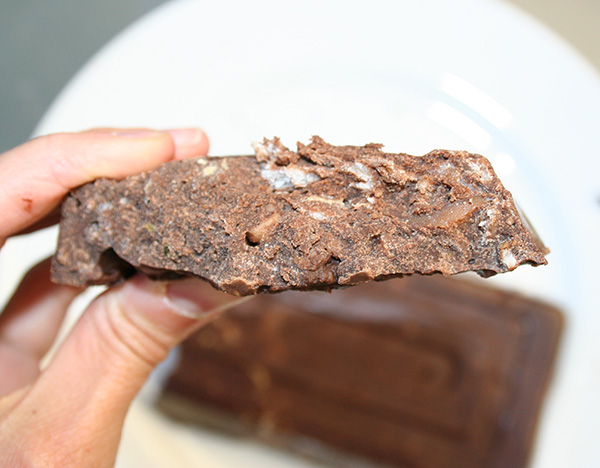
Well, these portions of dough really didn't like to be rolled like regular pie dough, so I separated the dough into little logs. I spread each with sugar and cinnamon, and then rolled them up. Rolling them was not easy--the texture was like shortbread and they cracked. But with some patience I worked them into submission. They looked sort of messy, but serviceable.

I baked them at 400 degrees for 10 minutes; this is how they looked.

They were very delicate and crumbly, but they tasted great. 

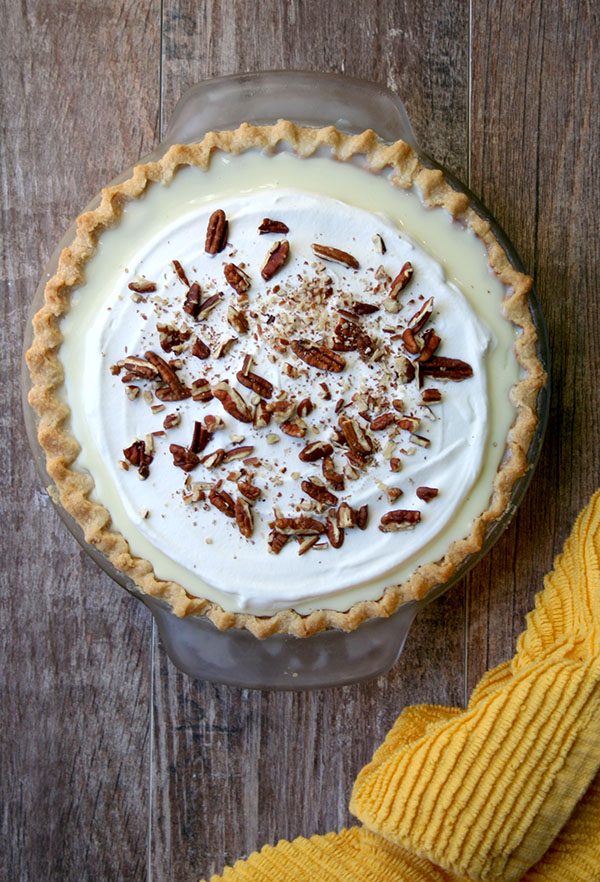
Now, I was ready to get back to the pie. I prepped a pumpkin pie filling (recipe for that coming soon) and poured it in the shell. Then I baked it as normal.

Once baked, the crust looked beautiful. It was lightly browned. The filling was set. It all looked lovely.

It was a pie that required chilling before serving, but after a while, it was ready to be sliced.

Right away, I noticed that the melted butter crust was more firm than a typical pie crust, and required a sharp knife to slice. But it did slice cleanly. 

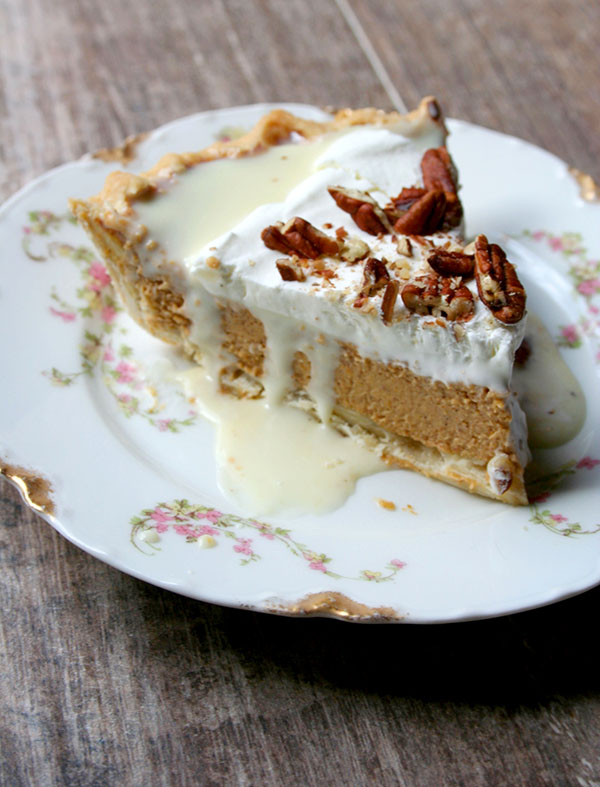
The crust itself was crispier than a typical pie dough, not soft and yielding in spite of the fact that the filling was quite moist. The taste was fairly similar to a regular pie crust, which makes sense because the ingredients were pretty much the same...but the texture was very different.

I would actually say that the texture was almost cracker-like. However, I never found it to be too hard. I think that were the crust pre-baked and then filled, it might have been too crispy and hard, but with the baked filling it never veered into "break your teeth" territory. 

Personally, I think I still prefer the texture of the more traditional, tender pie crust. But I am glad that I tried it the melted butter way, because it was definitely not a recipe failure. It was just a different texture. I think that it could actually be considered a success if some sugar was added to give the crust a bit more cookie-like appeal. 

So listen to this, those with fear of making pie crust: even if you made your pie crust with totally melted butter, the pie crust still tastes pretty good with the right toppings. 

So pie-crust fearers, hopefully that can take some of the fear out of the process! Basically, I broke all of the rules of making pie crust and it still turned out OK. I think that means that even if you mess up a little bit, your results are going to be just fine for where you are in your baking journey. 

Melted butter pie crust 

Printable version here

  • 2 1/2 cups all purpose flour
  • 1 teaspoon salt
  • 2 sticks unsalted butter, melted 
  • (water omitted)

In a large bowl, sift the flour and salt together. Set to the side.

Melt the butter in a saucepan. Once melted, pour on top of the dry ingredients.

Stir until totally combined. It will come together into a cookie dough like mixture.

Press the mixture into a greased (that's important here) 9-inch pie plate. You will likely have some left over, but not quite enough for a second crust. Use this to make roly polies as detailed in the post, and baking them at 400 degrees for about 10 minutes.

Once your pie dough is pressed into the plate, continue with your pie recipe as usual. 

Have you ever experimented with pie crust?

My 25 Favorite Moments from Florida's Space Coast

So, about a month ago I had the great fortune to travel to Florida's "Space Coast" for a girl's weekend. Now, if you're not familiar with the Space Coast, let me give you a touch more detail. The region, named because of its proximity to the NASA launch point of Cape Canaveral, is home to some of the finest beaches in Florida, and the closest ones to big time tourist destination Orlando.

I got to spend the weekend with an awesome bunch of girl bloggers on Florida's Space Coast, and here I will tell you about a bunch of the tasty and sweet things I did there. Here's my list of 25 favorite Space Coast moments!

1. Free Tieks shoes!

Screen shot via Feast + West

Screen shot via Feast + West

Before we even departed on our way to Florida, the trip organizer (EXTRAORDINAIRE), Julie, worked some sorcery and somehow got us each a gratis pair of Tieks shoes. I have seen these before, but never thought I would ever own them because they cost $175 a pair - on the low end. But I have to tell you. Having been exposed to the brand, I am super impressed - the quality of their shoes is impeccable, they're well-made and employ good quality leather. They're very comfortable for walking, and they come in super cute colors. These shoes might not be in my all the time budget, but I do think that they are a worthwhile investment. The above is a screen shot of all of us wearing our shoes with the tags showing. Follow all of those people on Instagram!

2. Arriving in lovely Melbourne Beach.

11221386_10207550069051289_6903214717225299866_o.jpg

Photo credit: Julie from The Little Kitchen

I drove from Santa Fe to Melbourne Beach, so you can bet your bottom dollar that I was happy to arrive safely (want proof of my happiness? Just look at the photo above, about 10 minutes after I got out of the car). And to meet a whole crew of new friends! I had met a few of the bloggers in attendance before, but most of them were brand new in real life friends. The roster:


3. Dinner at Crush Eleven. 

12033076_892061670830538_7312427177185374116_n.jpg


Our first dinner in the Space Coast region was spectacular. It was at a place in Cocoa called Crush Eleven, which specializes in kind of creative farm to table fare. I got the fish catch of the day, which was unbelievably fresh--it tasted like it had just been swimming. Which it basically was - it had been caught earlier that day. Sorry little fish, but you were tasty. They also had some really neat culinary things going on here, like the dessert palate cleanser (yep) which included a cocktail and sorbet shimmering atop an ice cap in a martini glass (pictured). We also had a freaking dessert buffet delivered to our table. I really cannot recommend this restaurant enough if you find yourself in the region. 

4. Learning the term "Cape Cookies".

During our first dinner, we were regaled with tales of the Space Coast from the tourism team. I need to tell you, though, that my favorite tidbit BY FAR was that during the heyday of NASA's Space program in the 60s, there were, well, astronaut groupies who went by the nickname "Cape Cookies." There's even a book on the subject: The 'Cape Cookie' Chronicles. Look at that cover! It's like Valley of the Dolls, but in Florida! I immediately dubbed our group the Cape Cookies, and got lots of looks like that moment in The Princess Bride when Inigo Montoya says, "You keep using that word. I do not think it means what you think it means." I didn't stop, though.

5. Staying at an ESTATE. OMG.

We stayed at an Estate which in addition to being right on the beach, also had a pool. I capitalized Estate in the last sentence because this is the first time I've ever stayed at one, and it seemed to warrant capitalization. Between you and me, I think I could get used to residing at Estates (and also I could get used to having a full-time housekeeper, but that's beside the point). The place in question was called Azure Estate. If you're headed to the Space Coast, go ahead and stay there. You too deserve to stay at an Estate. 

6. GOODY BAGS.


Holy crap! Julie, our organizer, coordinated with vendors and donors including Blue Diamond almonds (have you ever tried their coconut almonds, btw? Awesome.), Shutterfly, Grimaldi Candy Company, Lucy Jane totes, and Sweet Estelle's. All tucked in Mark & Graham tote bags monogrammed with our initials. I was all like, "OMG, this is amazing!" . My roommate, Suzanne, who had already opened hers when I got there, was in agreement. The above illustration is a dramatization. I'm the cupcake, Suzanne is the macaron. 

7. These amazing macarons Suzanne made.


Speaking of cape cookies! We enjoyed these cookies by the cape, by a decidedly non-astronaut groupie, Suzanne of Kokocooks, who has gone from dipping her toe in the world of macarons to becoming a Mac Daddy of macaron sorcery. Now, I need to tell you that I cooed over these French Toast Crunch macarons for a very long time. 

8. Breakfast at Sand on the Beach.

What looked like a beach shack type restaurant, Sand on the Beach, churned out beautifully fresh breakfast entrees. I got one of the fresh seafood Eggs Benedict varieties (what can I say, I like savory for breakfast!). The sweets looked great too, though, including a sweet-meets-savory waffle with a spicy seafood topping, pancakes and waffles, and French toast.

9. Making Nanaimo bars in the kitchen at the Estate!


We had a potluck dinner on our second night--every blogger made a recipe from her respective site. This was an awesome experience because it was a chance to eat the dish as it was intended to be made, and from the source. And there were some famous bloggers there, people! Well, naturally I was put on dessert duty, and so I whipped up a batch of my favorite bars--Nanaimo bars.  

10. Eating little cupcakes from Take a Bite. 


I always enjoy eating little cupcakes, but this was my first time enjoying them on the Space Coast of Florida. Well, my mouth was rendered officially happy by these mini cupcakes, which Julie had procured from Take a Bite Cupcakes. I enjoyed best the chocolate chip cookie dough varieties, which had nuggets of cookie dough nestled in the center. 

11. Enjoying the pool.


I love a good soak in the pool, but it was even better at the Estate where we stayed, and here's why in three simple words: Doughnut. Inner. Tube. It matched my bathing suit, too! 

12. Learning how to paddleboard!


If you've never experienced SUP (stand up paddleboard), can I suggest you learn how to do it with a private lesson from the staff at Ron Jon Surf School? That's what we were treated to--a lesson from the pros. It was great fun and I only fell off once! Dramatization of the moment, above. 

13. A Florida wine tasting.

Hey, did you know that you could ferment things other than grapes to make wine? I didn't either. But in Florida, they make wine with key limes, bananas, and even avocado! It was a fascinating tasting hosted by East Coast Winery, and I can't get the memory of their Key Lime wine out of my head!

14.  Our amazing dinner all together. 


As previously mentioned, we decided to have a potluck dinner on evening two. This meant there were a ton of blogger in the kitchen (hilarity, toes stepped on, and much instagramming ensued).But after all of the kitchen busyness, we were treated to a truly memorable meal, including fried brussels sprouts, homemade buttermilk biscuits, sriracha lobster tails, and short ribs. Oh, and some Magnolia bakery style banana pudding and Nanaimo bars for dessert, of course. The owners of Azure Estate joined us too, so now in addition to being someone who spends time at Estates, I am someone who hangs out with owners of Estates. 

Dramatization of the meal, above. 

15. Doughnuts for breakfast! 


We were treated to pretty-as-a-picture doughnuts from Love Bugs Bakery for breakfast the next day. I showed my doughnut the doughnut shaped pool float. I think it approved. 

16. A fun bus ride to Cape Canaveral.

After eating doughnuts, we piled into a bus and took a ride to the Kennedy Space Center in Cape Canaveral. While the ride itself wasn't standout, what was wonderful was the time it permitted us to all talk. We talked about kids, pets, body image issues, food, blogging goals--you name it. Connecting with inspiring women like this is a gift, so this was a highlight for me.

17. Visiting the Kennedy Space Center

I'll be the first to admit it: I'm CakeSpy, not MathSpy or ScienceSpy. But getting to see the actual Atlantis shuttle (the first space shuttle that was able to make return trips) and take in the show documenting its life at the Kennedy Space Center was pretty darned cool and inspiring. Plus, we got a VIP tour, including the chance to meet an astronaut who had been to space during the Space Race era, a customized lunch from the surprisingly great Orbit Cafe (many steps above your typical cafeteria / food court fare) and awesome goody bags, which, yes, included astronaut ice cream. 

18. Going down the slide at the Kennedy Space Center.

As part of the exhibit, there was a great big awesome slide to go down. Did I go down it, in spite of the fact that I was wearing a skirt? Yes I did, and everyone got the big treat of being able to see my undies. This fact made me laugh so hard that it made it a highlight.

19. OMG I GOT TO RIDE A HELICOPTER


A few weeks ago, if you talked to me about helicopter rides, I would think "helicopter rides are for News stations and famous people to get from Manhattan to the Hamptons." No longer, though, because now I have been on a helicopter ride. It was glorious to see Florida from up above! So if you've also been in a helicopter and would like to chat with me about your experience, I'd be open to that. We copter-riders have to stick together. 

20. Beautiful sunrises and scenery.

My roommate, Suzanne, was wonderful about getting up and seeing the sun rise. Well, that was fine because it left me room to open the window and enjoy it from bed. I am a sucker for a beautiful sunrise or sunset, and the pastel hues that characterized the Florida sunrise were very special. 

21. The pride that locals have for their area.

One of the things that impressed me most about the people we met in Florida was their enthusiasm for their home region. Danny and Tom from the tourism office were extremely knowledgable and helpful and proud of their area, but the enthusiasm went beyond the tourism employees. From the Ron Jon Surf School employees to restaurant servers to tour guides, everyone was so proud to showcase their unique part of the world, and I really appreciated that. 

22. An awesome dinner at D'Jons.

Owned by the same people as Sand on the Beach, D'Jons provided an extremely different, fine dining experience. I had the shrimp and grits, and I need to tell you how delicious it was. The shrimp were huge, incredibly fresh, and wonderfully seasoned; the grits very rich, and very delicious. It was a memorable meal with fantastic service.

23. Doing yoga by the pool.


Hey! I did a yoga routine by the pool at our Estate. This brings my 50 states of yoga project one step closer to completion, with Florida being filled in on my map! Above, you can see all of the US states where I've done yoga. 

24. Doing illustrations inspired by my trip.


I loved re-creating key moments from the trip using pastries. Now, in case you are not sure who is who, I asked each lady what type of pastry they'd like to be portrayed as. So what you have in the illustrations in this post is:

Maybe I should mention here that if you ever wanted a custom illustration, I'd be happy to do that for you. Check out my online shop here.

25. New friends. 


I left this trip feeling like I had eight friends. Some old, some new. But the connection was real, and I am so thankful we were able to share this time by the shores of the Florida Space Coast!

What's the last great trip you took?


What Happens When You Melt an Entire Box of Chocolates Together?

What happens when you melt the entire contents of a box of chocolates all together? 

Well, I can tell you that, but before I do, let's converse a little.

Forrest Gump famously (and maybe a little annoyingly) said "life is like a box of chocolates...you never know which one you're going to get."

I disagree. I think that life is more like the entire contents of a box of chocolates melted together. It's messy, it's sweet, it's gooey, it's complicated, and you get little tastes of this or that depending on which direction you go. 

With that having been said, let's see what in the world does happen when you melt the entire contents of a box of chocolates all together.

What happens when you melt an entire box of chocolates together?

The motivation for this experiment was fairly simple. I returned from a trip where I had been gifted a box of chocolates, only to find that during transit the chocolates had partially melted and mangled. Many had rolled out of their little segments and had stuck to the top of the box. While on the one hand this was a massive bummer, it did pique my curiosity, and it got me wondering if all of the flavors would mingle if they were all melted together. 

From there, it didn't take long for me to fire up a DIY double boiler (composed of a heatproof bowl atop a saucepan of simmering water) on the stovetop to see what I could see. 

So, I placed the entire contents of the chocolate box in the top of my DIY double boiler.

And I turned on the heat. Things started to get melty quickly.

Some bits, like coconut and nougat, proved resistant to melting. I turned the heat very low; gradually, most of the stubborn bits finally yielded and melted. But some parts retained little lumps of these firmer bits of confections. 

Once it was all melted, I realized I really hadn't thought this out fully. Where would I put the chocolate? 

Well, luckily I had a silicone loaf pan nearby. This loaf pan has proven pretty much useless for making actual cakes because of its wobbly sides, but it was perfect for spreading and patting down the melange of melty mixed chocolates.

After a few hours, it had set and I inverted it. 

It looked like a caricature-huge candy bar. 

I braced myself and took a bite.

OK, so this was just about the weirdest chocolate eating experience I've ever had. The only way to describe it is kind of gross, so sorry in advance. 

Have you ever been sick and thrown up, and as the food comes up you can taste individual foods, but you also taste the sum of them together? 

Eating this chocolate was sort of like that, but without the awful throwing up part. But you could taste hints of different chocolates from the usual collection - a bit of coconut, a touch of caramel, and oh, was that a bit of raspberry buttercream? - but then it's also simultaneously all mixed together. It was a very odd taste sensation.

Sorry to say, friends, but the result was not extremely crave-worthy.

Everyone at my house had a novelty bite like a good sport, but nobody opted to eat more of it, and after a few days, I tossed the monstrosity.

But the benefit is this: now we know what happens when an entire box of chocolates is melted together. So you, dear readers, can review this and decide if it's ever something you want to do (probably not).

Have you ever done something creative with a box of chocolates?

20 Recipes To Use Up 4 Egg Yolks

What to do with those leftover egg yolks? This is a question I asked myself over and over while developing a (perfect, if I do say so myself) recipe for Olive Oil Buttercream. The recipe employs four egg whites, and I tested it multiple times, which means I had multiple batches of four egg yolks left over. 

Turns out, four is an awkward number of egg yolks to use up! Many recipes call for 2; many ice creams call for 6. But four? Tougher to navigate. 

So I have made a collection of twenty worthwhile recipes that employ four egg yolks exactly. If you find yourself with 4 leftover egg yolks (like when you make my olive oil buttercream recipe), give one of these a try!

20 recipes with 4 egg yolks

Chocolate or vanilla pudding. Thanks, Martha! (Martha Stewart)

Julia Child's chocolate mousse. (Bran Appetit)

Espresso zabaglione. Fancy-sounding, but so easy to make. (Food Network)

Eggnog. This recipe calls for one yolk per serving; 4 servings means a party, right? (About.com) *bonus - all of these recipes call for an egg yolk each, as well. (Bar None Drinks)

Luscious, lovely, lemon curd. (Chow.com)

"What-to-do-with-all-the-egg-yolks-bread". Well, that's useful! (Food.com)

Olive oil ice cream. Creamy, nutty, fancy tasting. (Bon Appetit)

Egg yolk cookies. Rich little morsels. (Snapguide.com)

Spanish egg custard. (About.com)

French buttercream. Silky, sexy, delicious. (Serious Eats

Cinnamon creme anglaise. It tastes like melty ice cream, in a good way. (Cooking Light)

Creme brûlée. It's actually pretty easy to make. (Eggs.ca)

Crema Catalena. Like creme brûlée, but SPANISH. (About.com)

Classic key lime pie. (Epicurious)

Easy banana pudding. A southern classic! (Chow.com)

Pastry cream. Perfect for so many fillings. (King Arthur Flour)

Hazelnut buttercream (nestled within a recipe with many components). (Chef Bernard)

Mojito key lime pie. Yes. (Baking Bites)

Sugarplum-orange and Earl Grey-apricot tarts. (Epicurious)

Lemon pound cake. Luscious! (Italian Dessert Recipes)

Bonus: Grapefruit-Vanilla Curd. Technically you'll need three whole eggs, too, but 4 egg yolks are called for in addition to the whole eggs. (Serious Eats)

Bonus 2: how to freeze leftover egg yolks. My friend Nicole over at Baking Bites has a helpful post on the subject! Check it out here

Care for a Pecan Pie Baked into a Cake? Also, it Pairs Well with Beer.

Well, if that title didn't intrigue you, I don't know what else you want from me. Oh! I know! How about a recipe for pecan pie baked into a cake, plus a nice little beer pairing? Say what?!?

This recipe comes via pastry chef Melanie Diamond-Manlusoc of an award-winning Chicago restaurant called Spiaggia, in partnership with the blog Let's Grab a Beer. I received it from a public relations company, but given my personal interest in cake, pies, and beer, I definitely had to feature this one. 

Moist pumpkin cake with a pecan pie surprise inside? Awesome. And according to Let's Grab a Beer, better with beer. The suggested pairing: Belgian-style pumpkin-flavored white beer like Shocktop Pumpkin Wheat. Not only does a beer like this bring similar flavors to this unique pumpkin dessert, but also will cut through the richness and add zesty, citrus flavors to lighten this dish allowing all the flavors and its unique seasoning to shine.

I'm all about this delicious pairing. How about you? 


Pump-Can Cake Recipe

For the pastry

  • 1 1/4 cups all purpose flour
  • 2 teaspoons sugar
  • 1/8 teaspoon salt
  • 1/2 cup butter, cubed and frozen
  • 1 large egg

For the filling

  • 3/4 cup light corn syrup
  • 5 tablespoons unsalted butter
  • 1 cup light brown sugar, packed
  • 1/2 teaspoon salt
  • 2 cups whole toasted pecans
  • 3 tablespoons bourbon
  • 2.5 teaspoons vanilla paste
  • 3 large eggs, beaten

Spiced pumpkin cake

  • 6 large eggs 
  • 1 can (16 ounces) canned pumpkin
  • 3/4 cup canola oil
  • 1 teaspoon vanilla paste
  • 1 cup sugar
  • 1 cup light brown sugar, packed
  • 2 cups all purpose flour
  • 2 teaspoons baking powder
  • 1 teaspoon baking soda
  • 1 teaspoon salt
  • 2 teaspoons ground cinnamon
  • 1 teaspoon ground ginger
  • 1 teaspoon ground nutmeg

Cream cheese frosting

  • 9 ounces cream cheese, room temp
  • 4 1/2 tablespoons butter, room temp
  • 3/4 teaspoon vanilla paste
  • 3 cups confectioners' sugar, sifted
  • 1/4 teaspoon salt 

Pastry

  1. Make the pastry. Pulse the first four ingredients together in a food processor until the mixture resembles coarse peas. Add egg and process until dough forms into a ball.
  2. Wrap dough in plastic wrap and press into ½” thick disc; put dough in the refrigerator for 1 hour. Roll dough out into a 12” circle approximately ⅛” thick
  3. Put into an 8” cake pan, trimming dough, leave 1” overhang
  4. Tuck overhanging dough underneath itself to form a thick crust
  5. Freeze pie crust for 30 minutes.
  6. Cover pie crust with foil and fill with beans or pie weights. Bake in a 400 degree F oven for 20 minutes or until crust is set (start cooking pecan pie filling while the crust is baking).                                               Cook until crust is light brown and remove from the oven. 

Filling

  1. Make the filling. Bring the first four ingredients to a boil for one minute.Remove the pot from heat; add the next three ingredients. Let cool for five minutes.
  2. Whisk the eggs into the filling mixture. 
  3. Place the pie shell on a sheet pan; pour the filling into the shell.
  4. Bake for 45 minutes or until the edges are set and the center just barely jiggles.
  5. Let the pie cool completely before proceeding. 

Cake and assembly

  1. Whisk the first six ingredients together. Sift the remaining ingredients together, and whisk into the wet ingredients.
  2. Spray a 10 inch springform pan with nonstick spray. Place parchment in the bottom of the pan.
  3. Pour batter into the pan, about 1 inch thick.
  4. Place the pecan pie in the pan, making sure it is centered. Pour the remaining batter on top and on the sides of the pie. SUBMERGE IT!
  5. Place the entire pan on a sheet tray, and place in a 350 degree oven.
  6. Bake 60-75 minutes, or until a cake tester comes out clean (don't stab the pie, please)
  7. Remove the cake from the oven. Let it cool in the pan for several minutes.
  8. Remove the cake from the pan, and place on a wire rack. Let cool completely before frosting.

Frosting

  1. Make the frosting. Whisk all the ingredients together until smooth; frost the cooled cake. 

Wow! You deserve a beer, and cake! Enjoy!

Baker's Dozen: A Batch of Sweet Links + Giveaway!

Win a pair of these socks! See how to enter at the bottom of this post. If you can't wait, buy them online!

How to make a dessert graveyard dip. (Buzzfeed)

Why wait to paint? Get inspired with these acrylic painting ideas. (CakeSpy for Craftsy)

Pumpkin spice peanut butter bread. It is. So. Good. (Peanut Butter and Co.)

Candied rose petals. Beautiful and delicious. (Coco in the Kitchen)

I'm into these brown butter candy corn cookies. (Marla Meredith)

Caramel pumpkin latte. OMG. (Go Eat and Repeat)

Did you know that Eggo used to make potato chips? Seriously. (Eggo Wikipedia)

This company cooks art history. How cool is that? (Art Bites)

What does a witch's heart taste like? I dunno, but I like the cocktail that goes by that name. (The Flavor Bender)

Savory pumpkin pancakes. Cool! (Milk and Bun)

A history of our love-hate-love relationship with leftovers. (The Salt)

I must try this no-bake cheesecake made using sweetened condensed milk. (Just a Taste)

What is mise en place? Find out. (CakeSpy for Craftsy)

GIVEAWAY!

I feel like giving away a pair of the awesome socks pictured above, which feature MY amazing artwork. Wouldn't you or someone you know just love a pair of socks with unicorns, cupcakes, and robots? If not, I don't really know why you're on this site.

TO ENTER: simply leave a comment on this post letting me know which creature you like best and why: cupcakes, unicorns, or robots? Be creative! 

I'll choose one winner AT RANDOM one week from today, and reveal the winner in next week's link post. Because of the prohibitive cost of shipping overseas, I am asking that only US residents enter here. Or, if you live overseas and you'd be willing to pay the shipping fee beyond the US rates, go ahead and participate. 

Can Carrot Peel Be Candied?

It's #whathappenswednesday! And today, I'd like to address an important issue: why does candied citrus peel get all the glory? After all, there's a whole world of other foods out there that are just dying to be candied. For instance, carrot peel. 

So what would happen if you used the same candy-ing method used for citrus, but for carrot shavings? This was a question on my mind when I was making carrot cake recently and had plenty of time to think about this and that while grating carrots for the recipe.

A minimal amount of online research informed me that I wasn't the first one to wonder this, and in fact, according to some actual respected food websites, it is a Bona Fide Thing.

Not one to simply rely on what I read on the internet, though (especially when clear pictures aren't available!), I needed to see for myself. And so after I finished grating carrots for my cake, I swapped tools and used a peeler to shave some carrots and see what would happen when they were candied.  

So I played around with an Epicurious recipe, and in under two hours, I had myself a nice big ol' batch of candied carrot peel.

You know how the idea of carrot cake, when you really think about it, sounds strange? But how it's so ingrained in society that you kind of hear it and think "oh, that's normal"?  It's the same way with candied carrot peel. It sounds odd at first, but once you taste it, it just makes sense. The natural sweetness of the carrots is simply augmented by sugar, and the texture becomes very interesting in this crispy, candied format. You know, this would actually be a good snack just on its own.

I did enjoy some just as a snack...but mostly I used the candied carrot to decorate a carrot cake (natch) and it won me many new friends.

So what happens when you candy carrot peel? You'll dismiss the idea that citrus is the only produce that can be candied, that's what!

How to candy carrot peel - step by step!

Based on a recipe from  Epicurious - printable version here

2 to 3 medium carrots
1 cup water
1 cup sugar

Supplies:

a medium saucepan; a vegetable peeler; two baking trays and parchment paper or silicone mats to line

Procedure

Start by peeling the carrots. Try to get as wide, flat, and fat portions of peel as you possibly can. I tried to peel as much of the carrots as I could. Set the carrot peels to the side. 

In a medium saucepan, bring the water and sugar to a boil. The sugar should have dissolved. 

Add the carrot peel, and simmer the mixture for 15 minutes.

Strain the mixture (the carrot peel will be limp and moist). Let it hang out for a few minutes while you preheat your oven.

Oh yeah! The oven. Preheat it to 225 degrees F, please.

While the oven preheats go ahead and line your baking pans with parchment or silicone liners. Arrange the carrot peel on the sheets, so that the pieces are not touching. Bake for about 30 minutes.

At this point, you can remove the peel from the oven and shape it a bit, if you like. I found, however, that I really enjoyed the whimsy of the more free-form shapes, so I mostly left them that way. 

Return the carrot peel to the oven and bake for another 30 to 40 minutes, or until firm and lightly crisp. Let cool completely on your baking sheet before using. 

Have you ever made a candied fruit or vegetable?

Red Hots Candy Apples

Candy apples made with a coating made from melted Red-Hots will warm your heart and make your mouth happy. 

In my opinion, Fall can be summed up in three words: apples, candy, and pumpkin. This recipe for Red Hots candy apples contains no pumpkin, but it's got enough apple and candy superpower that I'm willing to shrug and say "two out of three ain't bad". 

Actually, far from "not bad", these are really quite great. Personally, upon bite #1 I found myself wondering why everyone isn't making candy apples with Red Hots all the time. The sweet-spicy cinnamon candy makes a perfect complement to tart-sweet apples--it is a million times more interesting and tasty than a plain old sugar coating, which is what most candy apples have. 

As candy-making goes, this recipe is pretty straightforward. The only difficult part is waiting for the candy mixture to get to the right temperature; this is important in ensuring that it will set up firm and stick to the apples. If you don't, this will happen:

They will still be delicious, but they're better when fully coated. :-) 

webapples2.jpg


Red Hots Candy Apples

Makes 4

  • 4 apples (Granny smith work great; try to get unwaxed ones)
  • 1/2 cup water
  • 1 tablespoon butter
  • pinch salt
  • 1 box (6 ounces) Red Hots cinnamon flavored candy
  • Supplies: skewers, popsicle sticks, or "candy apple" sticks

Thoroughly wash the apples. Dry, and remove the stems. Skewer the tops, inserting the skewer deep enough so that you can hold the apple upside down and it feels secure. 


In a medium saucepan, heat the water, butter, and salt until the butter has melted and the mixture comes to a low boil.

Add the Red Hots candy and reduce the heat to low. Simmer the candy mixture until it reaches 290 degrees F. This will ensure that the candy is thick enough to coat your apples. 

Remove from heat, and dip the apples in the candy coating.

 Place them on your parchment-lined baking sheet. If you'd like, press additional candies on the apples before the candy coating hardens. 

Enjoy!

Solidly Delicious Chocolate Chip Cookies

Who out there can resist a chocolate chip cookie? Raise your hands. I'm waiting. Waiting...

Seriously. Chocolate chip cookies are basically the best, and arguments are few and far between. 

These days, there are so many chocolate chip cookie recipes out there that it makes your brain feel tired (or at least it does to mine). Sometimes, you just want a good, solid, dependable recipe.

This recipe, featured in the new book The Yellow Table, is just that. There's nothing crazy funky about it, but the combination of salted and unsalted butter yields what, to me, is a perfect cookie flavor. I think you'll enjoy this one. Below is the recipe and headnote from the book.

PERFECT CHOCOLATE CHIP COOKIES

Makes about 3 dozen cookies

This recipe is the result of my obsessive quest to create the perfect chocolate chip cookie: slightly crisp on the outside, gooey on the inside, and with plenty of chocolate chips and a touch of sea salt. My husband loves these cookies so much that I made hundreds of them—with help from a team of friends and family—as favors for our wedding.

  • 1/2 cup (1 stick) unsalted butter
  • 1/2 cup (1 stick) salted butter
  • 1 cup packed light brown sugar
  • 1/2 cup granulated sugar
  • 1 large egg, plus
  • 1 large egg yolk
  • 1 tablespoon pure vanilla extract
  • 2 1/4 cups all­purpose flour
  • 1 teaspoon baking soda
  • 1/2 teaspoon fine sea salt
  • 1 (12 ­ounce) package semisweet or bittersweet chocolate chips
  • 3/4 cup chopped walnuts (optional)

Soften both the salted and unsalted butter in the microwave (or on the stovetop) until nearly melted, about 1 minute. Let cool slightly then transfer to the bowl of a stand mixer fitted with the paddle attachment. Add both sugars, and beat on high until smooth and lightened in color, 2–3 minutes. Add the egg and the egg yolk and beat until fully combined. Add the vanilla and beat until fully combined.

In a medium bowl, whisk together the flour, baking soda, and salt. Add to the stand mixer and mix on low just until no flour streaks remain. Stir in the chocolate chips and walnuts, if using. Cover with plastic wrap and refrigerate at least 1 hour.
Preheat the oven to 350°F.

Drop tablespoonfuls of dough, about 2 inches apart, onto ungreased baking sheets.

Bake until the cookies are slightly brown and puffy, about 11 minutes for soft cookies and 13 for crisp ones. Set the baking sheets directly on the racks to cool for 10 minutes then place the cookies directly on the rack to cool completely. Eat one (or two or three!) warm with a glass of ice cold milk. Life doesn’t get much better than this.

Store cookies, in an airtight container at room temperature, for up to 3 days. 

Reprinted with permission from The Yellow Table published in 2015 by Sterling Epicure, an imprint of Sterling Publishing Co., Inc. © Anna Watson Carl. Photography by Signe Birck