What Happens When You Forget to Add Sugar to Your Cookie Recipe?

I'll be straight-up about this: I did not intend to write an experiment post about this. What I intended was to make delicious cookies.

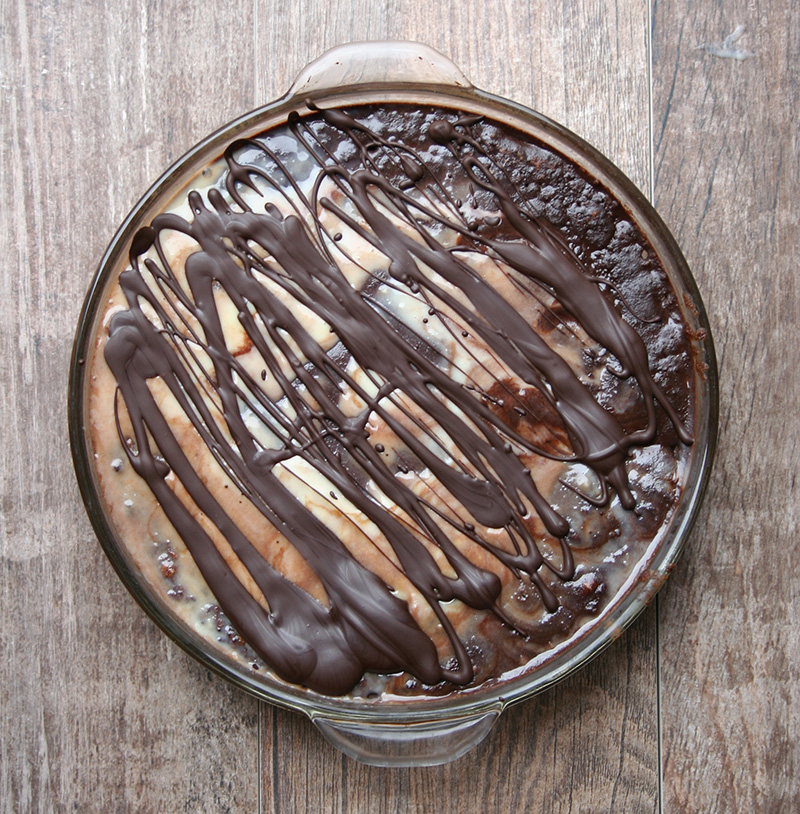
Let me set the scene. I have worked really hard to develop a delicious recipe for chocolate filled dark chocolate cookies. And I have succeeded. I have succeeded so well, in fact, that I want to make another batch, to share with my neighbors. I am already preparing myself for the copious compliments I'm about to receive for these babies. I mean, just look at how the previous batch had turned out: 

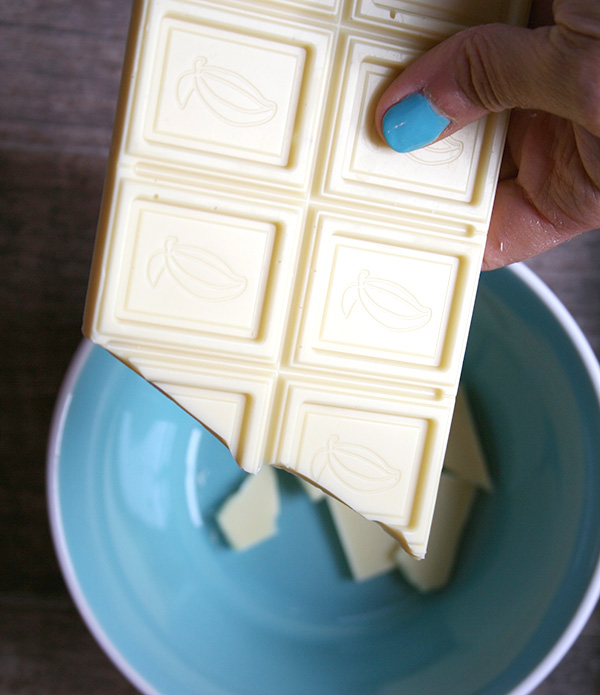
So here I am, mentally congratulating myself as I apply white and dark chocolate drizzle on top of the latest batch. And then I happen to look over to the other side of the counter, and I see a half-cup of sugar, prettily measured out and looking ready for business. I look at it stupidly for a moment, thinking "why is there sugar on the counter?". 

And then it dawns on me: that sugar was supposed to be in the cookie dough. The cookie dough that I just formed into rounds and put in the oven and baked and let cool and decorate. The beautiful cookies which, apparently, contained no sugar. 

I won't lie: I said one or five curse words right about here. 

But I also began to feel curious. Because the dough had felt just fine while I had molded it into balls, and it looked and smelled fine when I took the cookies out of the oven. They seemed the same as I decorated them. I wondered: how might these cookies taste? 

I will confess I felt a touch of hope. I wondered if because there was only a half cup of sugar--not that much, right?--and because the cookies contained cocoa, and because they were filled with chocolate, and because I'd drizzled them with copious amounts of white and dark chocolate, maybe, just maybe, they'd taste OK. 

I decided to give them a try. 

Before I tell you how they tasted, let me tell you a little bit more about how the cookie experience went when the recipe was made properly, with sugar.

They are delicious. They are rich, moist, deep-dark-chocolatey, just a touch crumbly, and when warm, gooey with chocolate. They are good stuff. 

How would they compare when made without sugar?

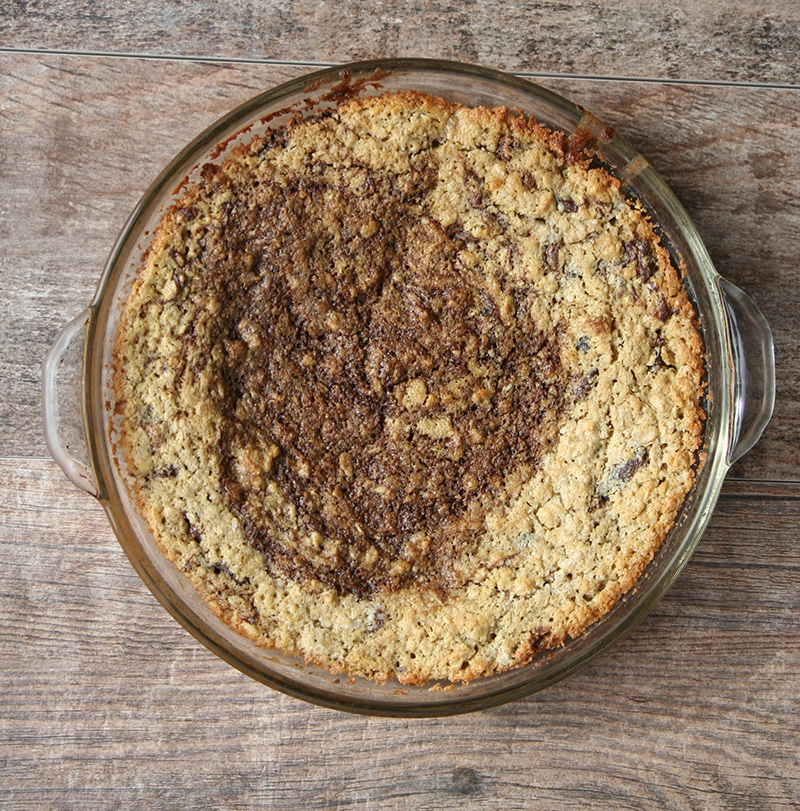
Well, it wasn't a good sign when I picked up the cookie and the slight pressure of my fingers poising it toward my mouth to take a bite basically caused it to explode. 

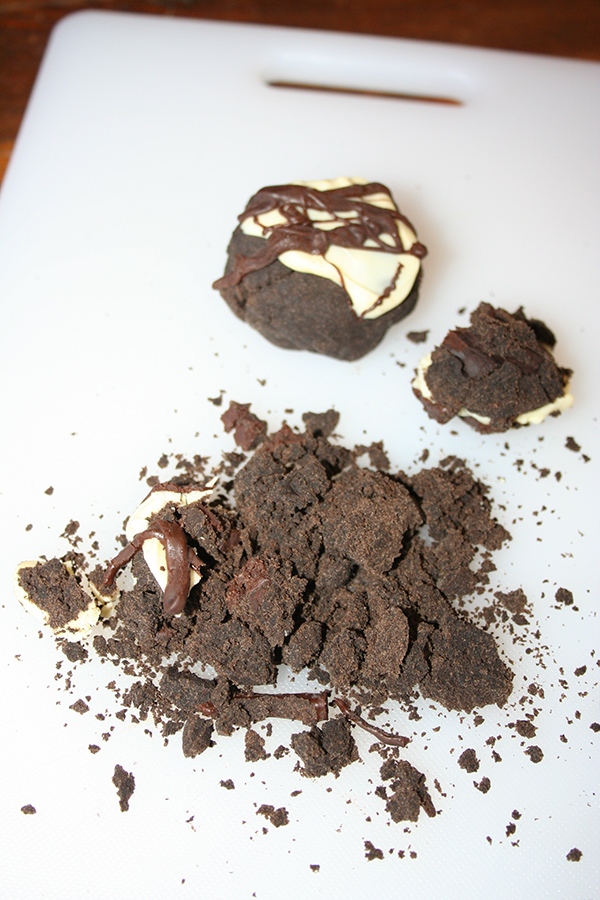
I was tempted to cry. The little chocolate filling goo that you can see toward the bottom left quadrant of the crumbs seemed to be wailing to me "I'm still delicious!".

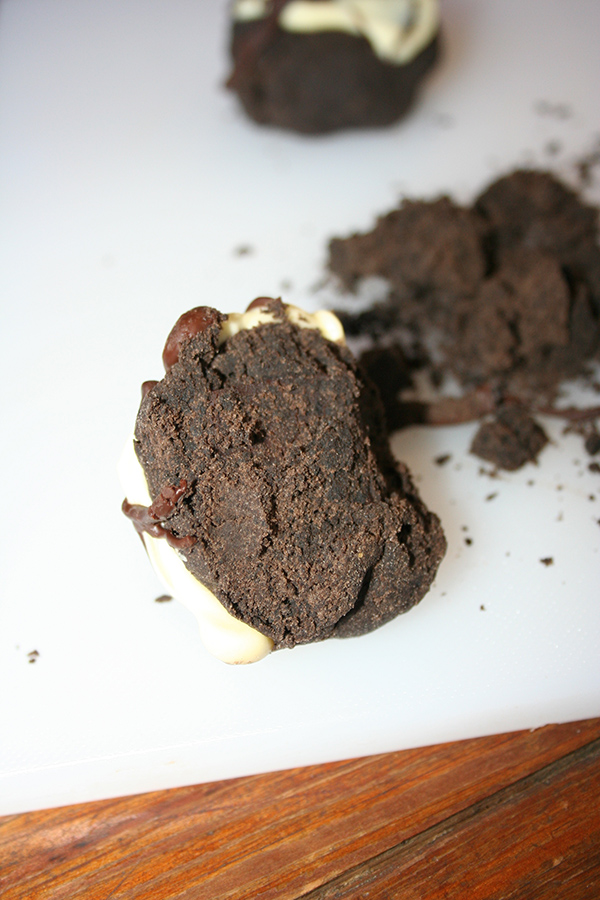
I tried again with the chunk of cookie you see on the top right above. This time, I pretended that the cookie was a teeny tiny unicorn with bones made of glass, and tried to handle it as gently as I would such a magical creature. This time, it didn't break, but you'll have to trust me in that this operation required such care and concentration that I felt like I would need a nap afterward.

I took a bite. 

Well, the good news is that the cookie wasn't terrible. The chocolate filling, coating, and cocoa in the dough made the melange of ingredients taste vaguely cookie-like. 

But all the same, it was all wrong. The lack of sweetness in the cookie itself made it taste like a sandy, cocoa-scented pie dough. It was sort of interesting, but not really delicious or the type of thing that invited you to eat more. 

Listen, I am not an actual scientist, I am just an enthusiastic amateur dessert experimenter. And obviously, this is just one cookie recipe, so it doesn't speak to what will happen to every cookie recipe when sugar is omitted. 


To sum up the experience of cookies made without sugar:

Here's what I can tell you about what happened to this chocolate cookie recipe when no sugar was present.

1. The cookies were not sweet.

Well, obviously. The chocolate filling and topping were sweet, but they weren't enough to mask the lack of sweetness in the cookies themselves.

 But it was a strange experience because the cookies looked right, and a powerful reminder that we eat with our eyes first. Because these cookies looked like they were going to taste good, and because I had the flavor memory of the previous batch, it was a shock to have the flavor not match what my mind was anticipating. 

2. The cookies were extremely fragile.

The cookies were SO fragile! They exploded with the slightest application of pressure, and you'll have to trust me when I say that I am not heavy-handed when holding cookies. 

3. The cookies didn't brown quite the same. 

While this wasn't immediately evident because the cookies were already dark to begin with, and it is probably hard to see in photos, upon closer inspection, the cookies hadn't browned quite the same as the batch made with sugar. With the sans sugar variety, what had happened was less toasty edges, and more like an all-over matte finish. 

4. The cookies were not delicious.

Nope. They tasted weird. As previously mentioned, the cookie itself tasted like a sort of cocoa-scented pie crust. I would not suggest making these cookies (or any) without sugar if called for in the recipe. However--and here's the optimistic part of this accidental experiment--the flavor DID make me curious about incorporating cocoa into a pie crust, or maybe making an unsweetened chocolate cracker for an avant-garde cheese plate. So maybe you'll see more experimentation in the future!

So, as to how I could sum up the results? Don't forget to add sugar to your cookies. It is an ingredient that helps them bake right and makes them delicious.

Have you ever forgotten to add sugar to a recipe?

Make This: Easy Stollen Recipe

Stollen is an old recipe--rumor has it that it's been alive and kicking since the 1300s. Seriously! While original loaves are said to have weighed a hefty 30 pounds, things have lightened up a bit since then.


This is a rich, yeast-raised and milk-and egg enriched dough which is dotted with dried fruit. Some recipes have you using gross candied fruit (I think it's gross anyway) but I used my homemade dried cranberries and some turkish apricots. It is worth tasting this tradition.

Check out the recipe here!

What Happens When You Still Have Leftover Pie after Thanksgiving?

What if it's Wednesday now, and you still have leftover pie from Thanksgiving? Well, it is probably sort of stale, but that doesn't mean it has to go to waste, because it will still be delicious if you make it into a milkshake.

What happens when you put your leftover pie into a milkshake?

I won't keep you in suspense: very, very, very delicious things happen when you have leftover pie and you make the decision to transform it into a shake. 

A pie shake is pretty much the best way ever to revive slightly stale pie. Blending it to delicious oblivion in a sea of ice cream makes it an extra-special treat, and as a bonus, people who haven't seen you make it but only see you drinking something blended will probably believe that you're drinking a smoothie. Joke's on them!

Realistically, I realize that it's unlikely at this point that you still have pie left over from Thanksgiving. But pies and treats are around the rest of the season, and in plentitude, so I really want you to have this option.

Check out the full post featuring a pie shake recipe.

Hazelnut Cupcakes with Chocolate ­Hazelnut Frosting

When I received a review copy of the new book Quick-Shop-&-Prep 5 Ingredient Baking: Cookies, Cakes, Bars & More that are Easier than Ever to MakeI instantly loved the idea. Basically, it's a collection of awesome recipes that utilize common pantry items. So it doesn't really require a lot of weird or hard to source ingredients.

One of the recipes that caught my eye right away was this one, for hazelnut cupcakes with chocolate hazelnut frosting. Like, what more could you possibly ask for? These cupcakes are simple to make, but fancy in end product. 

If you like 'em, check out the book! It was written by Jennifer McHenry, author of the Bake or Break blog!

BUTTERMILK ¬ HAZELNUTS ¬ CREAM CHEESE ¬ CHOCOLATE ­HAZELNUT SPREAD ¬ CONFECTIONERS’ SUGAR
Hazelnut Cupcakes with Chocolate ­Hazelnut Frosting

The combination of chocolate and hazelnut is nothing short of fantastic. From my first bite of chocolate­ hazelnut spread, I designated a permanent spot in my pantry for at least one jar. Here, that delicious spread stars in a sweet, creamy frosting that tops off simple cupcakes filled with toasted hazelnuts.

Makes 24 cupcakes

FOR THE CUPCAKES
2 1⁄2 cups (300 g) unbleached all­purpose flour 11⁄2 tsp (7.5 g) baking powder
1⁄2 tsp baking soda
1⁄2 tsp salt
3⁄4 cup (170 g) unsalted butter, softened
1 1⁄2 cups (300 g) firmly packed light brown sugar 3 large eggs
2 tsp (10 ml) vanilla extract
1 cup (240 ml) buttermilk
1 cup (120 g) hazelnuts, toasted and chopped

FOR THE CHOCOLATE­HAZELNUT FROSTING 8 oz (227 g) cream cheese, softened
1⁄2 cup (113 g) unsalted butter, softened
1⁄2 cup (140 g) chocolate­hazelnut spread

2 1⁄2 cups (275 g) confectioners’ sugar, sifted

TO MAKE THE CUPCAKES
Preheat the oven to 350°F (180C). Grease 24 standard muffin cups.

Whisk together the flour, baking powder, baking soda and salt. Set aside.

Using an electric mixer on medium speed, beat the butter and brown sugar until light and fluffy. Add the eggs, one at a time, mixing well after each addition. Mix in the vanilla.

Reduce the mixer speed to low. Add about a third of the flour mixture, and mix until a few streaks of flour remain. Mix in about half of the buttermilk. Add the remaining flour mixture in 2 portions, alternating with the remaining portion of buttermilk, mixing just until combined. Stir in the hazelnuts.

Divide the batter among the prepared muffin cups, filling each about half full. Bake for 18 to 22 minutes, or until a pick inserted into the center comes out clean. Allow to cool in the pans for 10 minutes. Then transfer the cupcakes to a wire rack to cool completely.

TO MAKE THE CHOCOLATE ­HAZELNUT FROSTING
Using an electric mixer on medium speed, beat the cream cheese, butter and chocolate­ hazelnut spread until blended and smooth. Gradually add the confectioners’ sugar, and mix until smooth. Frost the cooled cupcakes.

Tip: To toast hazelnuts, place them in a single layer on a lined baking sheet. Bake at 350°F (180°C) for 10 to 15 minutes, or until browned and fragrant. If the hazelnuts have skins on them, place the toasted nuts on a kitchen towel and rub them with the towel to remove the skins easily. 

Recipe reprinted from Quick-Shop-&-Prep 5 Ingredient Baking: Cookies, Cakes, Bars & More that are Easier than Ever to Make with permission from the author.

A Simple Way to Dress up a Plain Yellow Cake

So, I recently wrote about how to make an egg-free vanilla cake for Craftsy. This is a useful thing to have on hand, because you never know when you'll start baking only to find that you have no eggs--or, it's good to be prepared in the event someone can't consume eggs. 

But the egg-free cake isn't necessarily what I want to tell you about today. I want to tell you about what I did after I completed baking it.

Actually, the process started while the cake was still baking. I thought: "I know what to do with this cake. I am going to make it a dulce de leche poke cake."

I happened to have a 14-ounce can of dulce de leche I'd found in the International Aisle at the grocery store in my cabinet. I cracked it open and poured it into a pan, reserving a small spoonful for myself, for SNACKING.

Then I added about 1/2 cup of whole milk and a pinch of salt.

I heated the mixture on low, and added a little more milk (sorry, I didn't measure) to give the mixture a thick but pourable consistency (you can kind of play it by ear). I didn't let it boil, just warmed it enough so that the mixture was smooth and combined. 

Around then, the cake was done.

Here's what I did then. First, I poked the cake all over. 

pokecakedulce.jpg

Then I poured the silky dulce de leche mixture on top.

dulcacakepour2.jpg

It was thick on top at first but then it gradually soaked and settled into the cake, leaving a glaze-like finish on top but a full, saturated texture inside of the cake.

It was beautiful to watch.

I finished it with some toasted pecans and some sea salt.

And it was heaven. 

So, I suppose the point of this blog post is to tell you that if you ever need inspiration for how to gussy up a yellow cake (egg-free or no), please do this. Just heat up some dulce de leche with enough milk to thin it, then pour it over the cake which you've poked with the tines of a fork or a skewer. Then enjoy.

I would cue the "the more you know" music here, but I will have to settle for an image I found from the web:


Enjoy this inspiring idea! 

Cookie-Pie With Three Types of Chocolate

This was a mistake. It was supposed to be scones. But as you can see, this is not scones. It is a cookie-pie topped with three types of chocolate. 

Let me explain. I was working on the recipe for chocolate cranberry scones that I published a while back, but on my way, I had some recipes that didn't work out. Well, this recipe didn't work out as scones, but it  came out as some non-scone thing that was highly delicious.

Working to try and transform a cookie mix into scones wasn't extremely easy, as it turned out. At first, I started with traditional scone-making methods: working cold butter into the dry mixture, making a well and adding cream, et cetera. Unfortunately, when using a cookie mix instead of flour as the base, these traditional scone-making methods left me with a batter that was too gooey to be shaped into a traditional circle for scones.

So I decided to transfer the mixture to a pie plate, and baked it up.

Ooh. Definitely not scones, but I was intrigued.

I decided to make it even better by adding some chocolate ganache on top.

Then I decided to drizzle it with some white chocolate cream.

And then (why not) I drizzled it with some semisweet chocolate. 

It came out like some work of abstract pie art. Oooh, ooh, ooh. 

And it tasted AWESOME. Like a wedge of soft chocolate chip cookie studded with cranberries, and saturated in chocolate. I mean, AWESOME.

Since I had made the chocolate sauce more on the liquid side, It really seeped into the cookie mixture, and when sliced, it looked like this. 

It would be a great idea to make this recipe, which was a mistake that turned out to be quite serendipitous and delicious.

Cookie-Pie with Three Types of Chocolate

Printable version here

  • 1 pouch (13.8 ounces) Phil-em up Cookie Mix by Among Friends Baking Mixes
  • 1 stick cold butter, cut into small pieces
  • 1/4 cup plus 2 tablespoons cream
  • 1 egg
  • pinch salt
  • 1 teaspoon vanilla

To top:

  • 3/4 cup milk
  • 3 ounces dark chocolate, chopped

To further top:

  • 1/2 cup milk
  • 4 ounces white chocolate, chopped

To yet further top:

2 ounces semisweet chocolate, melted 

Make it:

Preheat the oven to 375 degrees F.

In a large bowl, combine the cookie mix and butter. Use a pastry cutter to combine, until the butter is no larger than the size of small peas.

In a separate small bowl (I used my measuring cup), whisk together the cream, egg, salt, and vanilla.

Pour the wet mixture into the dry, and stir to combine.

Transfer the mixture into a pie plate, and bake for 18-25 minutes, or until golden to your liking.

Make the first chocolate topping. Place the chocolate in a heatproof bowl. Heat the milk to simmer, then pour over the chocolate. Stir until combined. Pour over the cookie-pie. It will begin to seep into it after a minute. Pour gradually if it doesn't seem to be absorbing quickly.

Make the white chocolate topping, following the same steps as you just did for the dark chocolate. Pour right over the chocolate on the cookie-pie.  

Let the pie set in the fridge for several hours. Finish by drizzling with the final topping, the melted chocolate.

Have you ever had a happy accident while baking?